Boost Your Sales with SellerApp Advertising Insights: A Complete Guide
As an Amazon seller, you already know that Amazon PPC is the best way to gain visibility on your products and get more sales.
However, with increasing competition in the eCommerce space, it has become more challenging to stand out from the crowd and generate consistent revenue.
Now, if you are a large-scale seller selling hundreds of products, and running multiple ad campaigns, monitoring all campaigns daily can become taxing.
That’s where the SellerApp advertising dashboard comes in!
The innovative AI-powered tool provides valuable insights into advertising campaigns, allowing you to optimize your ad spend and maximize your sales potential.
To make the most use of the SellerApp advertising insights tab, you must know about all the features available under the insights tab. All the features are based on how the search terms and ASINs contribute to the sales and conversion of your product.
Given below are the types of data you can see in the Insights tab:
- Negative Search Terms
- Positive Search Terms
- Auto-to-Manual
- Target Improvement
- Bid Optimization
- Positive ASIN
- Negative ASIN
A step-by-step guide to using SellerApp Insights Tab
Now let’s see how to start with the SellerApp advertising dashboard!
- First, log in to your SellerApp Dashboard and connect Amazon Advertising Account.
- Navigate to Overview, and set a target ACoS. The SellerApp algorithm categorizes search terms based on the target ACoS and populates all the tabs in the Insights dashboard.
Learn more about the process from the following guide.
- Next, navigate to the Insights tab either from the left sidebar or from the advertising dashboard.
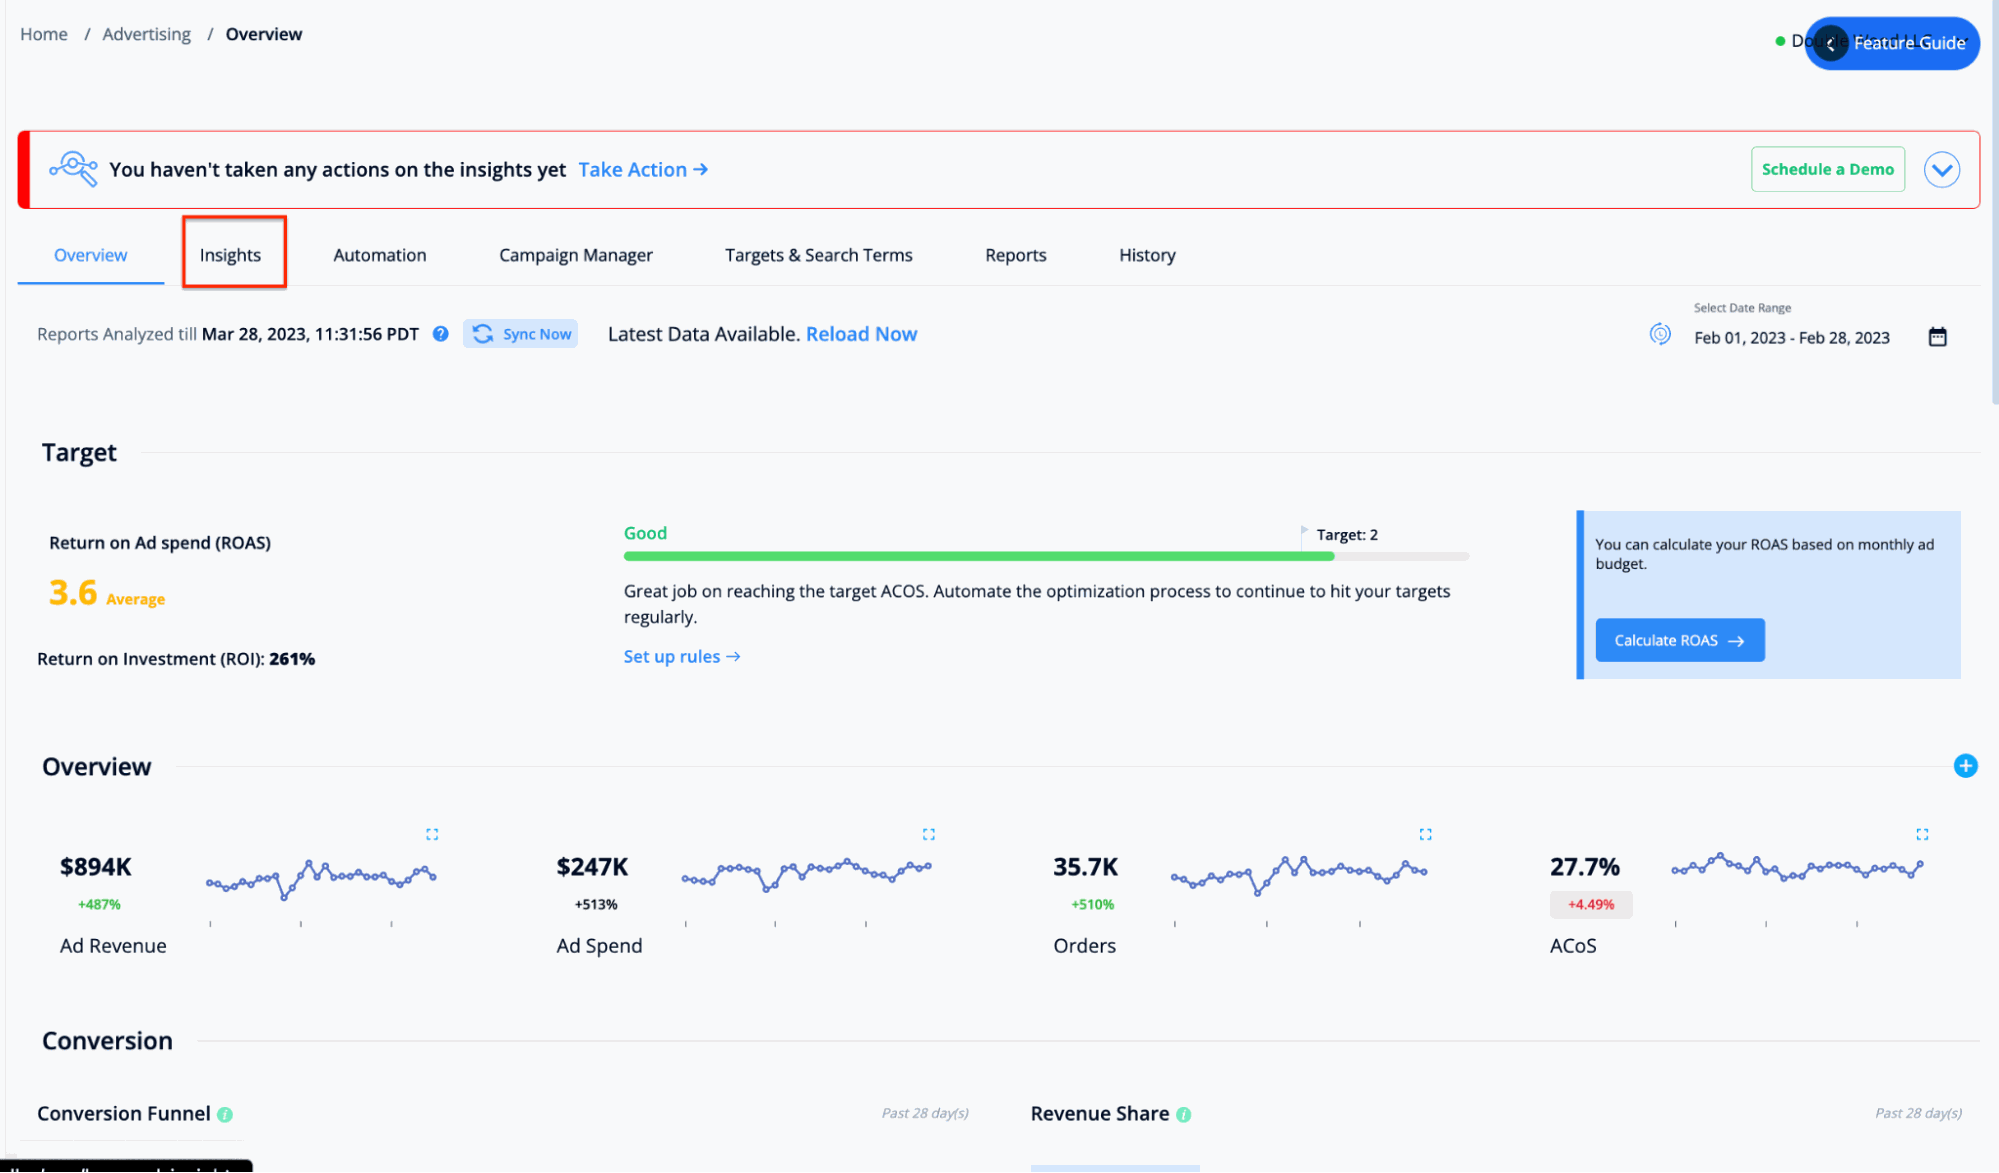
Here, you can find multiple tabs on the Insights dashboard. Let’s explore all the tabs and see how they can help you optimize your campaigns.
Negative Search Terms
The first feature is Negative Search Terms. These search terms have a higher ACoS than the target ACoS, meaning these search terms are either irrelevant or non-converting for the product and burning through ad budget.
To optimize your campaign and minimize wasted ad spends, select these search terms and “Mark Negative” in your campaigns. This action converts them to Negative Exact keyword match types for your campaigns.
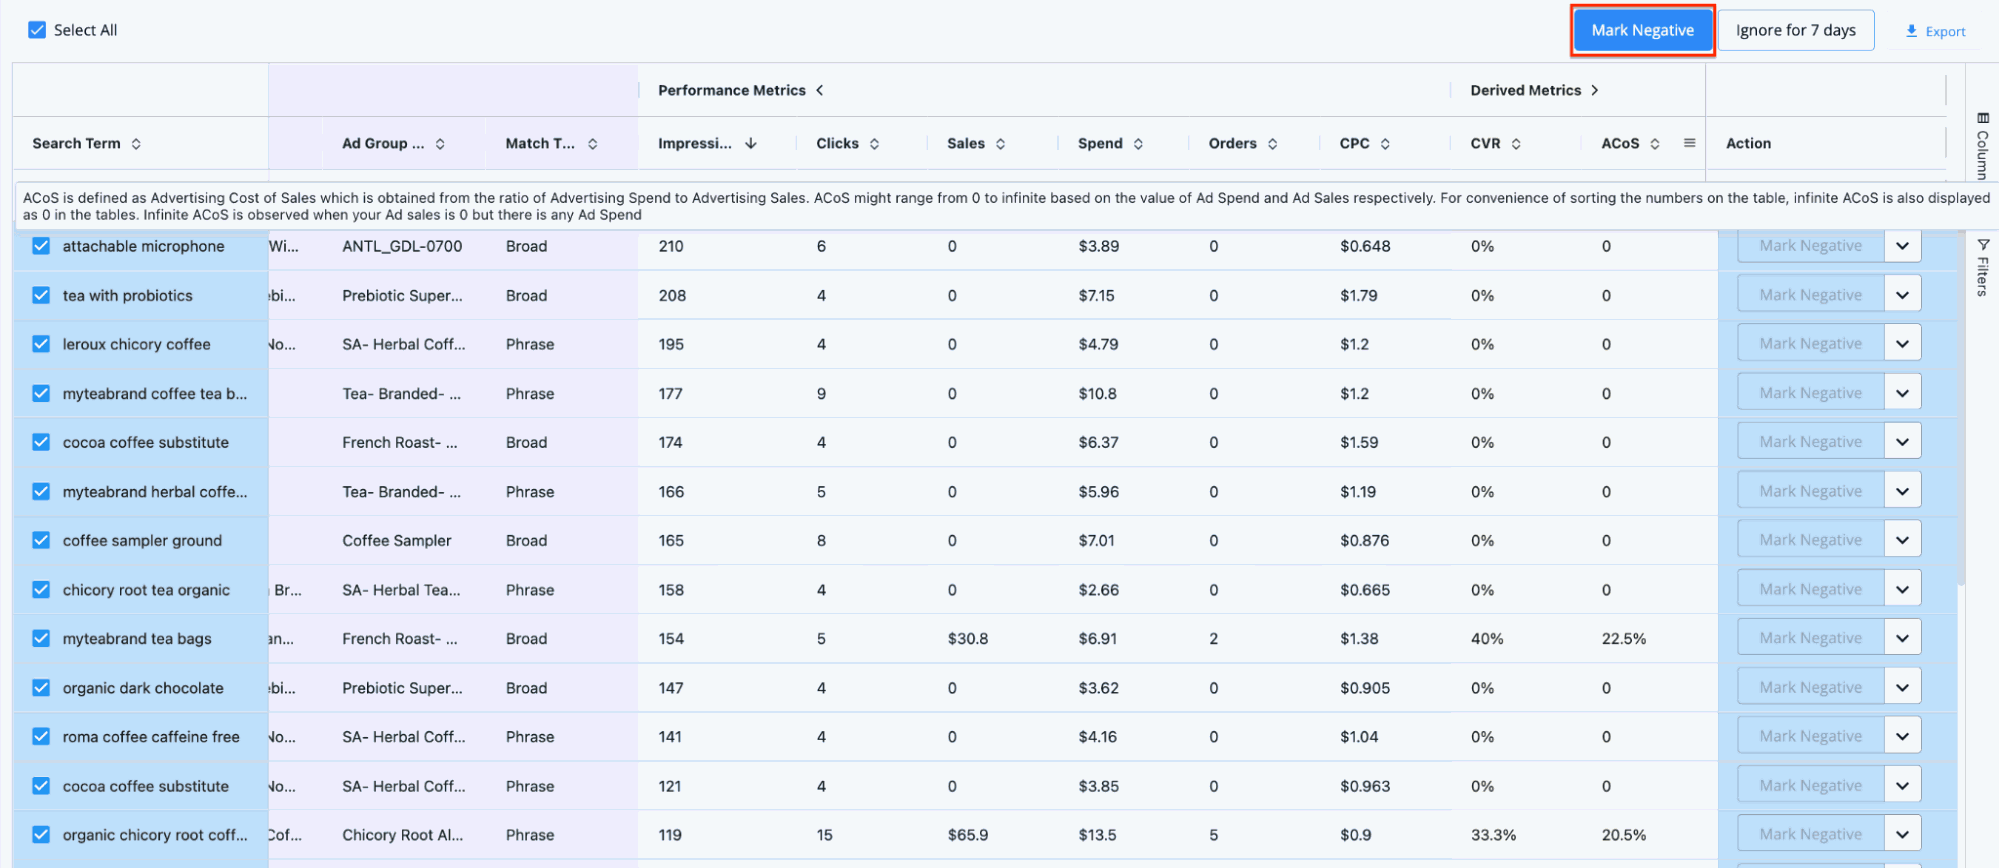
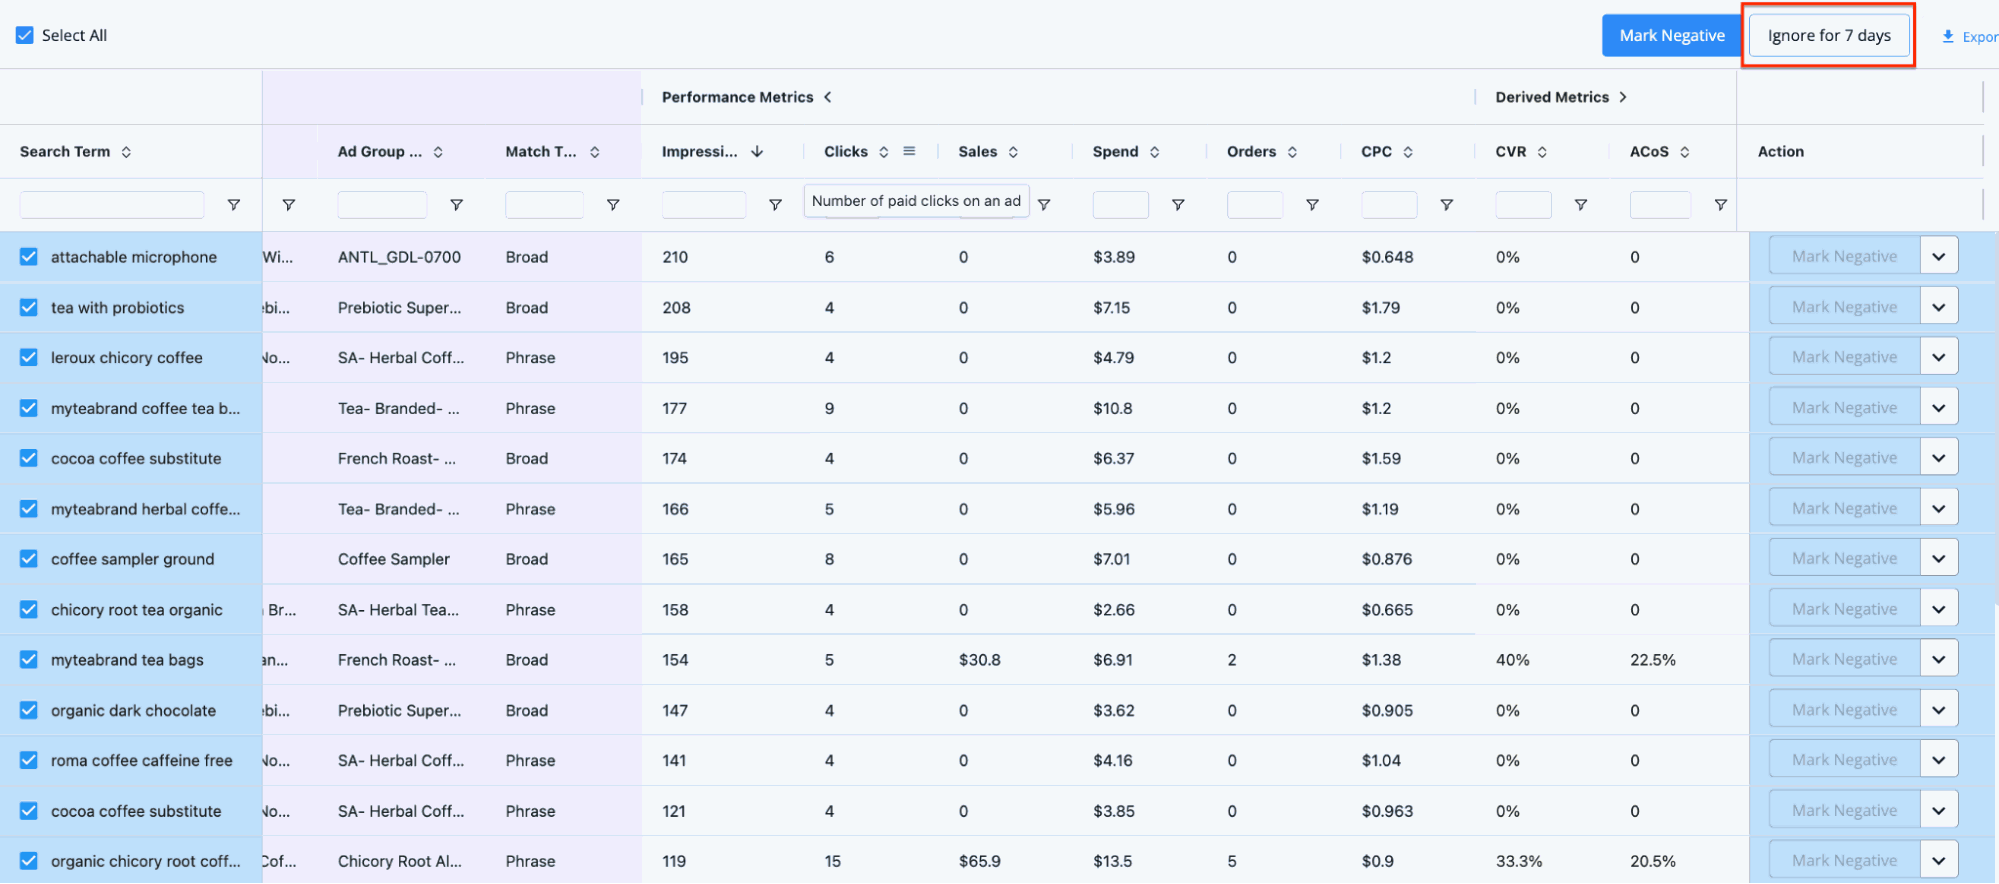
On the other hand, if your product is in the launch phase, and your primary objective is to maximize impressions, click on the “Ignore for 7 days” button. Doing this will prevent the search term from appearing in your Negative Search Term dashboard for the next 7 days.
In addition, you can set each search term as negative in the dashboard. Click on the “Mark Negative” button at the end of the search term row, which converts them into an exact negative keyword for the campaign.
You can also ignore the keyword for 7 days from this section.
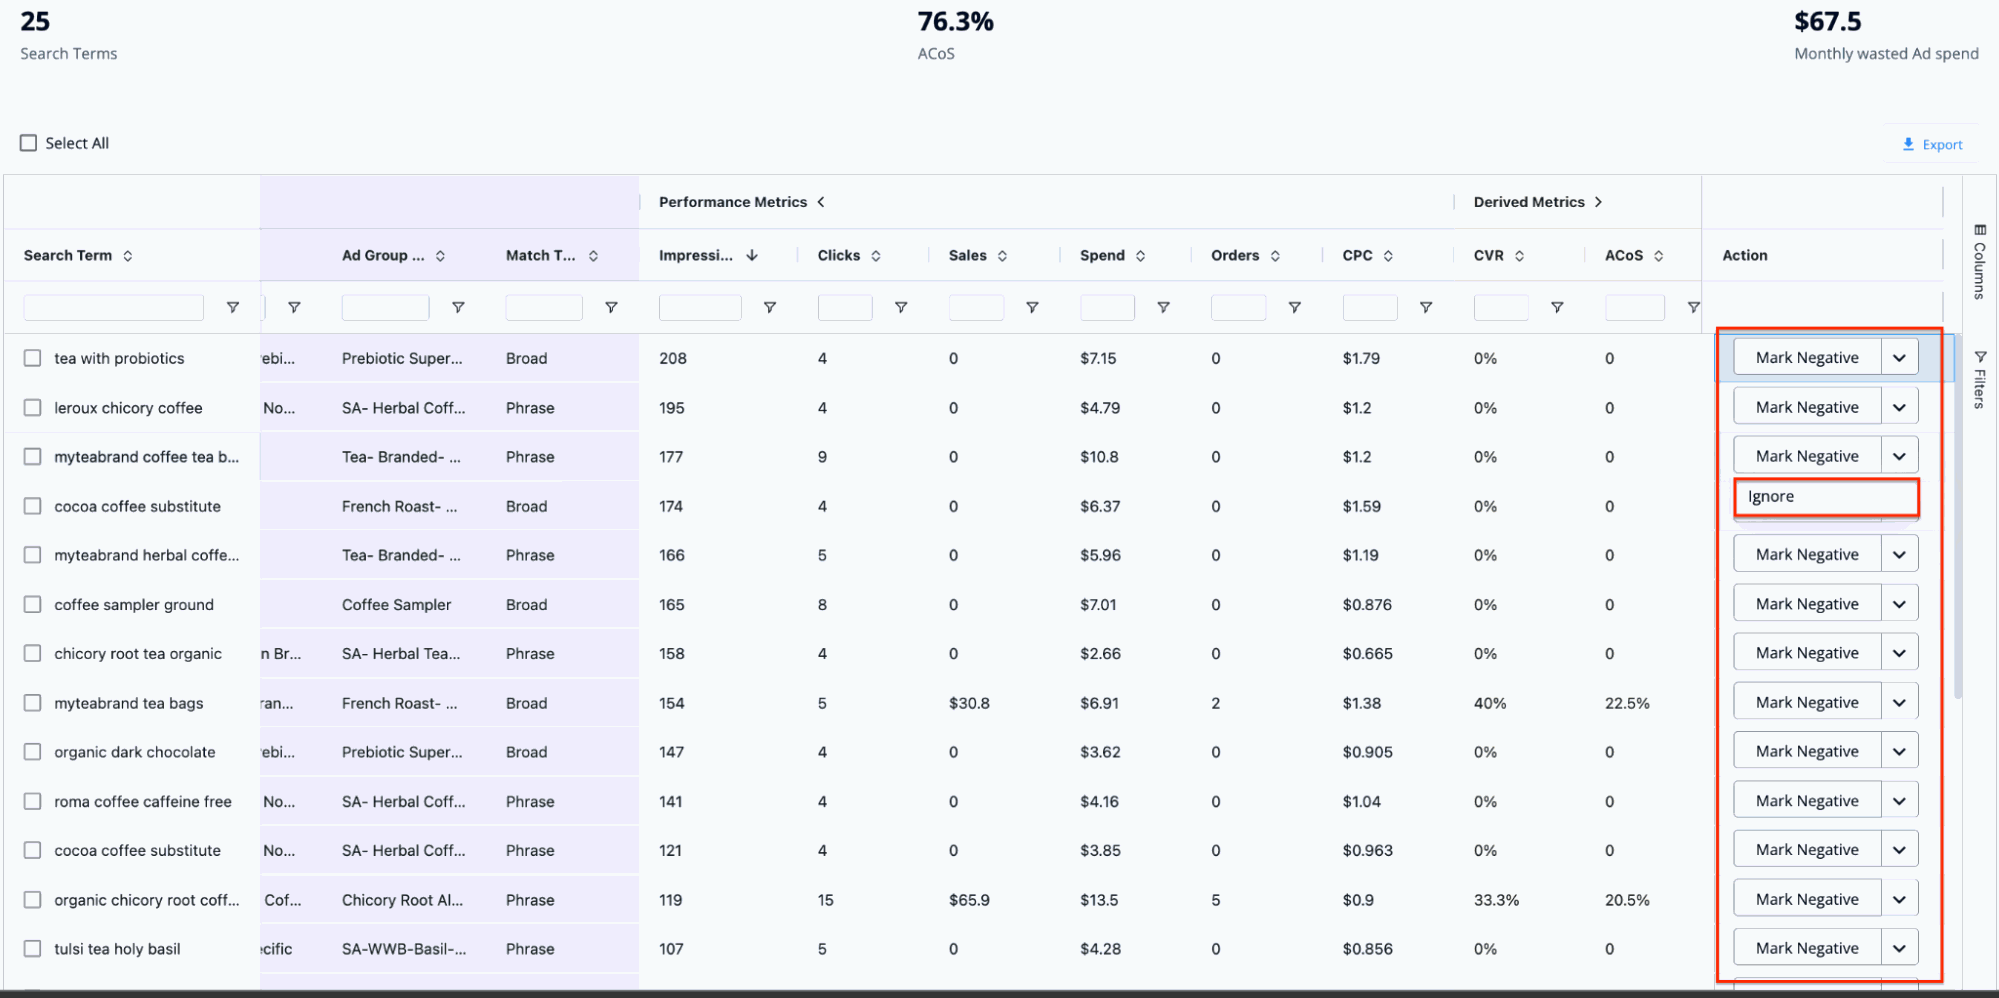
Other metrics you’d get from this Negative Search Terms dashboard are:
- Search Term: It’s the exact word or phrase shoppers search on Amazon for which the ad is shown.
- Keyword: Relevant words and phrases in the advertising campaign that you bid on to show the ad.
- Campaign Name: The name assigned to ad campaigns in your advertising account.
- Ad Group Name: The unique name of the ad group within a campaign.
- Match Type: It’s the current keyword match type based on different types of customer searches.
Performance Metrics:
- Impressions: It’s the number of times your ad is shown to shoppers for the search term.
- Clicks: It’s the number of times shoppers have clicked your ads.
- Sales: It’s the total amount of sales generated from ads over the last 60 days.
- Spend: It’s the total amount of money spent on advertising for the search term.
- Orders: It’s the number of units ordered from ads over the last 60 days.
- CPC: It’s the amount you pay to Amazon when someone clicks on an ad.
Derived Metrics:
- CVR: Conversion Rate (CVR) indicates the percentage of clicks converted to sales for the associated search term. Higher CVR indicates better campaign performance.
- ACoS: Advertising Cost of Sales (ACoS) is the percentage of total ad spend to total ad revenue.
ACoS = (Total Ad Spend / Total Ad Revenue) x 100
- CTR: Click-through rate (CTR) is the total number of clicks on your ad divided by the total number of impressions.
CTR = (Number of clicks / Number of impressions) x 100
- Action: Action suggested by SellerApp to improve campaign performance. Here it’s either to “Mark Negative” or to ignore it for 7 days.
Positive Search Terms
Positive search terms are excellent for optimizing your advertising campaigns. They are keywords that perform exceptionally well for your campaign and have a lower ACoS than the target. Tracking these terms can enhance your product visibility and organic ranking, reduce advertising costs and improve sales performance.
As a seller, your ultimate goal is to improve the organic ranking for a product and reduce advertising costs. Of course, it won’t happen in a day. Initially, you have to invest in paid advertisements.
But over time, track these positive search terms in the Product Intelligence section to see if the organic ranking of your products for these search terms is improving or not!
Similar to Negative Search Terms, the key insights you’ll get here are:
- Campaign name
- Ad group name
- Match type
- Impressions
- Clicks
- Sales
- Spend
- Orders
- CPC
- CVR
- ACoS
- CTR
- To track all keywords, select the “Select All” checkbox, and click on the “Track Keywords” button.
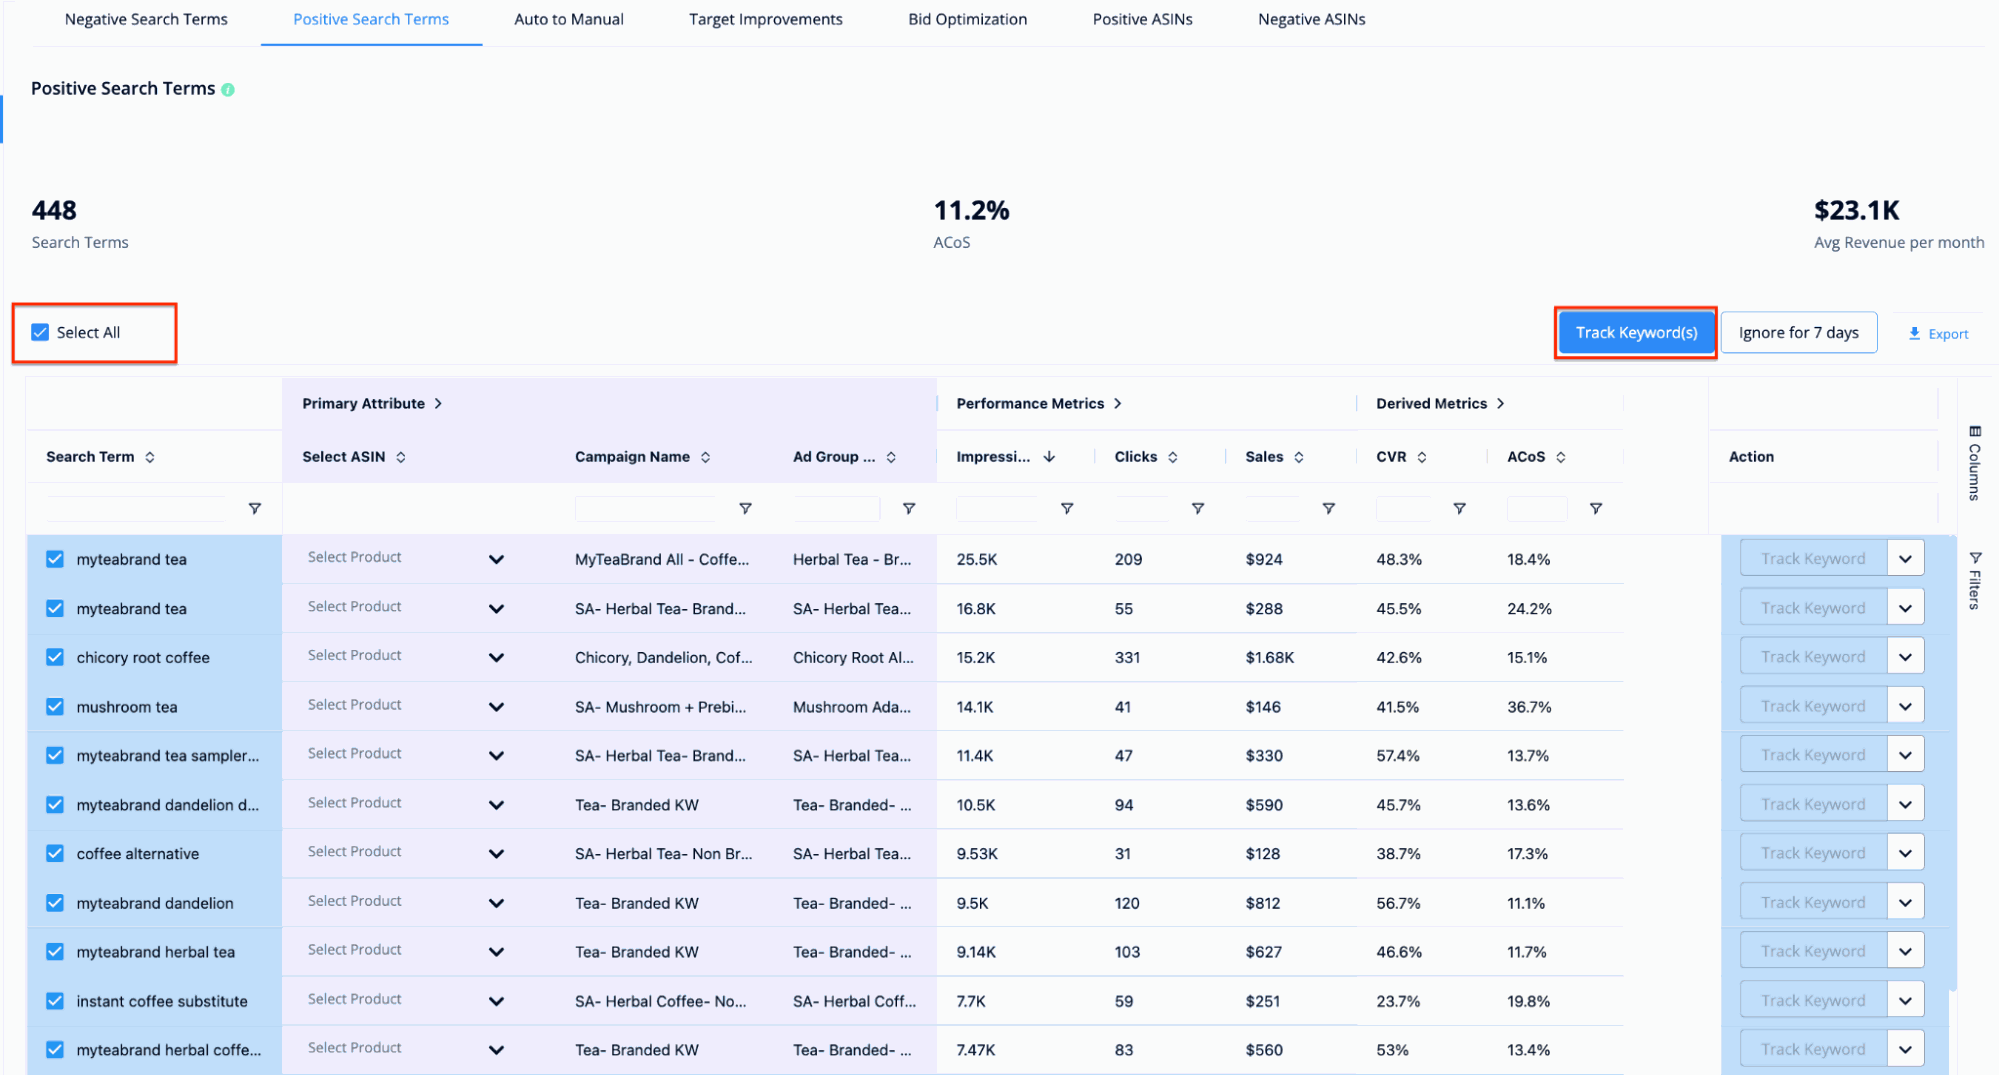
- A pop-up window will appear. Here you can choose the product to track the keywords for. Click on “Submit” to track the products.
Alternatively, you can track individual keywords one by one as well!
- Select the product you want to track the search term from the dropdown menu. Then click on the Track Keyword button on the far right column.
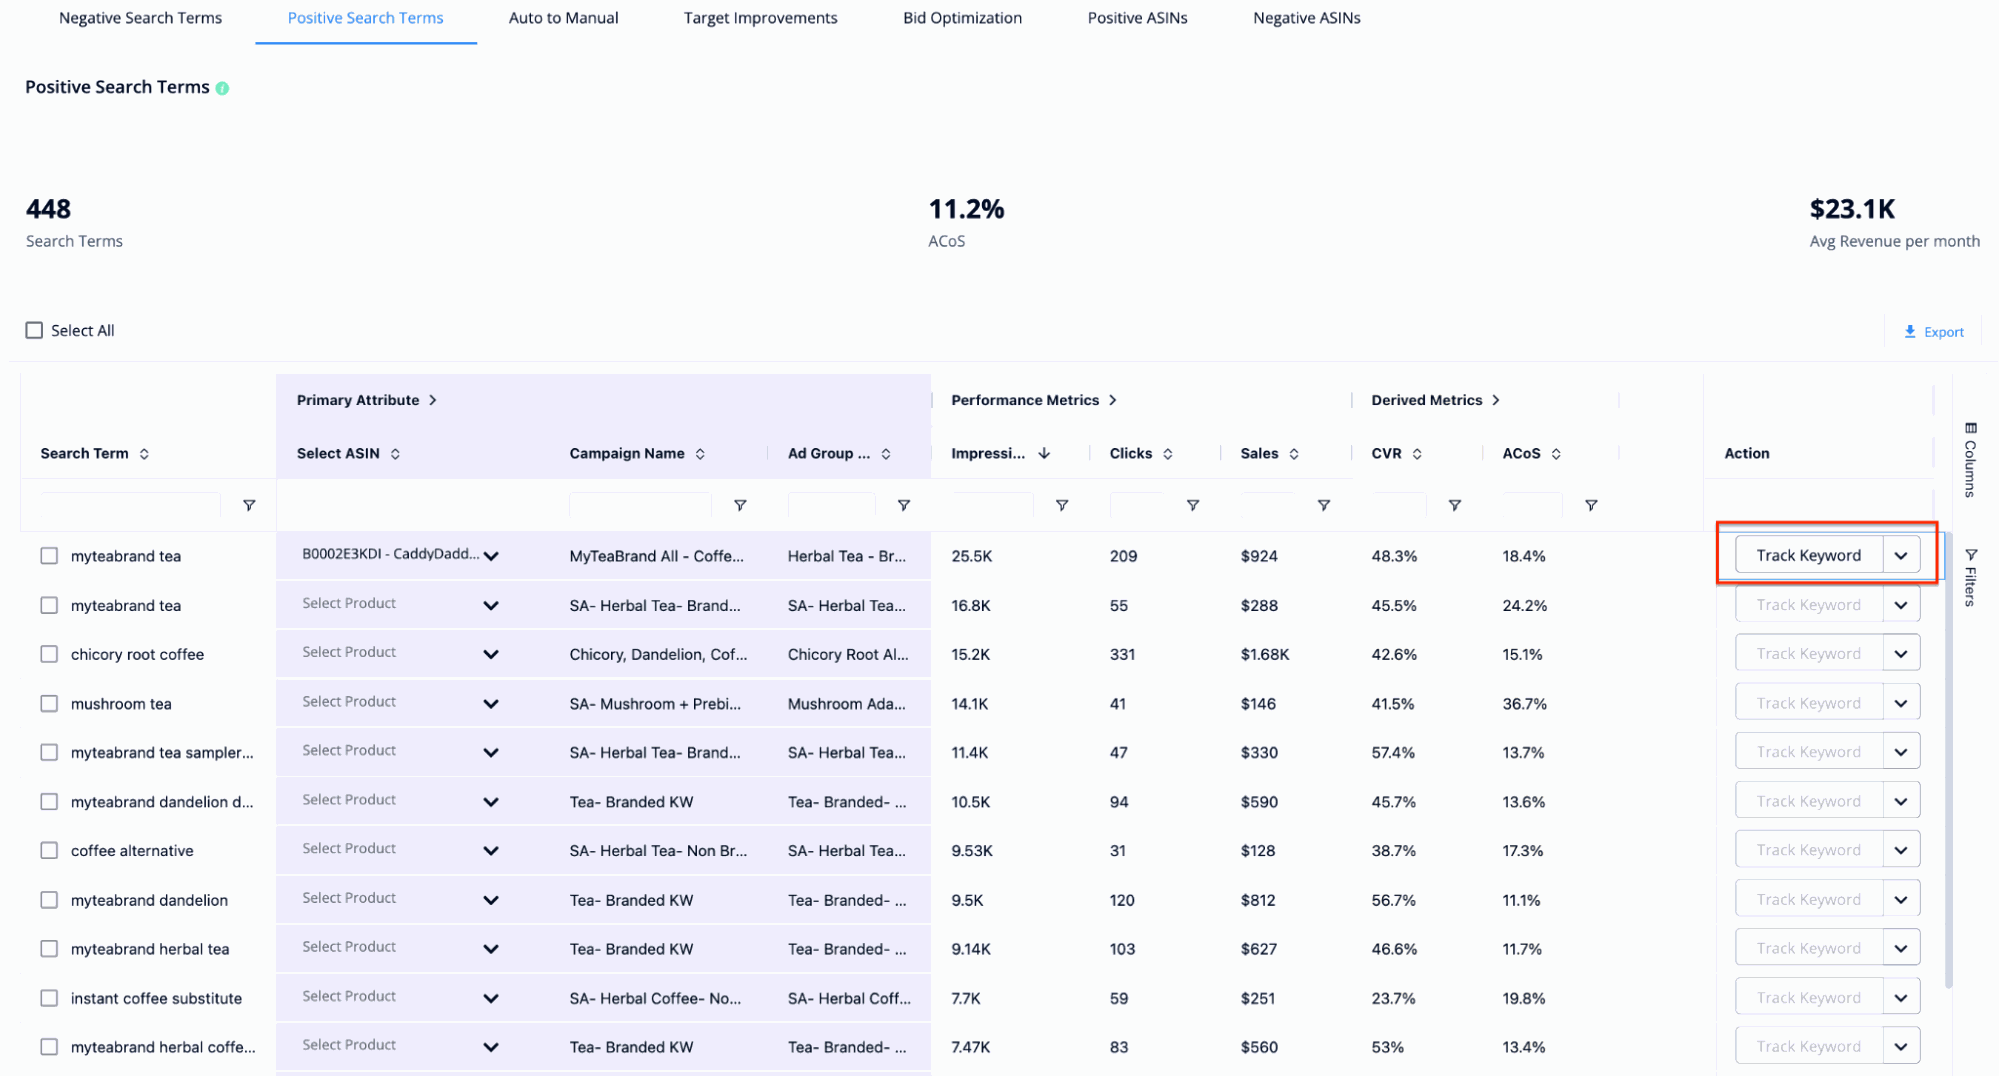
- A pop-up will appear. Click on “Save” to track the keyword.
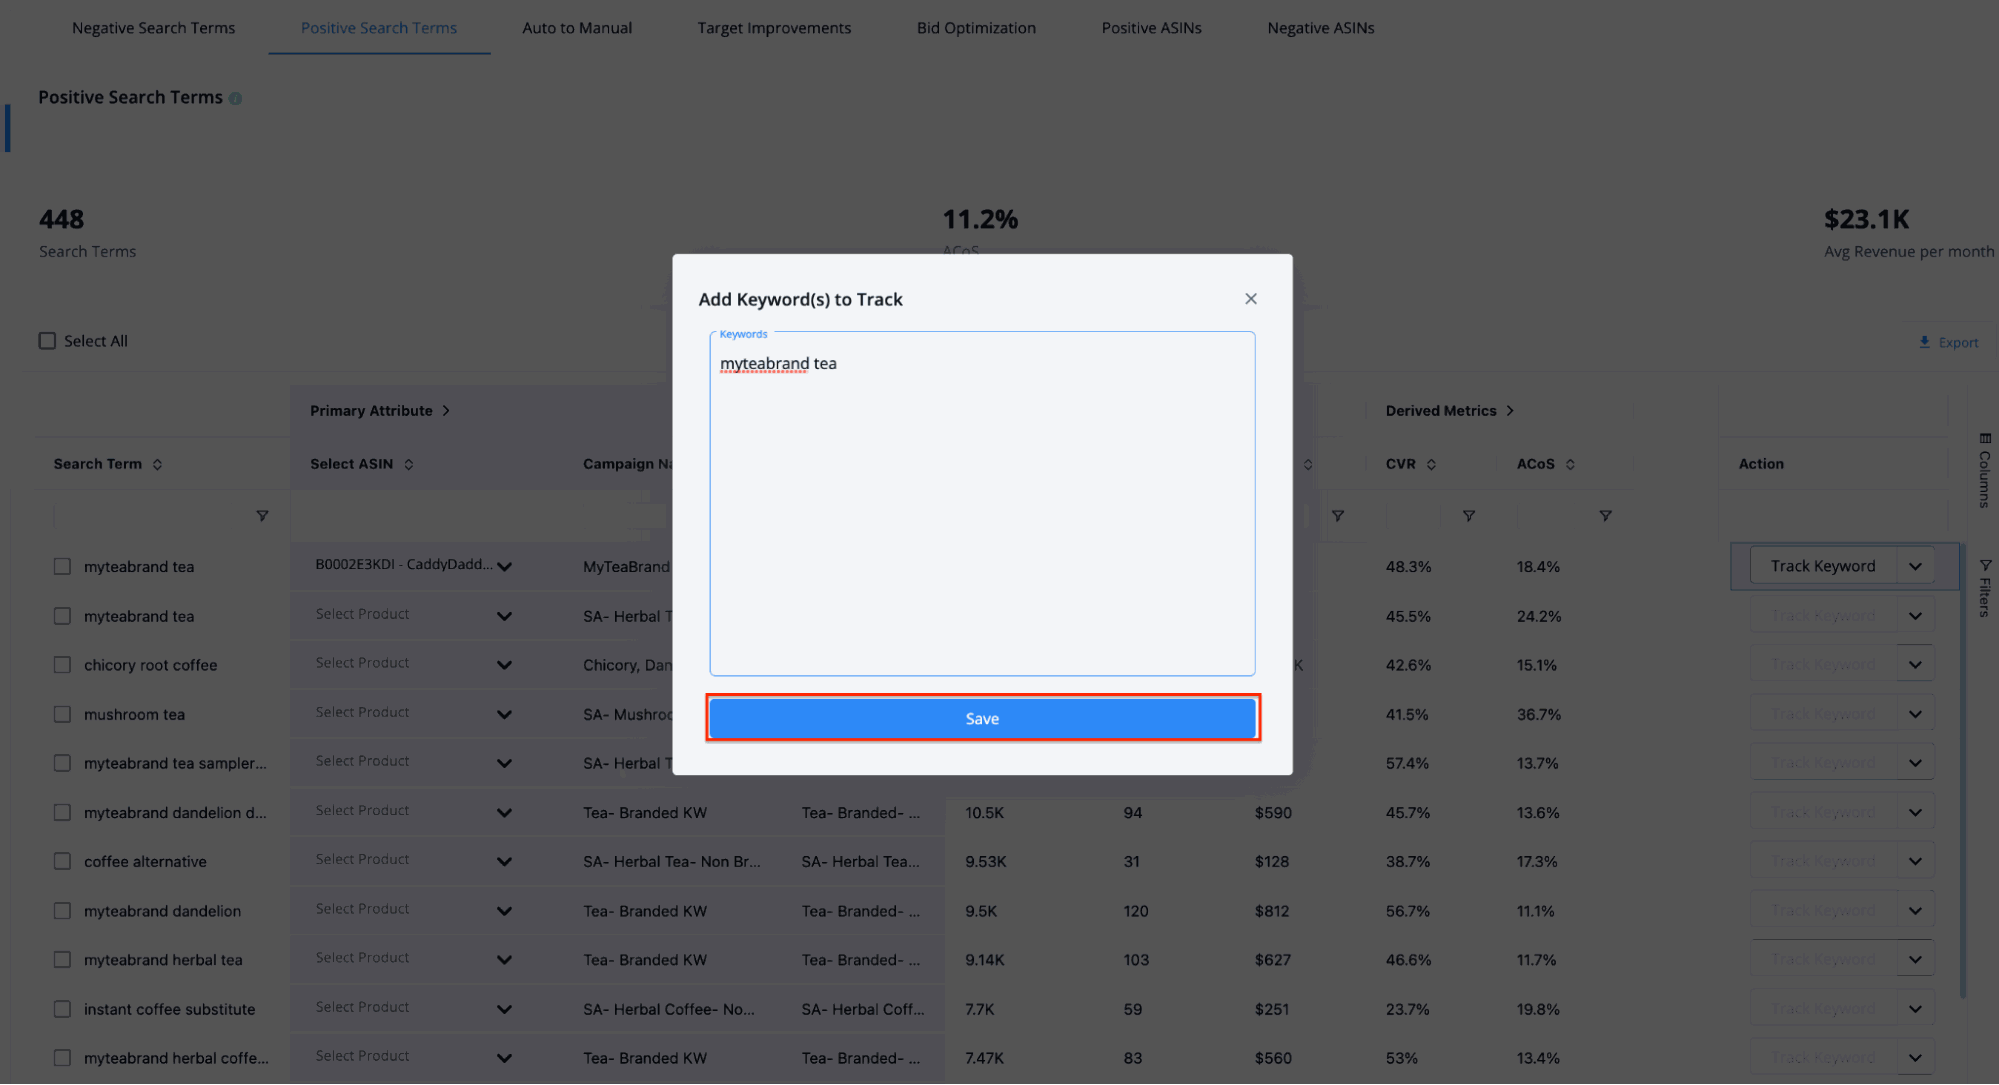
Congratulations, you’ve successfully tracked a keyword for a product.
Auto-to-Manual
The next feature in the SellerApp advertises insights dashboard is “Auto to manual” targeting.
The Auto-to-Manual tab allows you to easily convert high-converting search terms from your automatic campaigns into exact-match keywords for your manual campaigns, improving overall campaign performance.
The key insights you’ll get here are:
- Campaign name
- Ad group name
- Impressions
- Clicks
- Sales
- Spend
- Orders
- CPC
- ACoS
- CTR
To convert a search term from automatic to manual, follow these steps:
- Select the desired campaign and ad group from the dropdown menu beside the search term.
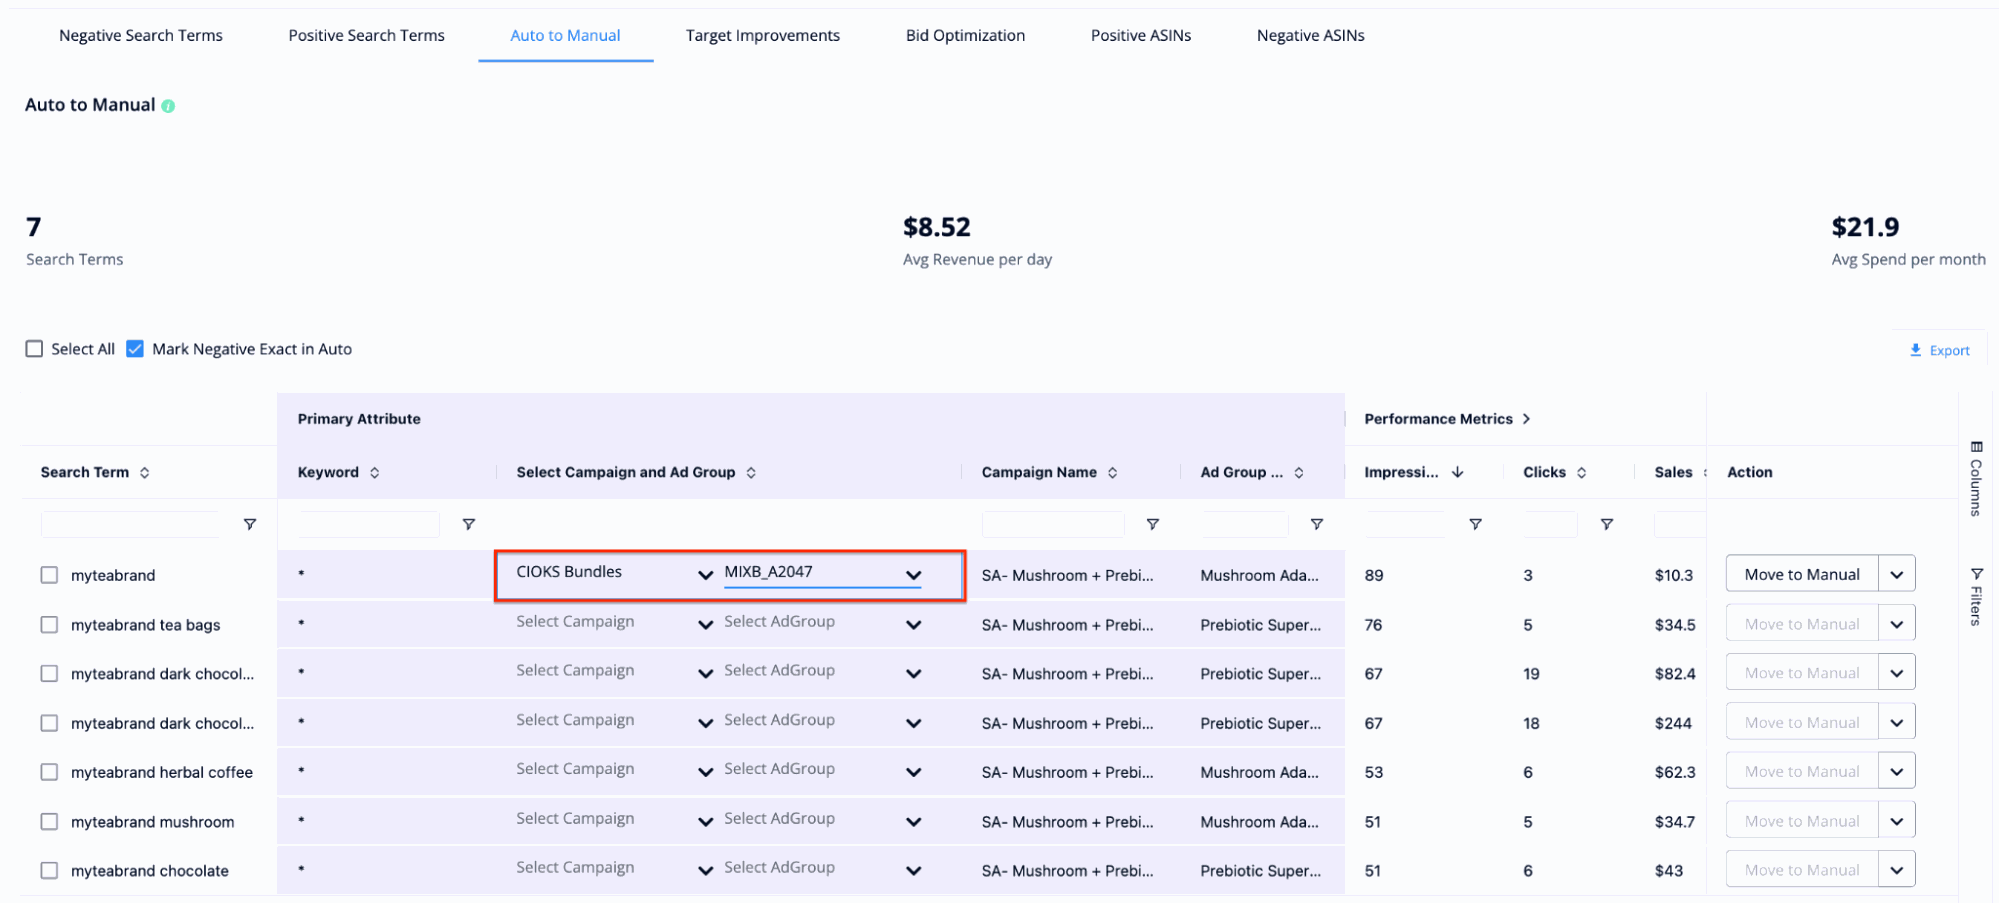
- Click on the “Move to Manual” button on the far right.
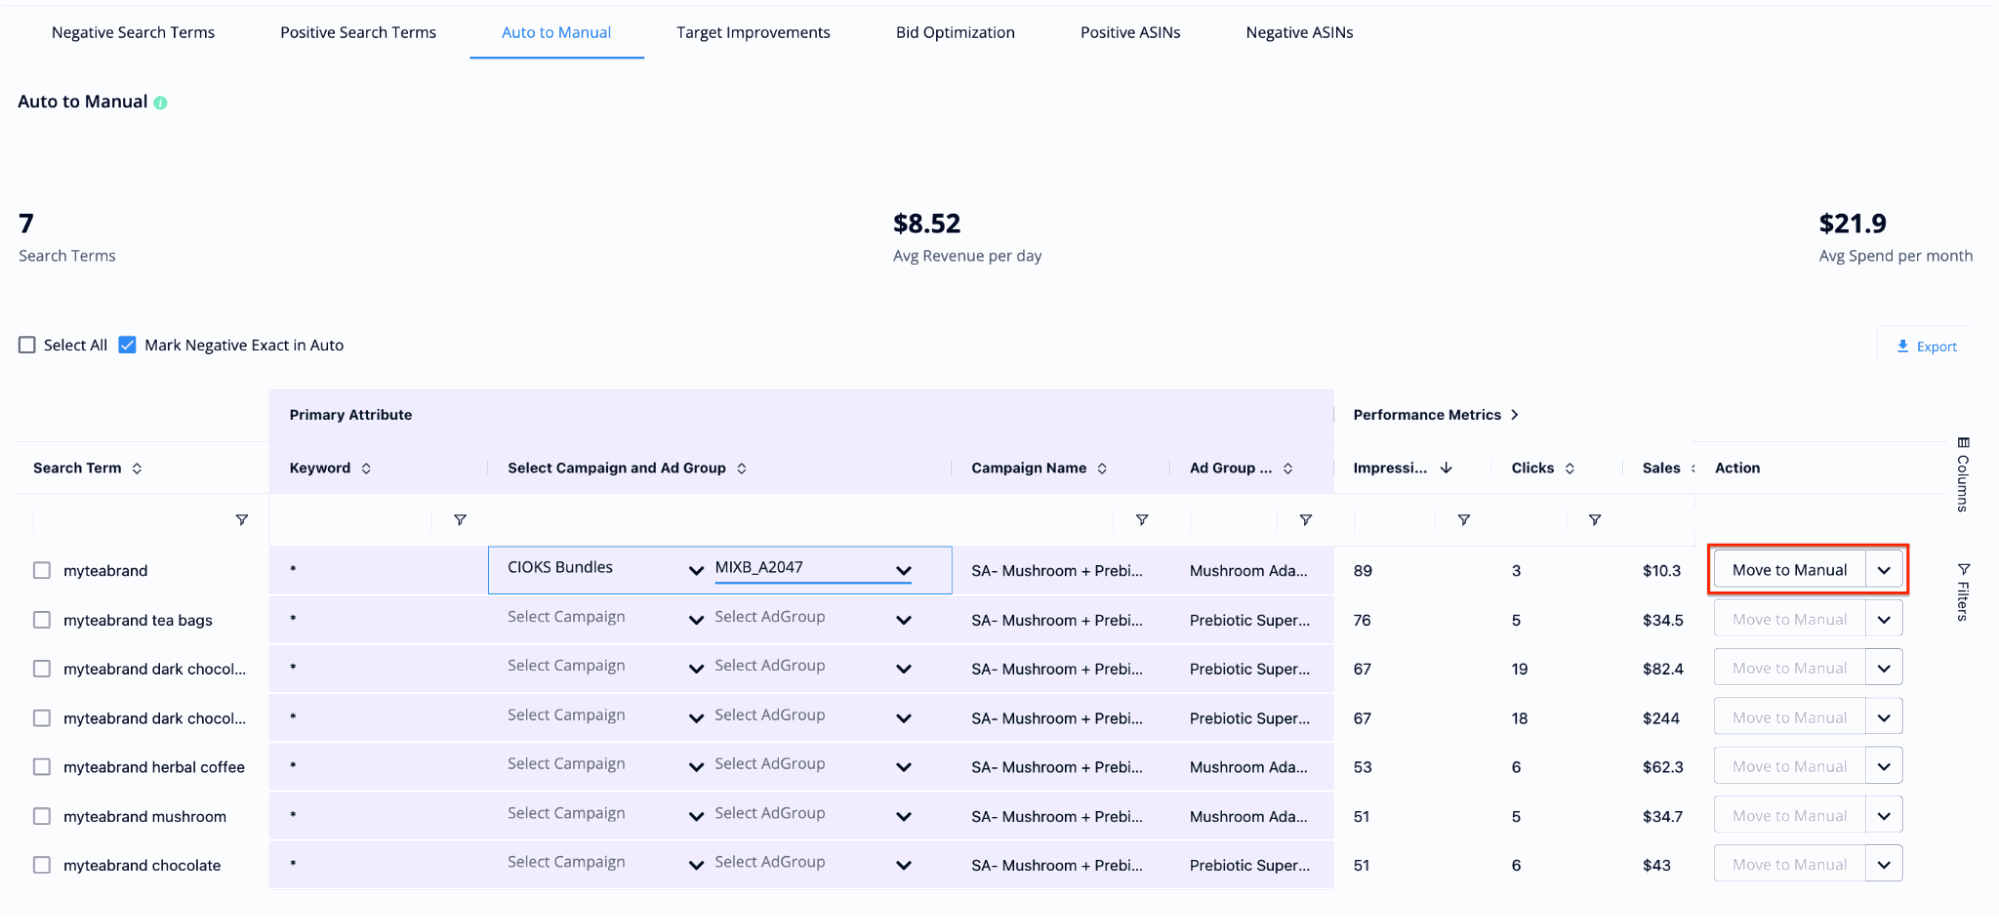
- The search term will be added to the selected campaign as an exact match keyword, with the default bid set the same as the entire ad group.
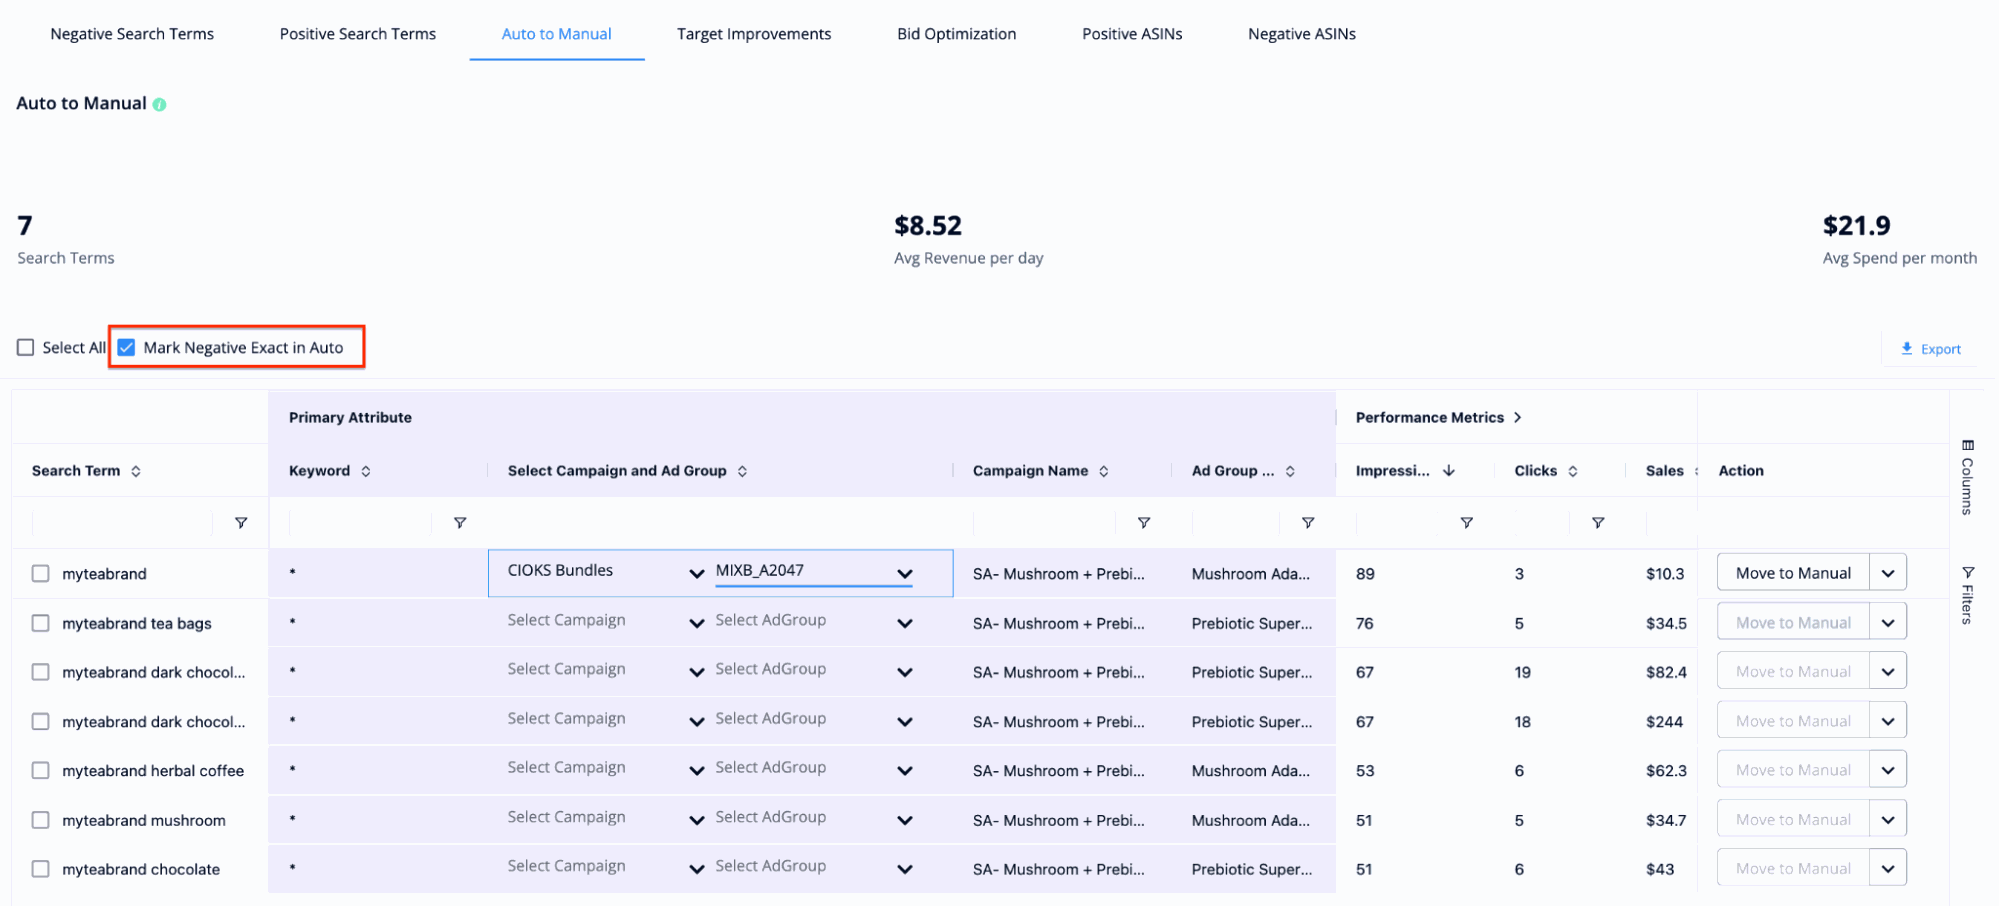
- If the “Mark Negative Exact in Auto” checkbox is checked (which is the default setting), the search term will automatically be marked as negative in the auto campaign to avoid wasted ad spend.
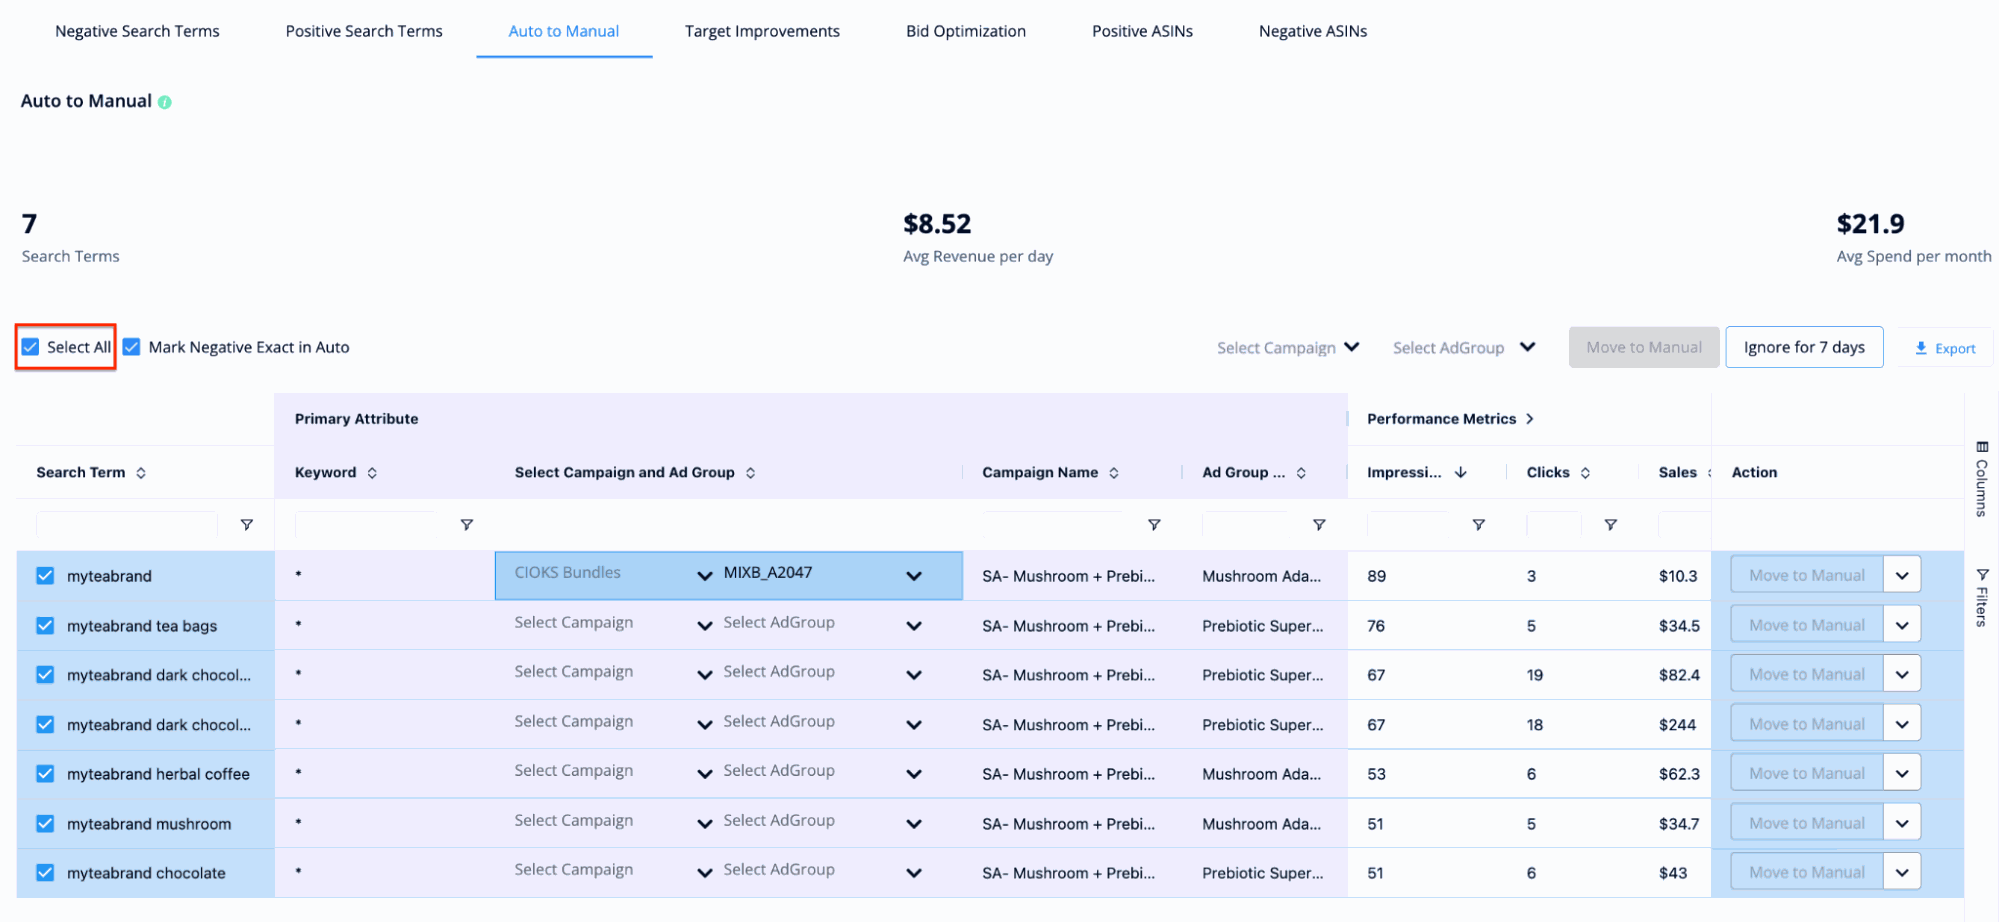
If you want to move all the keywords from auto to manual, follow these steps instead:
- Click on the “Select All” checkbox on the top left.
- Select the desired campaign and ad group on the right, and click on the “Move to Manual” button.
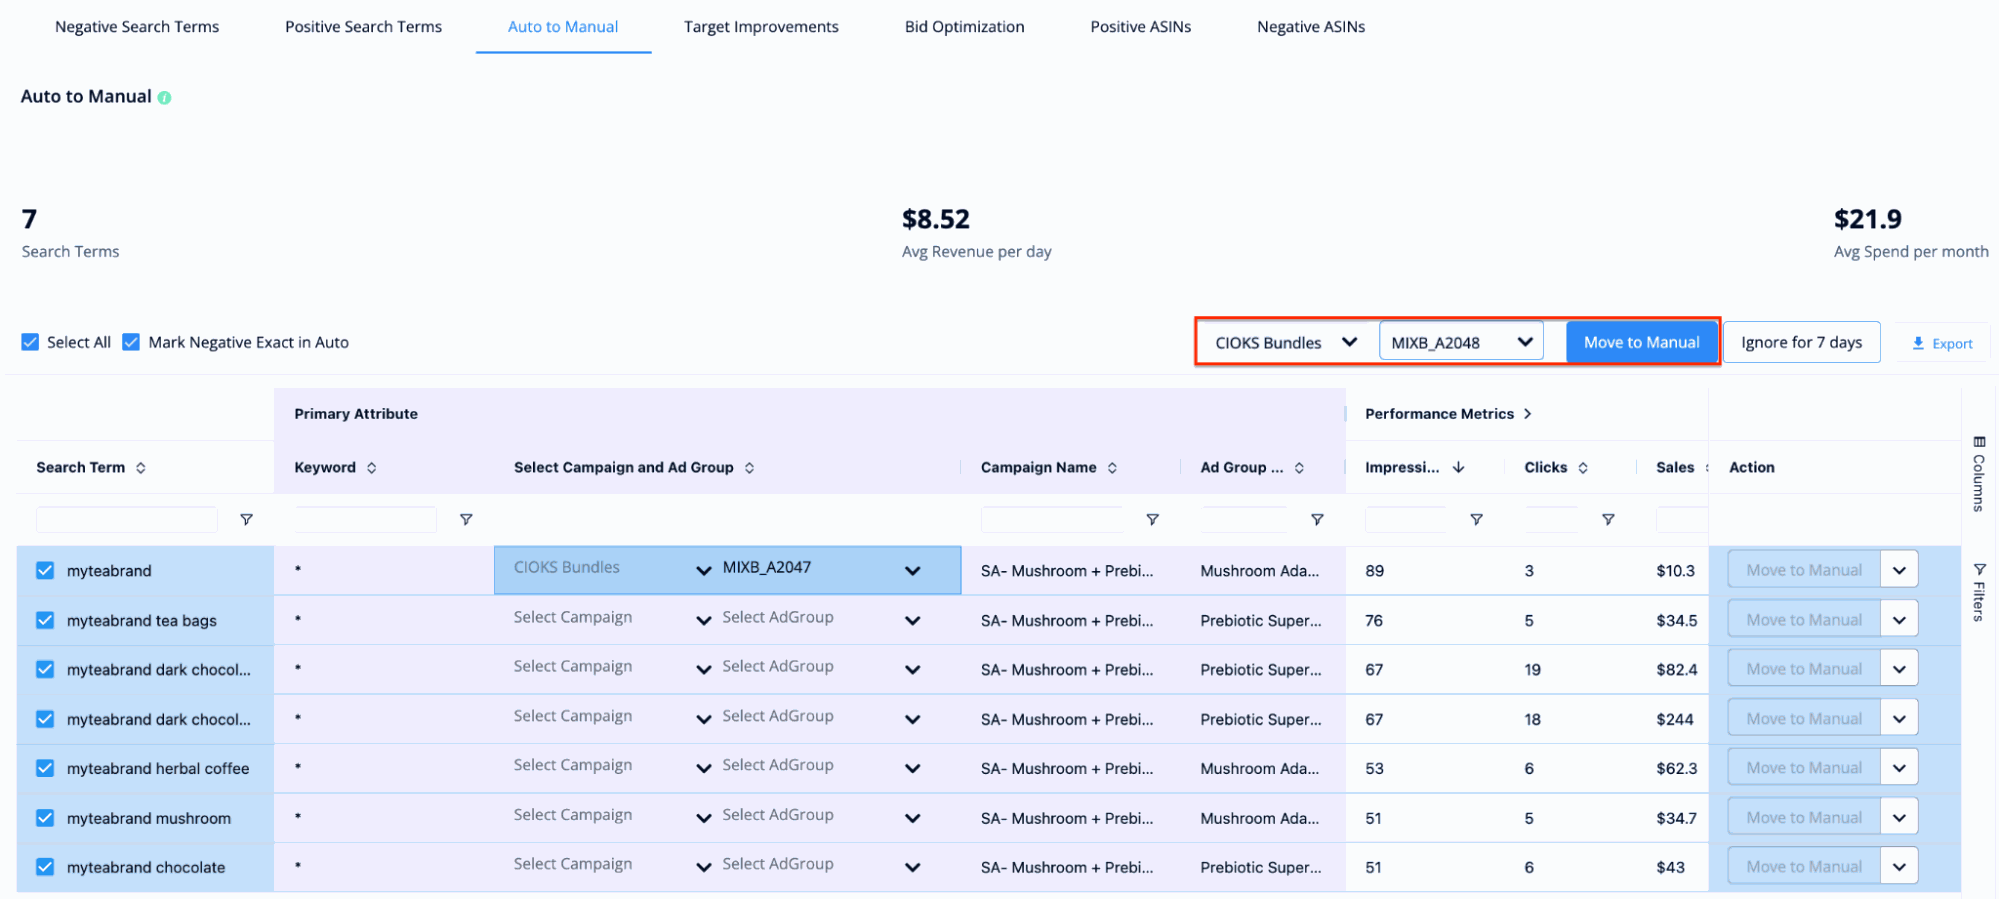
- All search terms will be added to the selected campaign as exact match keywords and will be marked as negative keywords in the automatic campaign.
Target Improvement
The target improvement feature helps sellers to advertise to shoppers more precisely and accurately.
SellerApp’s ML-powered algorithm sorts through all the campaigns and displays all the high-converting search terms in each match type. You can refine your campaign performance by narrowing down the match type for these keywords.
For example, if a search term “A” is performing well in your campaign but is a phrase match type, you can convert the search term to an exact match type to refine the targeting and improve the return on ad spend.
The key insights you’ll get here are:
- Campaign name
- Ad group name
- Impressions
- Clicks
- Sales
- Spend
- Orders
- CPC
- CVR
- CTR
- ACoS
To improve the targeting for a search term, follow these steps:
- Select the desired campaign and ad group from the dropdown menu beside the search term.
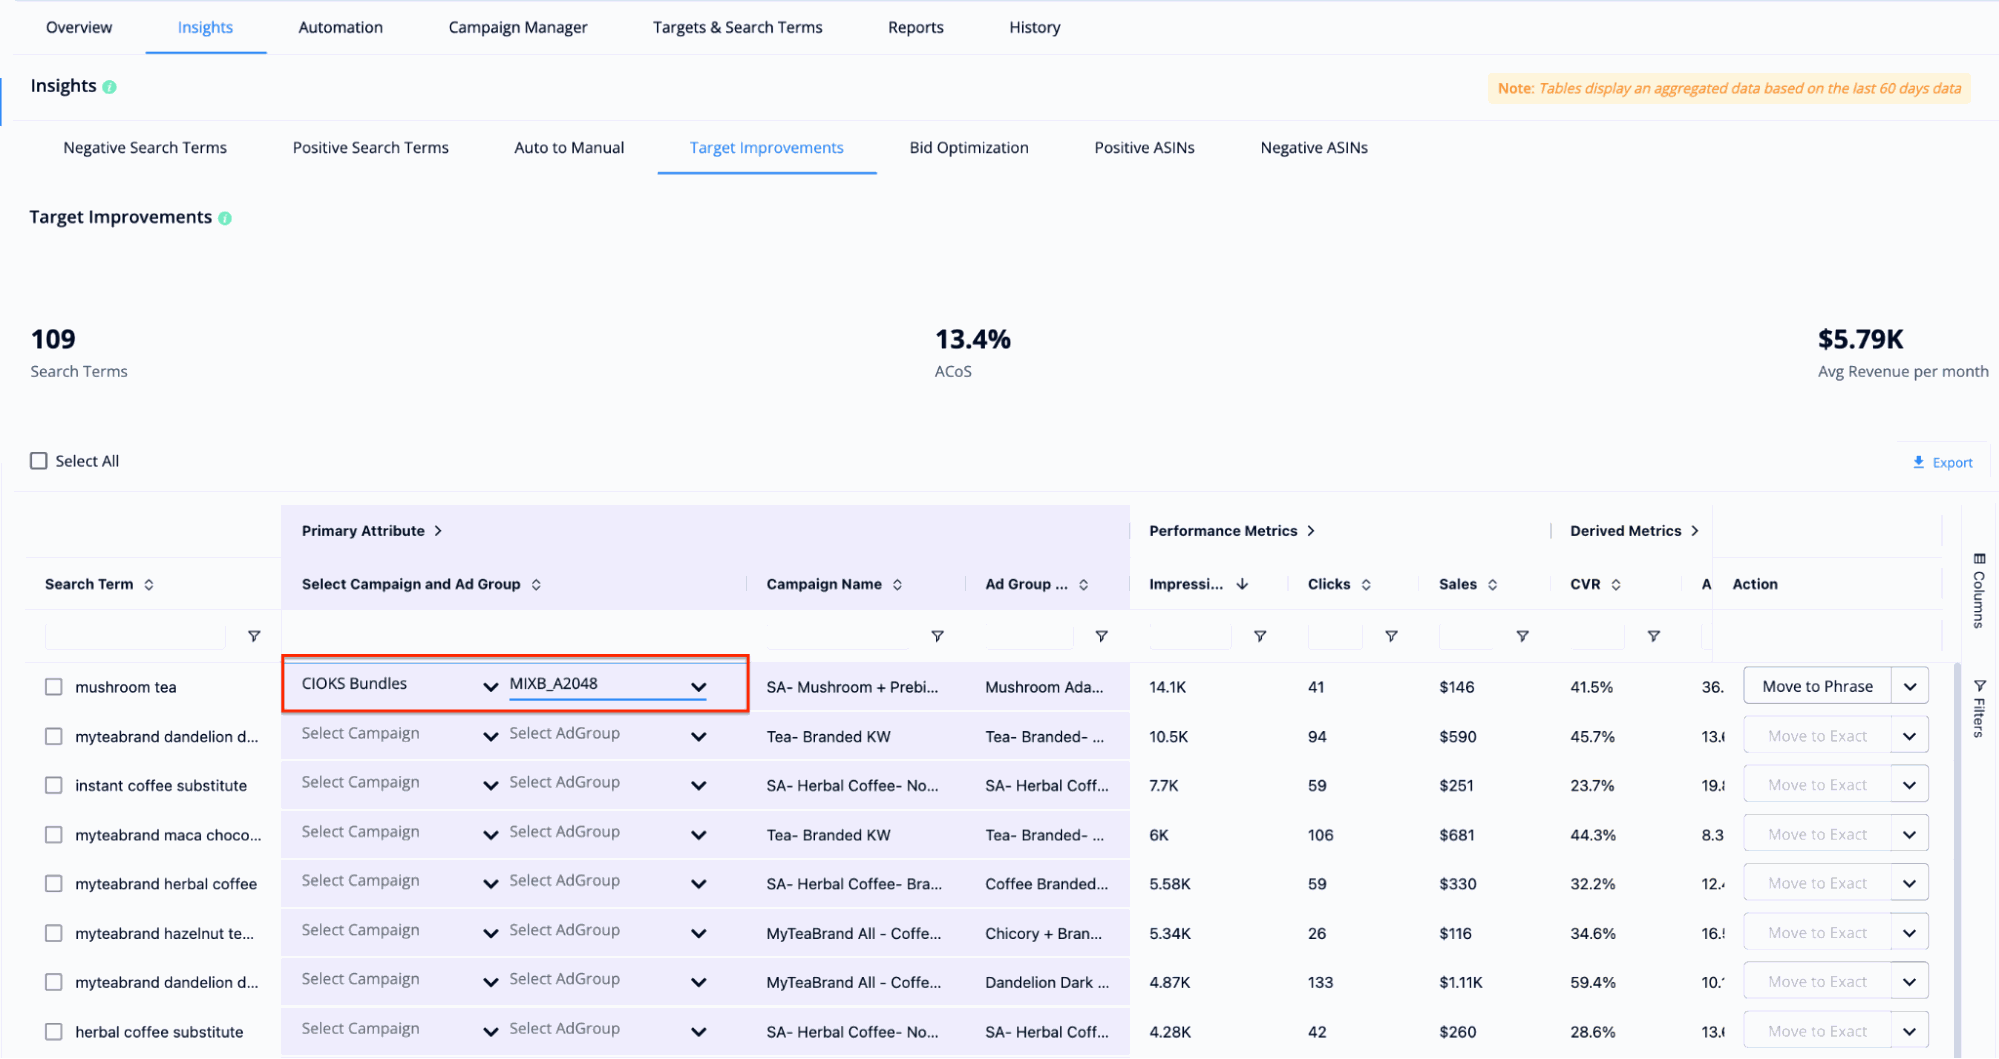
- Click on the “Move to Phrase/Exact” button on the far right. (Usually, if the search term is currently in broad match, the button will show “Move to Phrase,” and if the search term is in phrase match, the button will show “Move to Exact.”
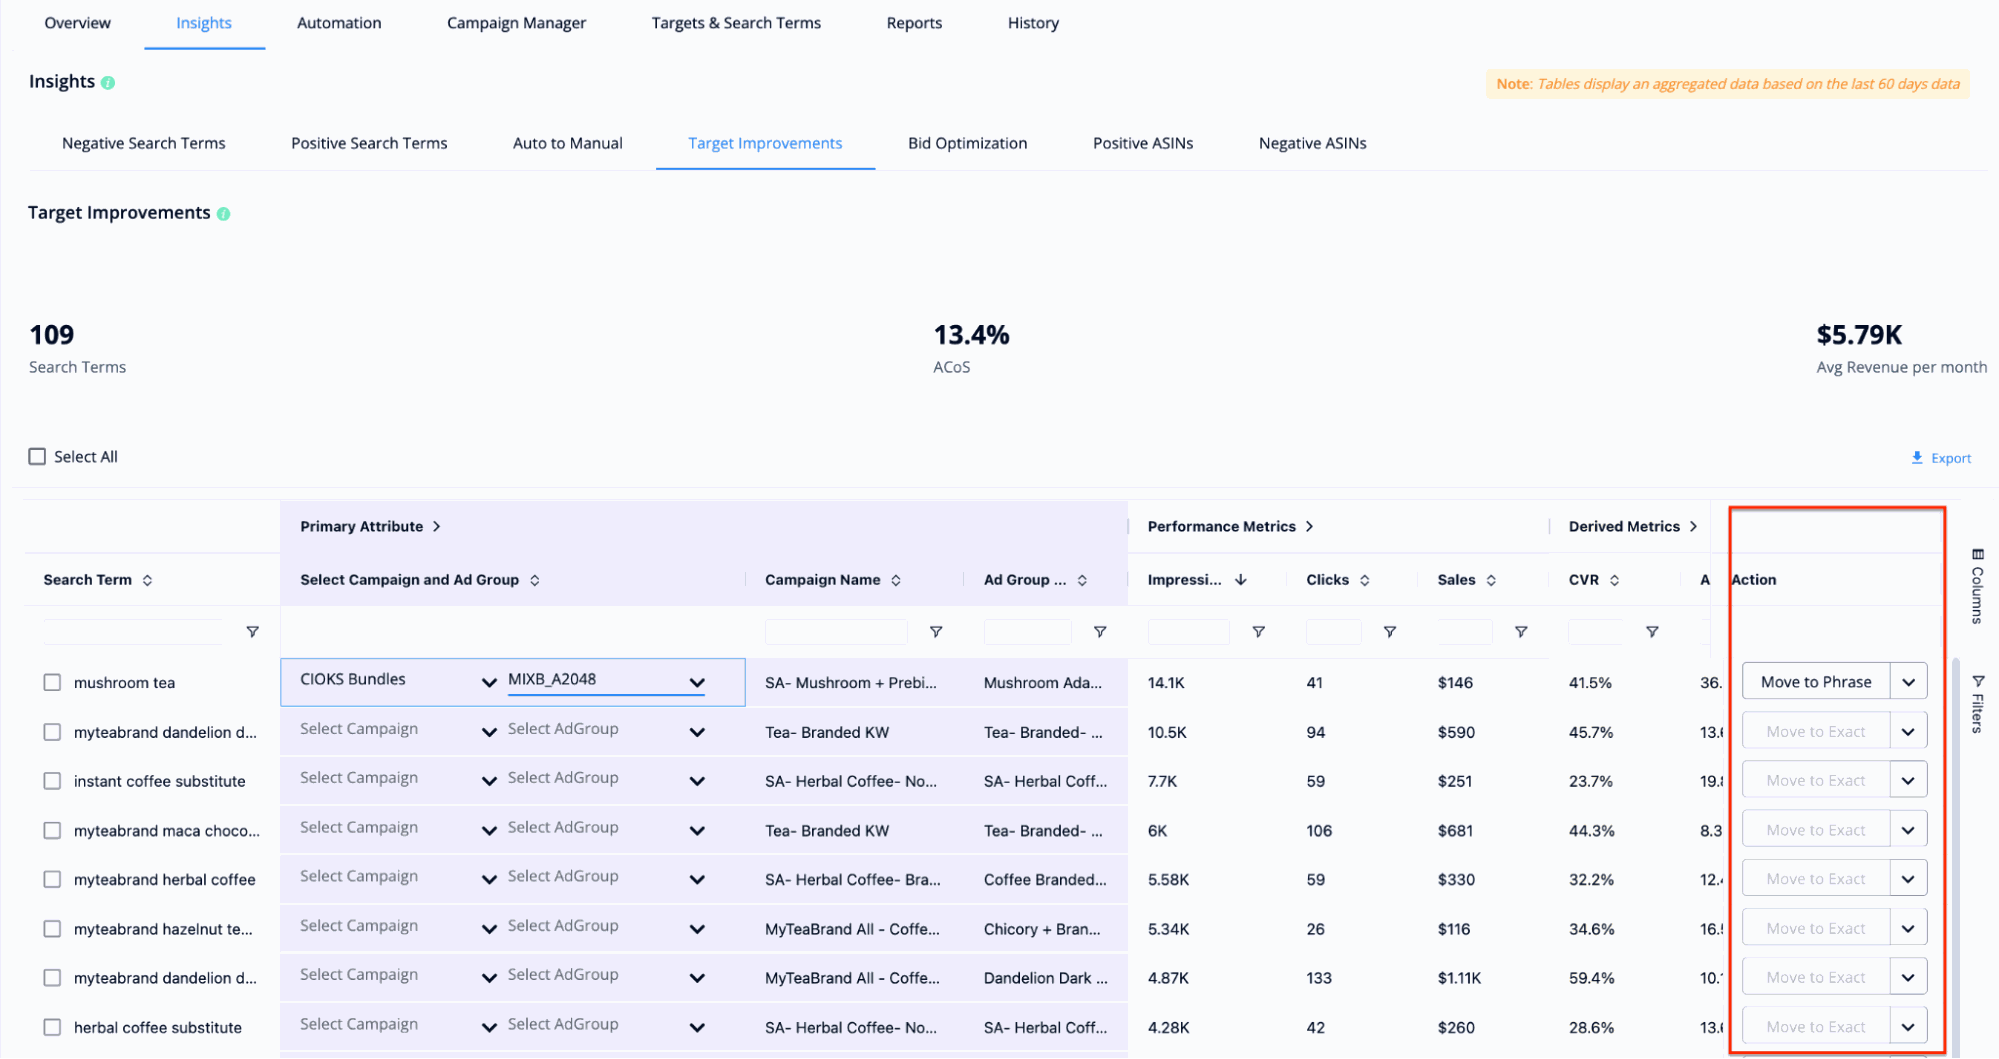
- Once you click the button, the search term will move to Phrase/Exact match to improve the targeting.
If you want to make target improvements for all the keywords, follow these steps instead:
- Click on the “Select All” checkbox on the top left, and select the desired campaign and ad group on the right.
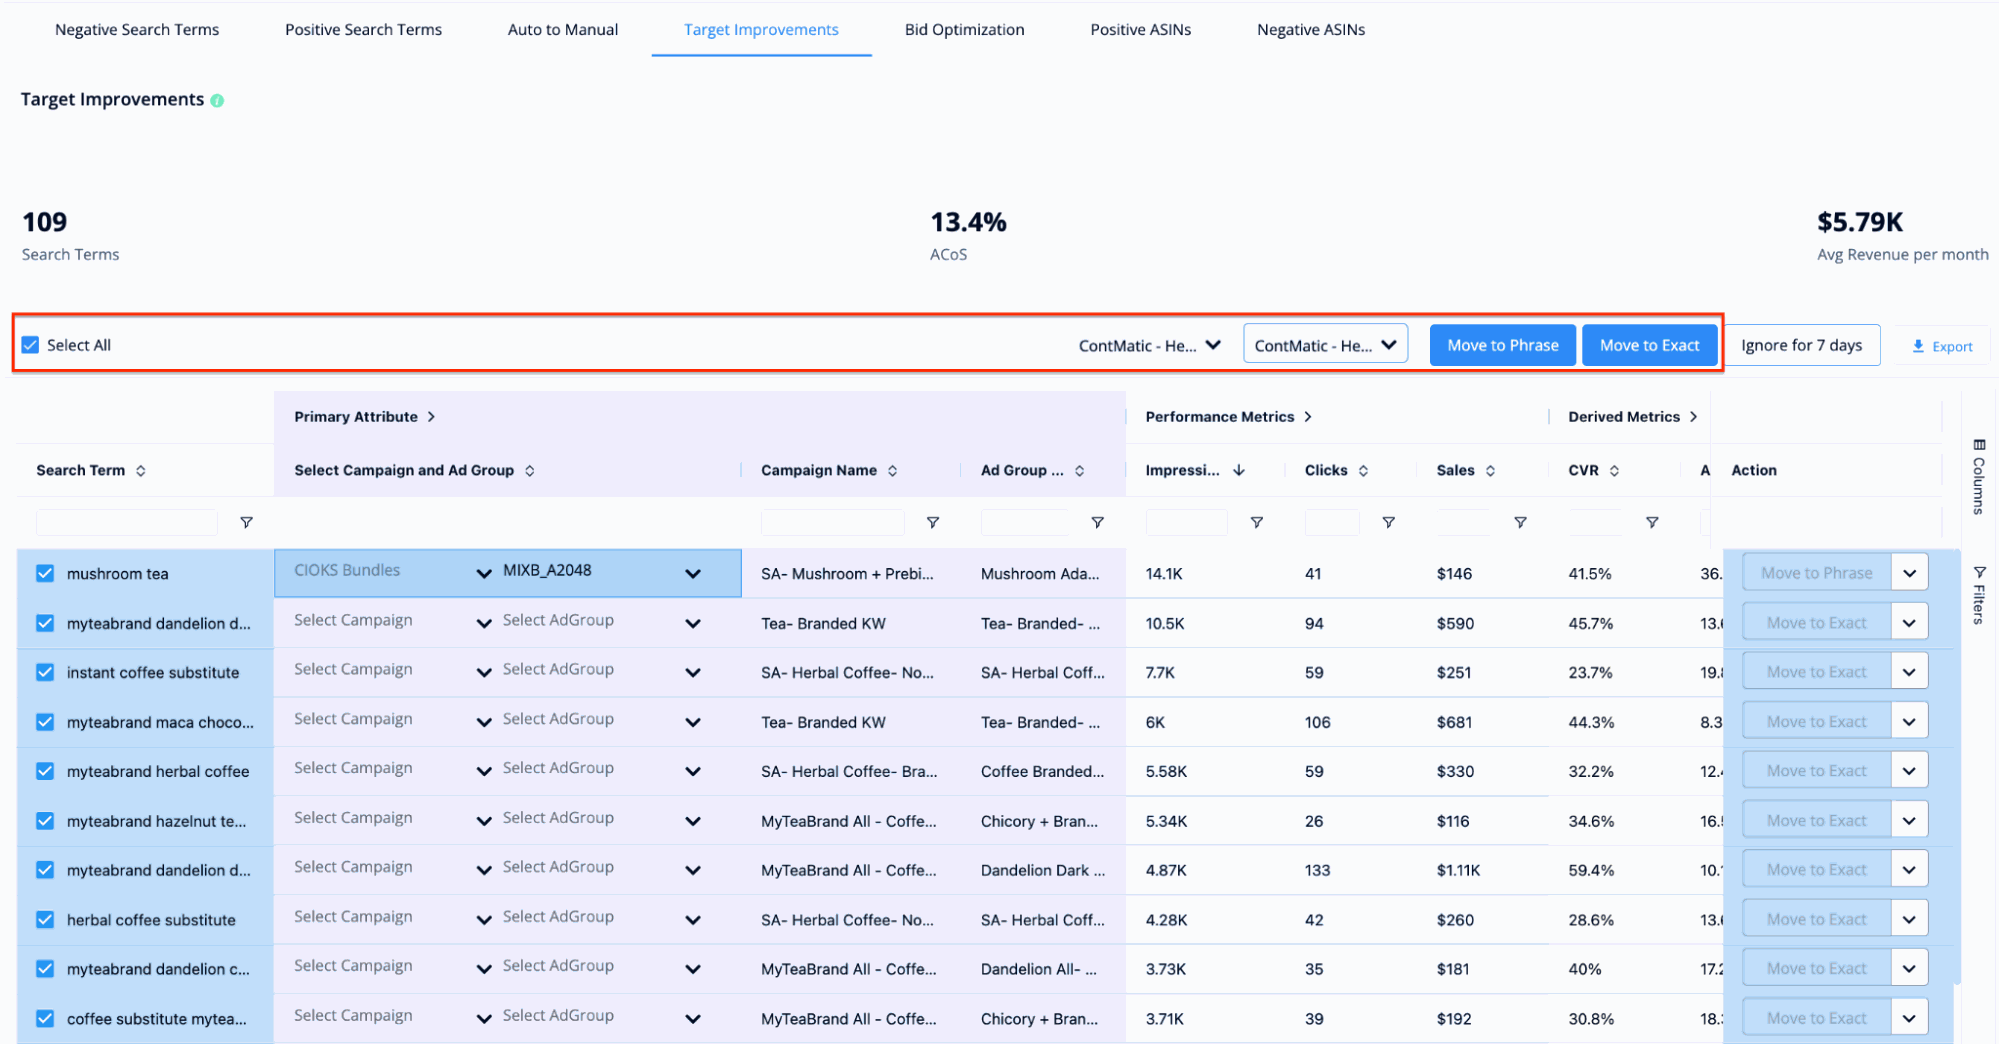
- Click on “Move to Phrase” to convert the search terms as phrase match or “Move to Exact” to convert the search terms into an exact match.
Bid Optimization
The next tool in advertising insights is Bid Optimization. This tool finds all your campaigns’ high-performing and high-volume keywords and gives you bid suggestions with a powerful ML algorithm to reduce the overall ACoS.
You’ll be able to see the estimated impression growth a particular seller will get after optimizing the bids on the top right-hand corner.
The key insights you’ll get here are:
- Keyword
- Current Bid
- Campaign name
- Ad group
- Impressions
- Clicks
- Sales
- Spend
- Orders
- CVR
- CTR
- ACoS
To edit your bids, follow these steps:
- Click on the “edit” button in the suggested bid column for the desired keyword.
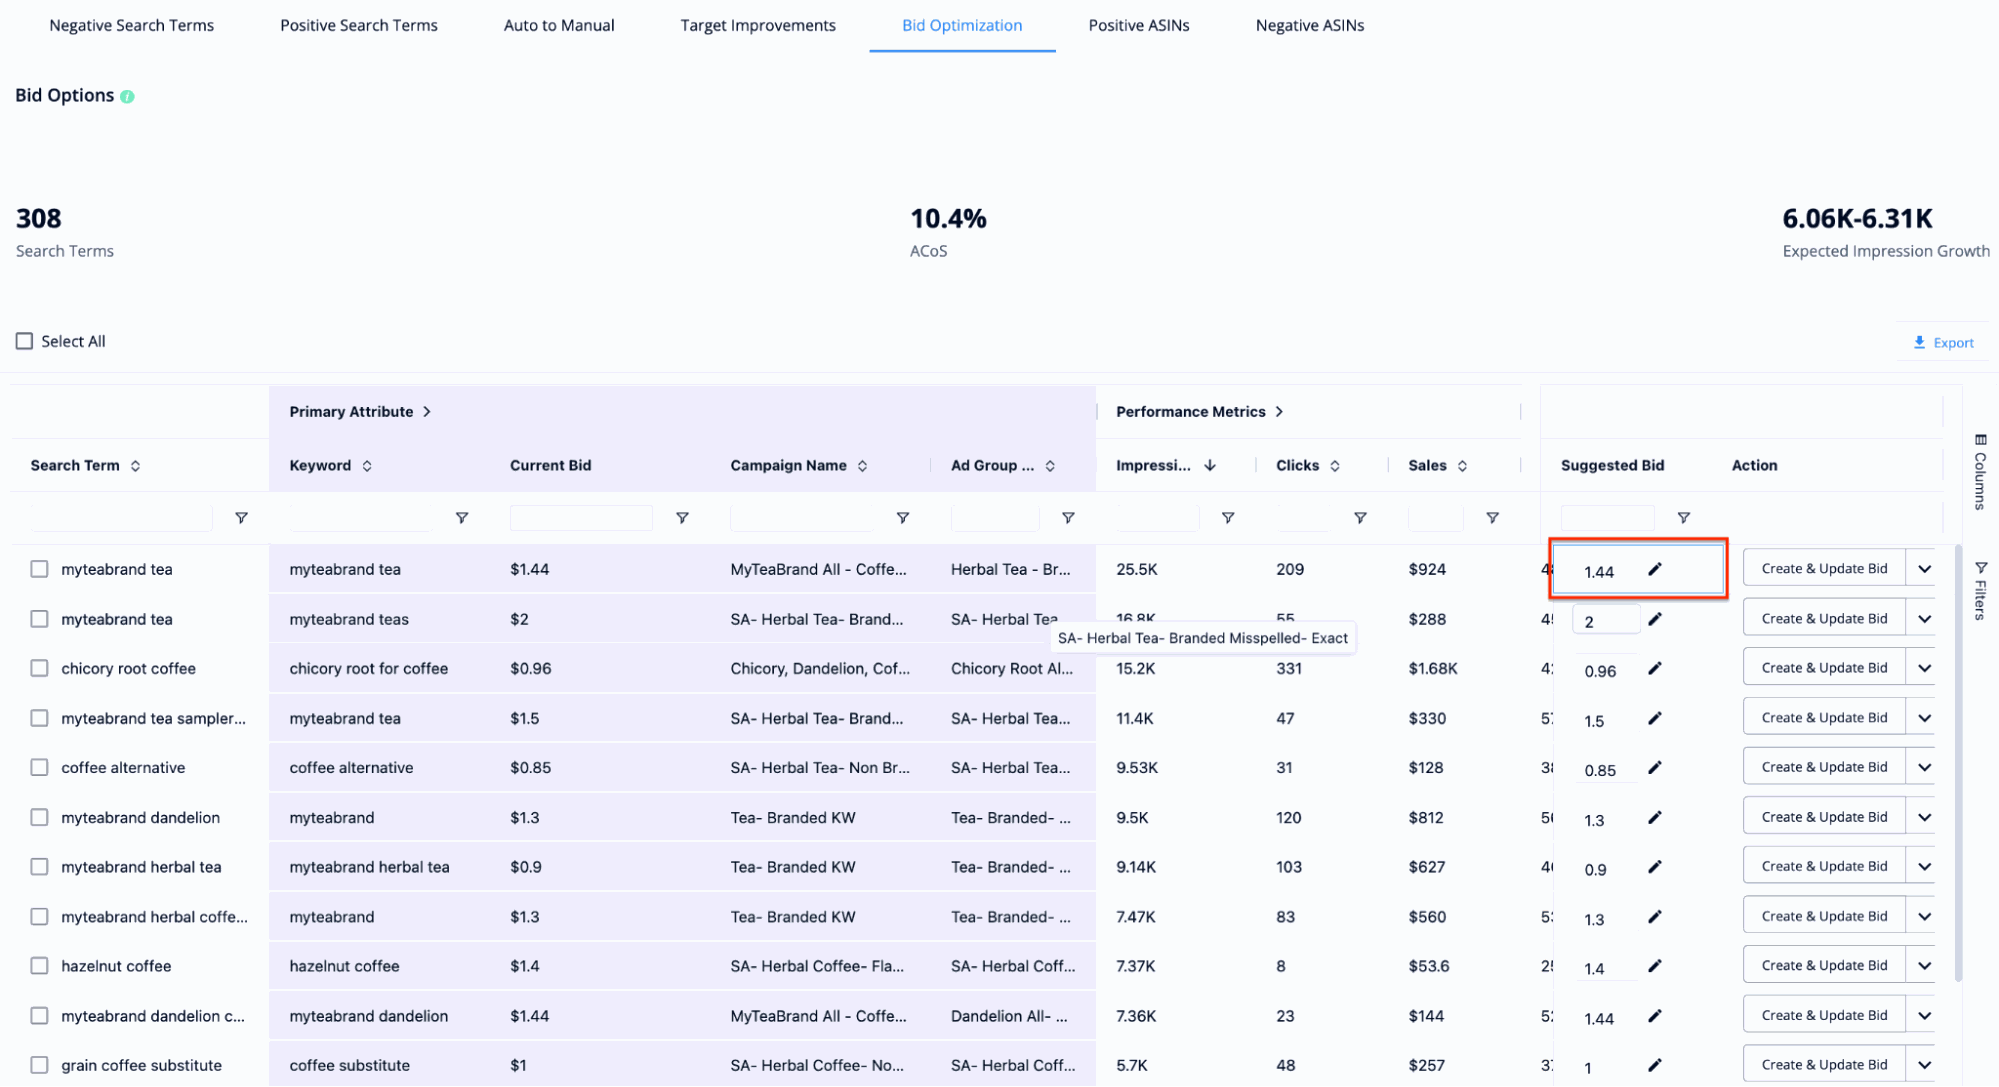
- A pop-up window will appear where you can set a custom bid or use SellerApp’s suggested bid.
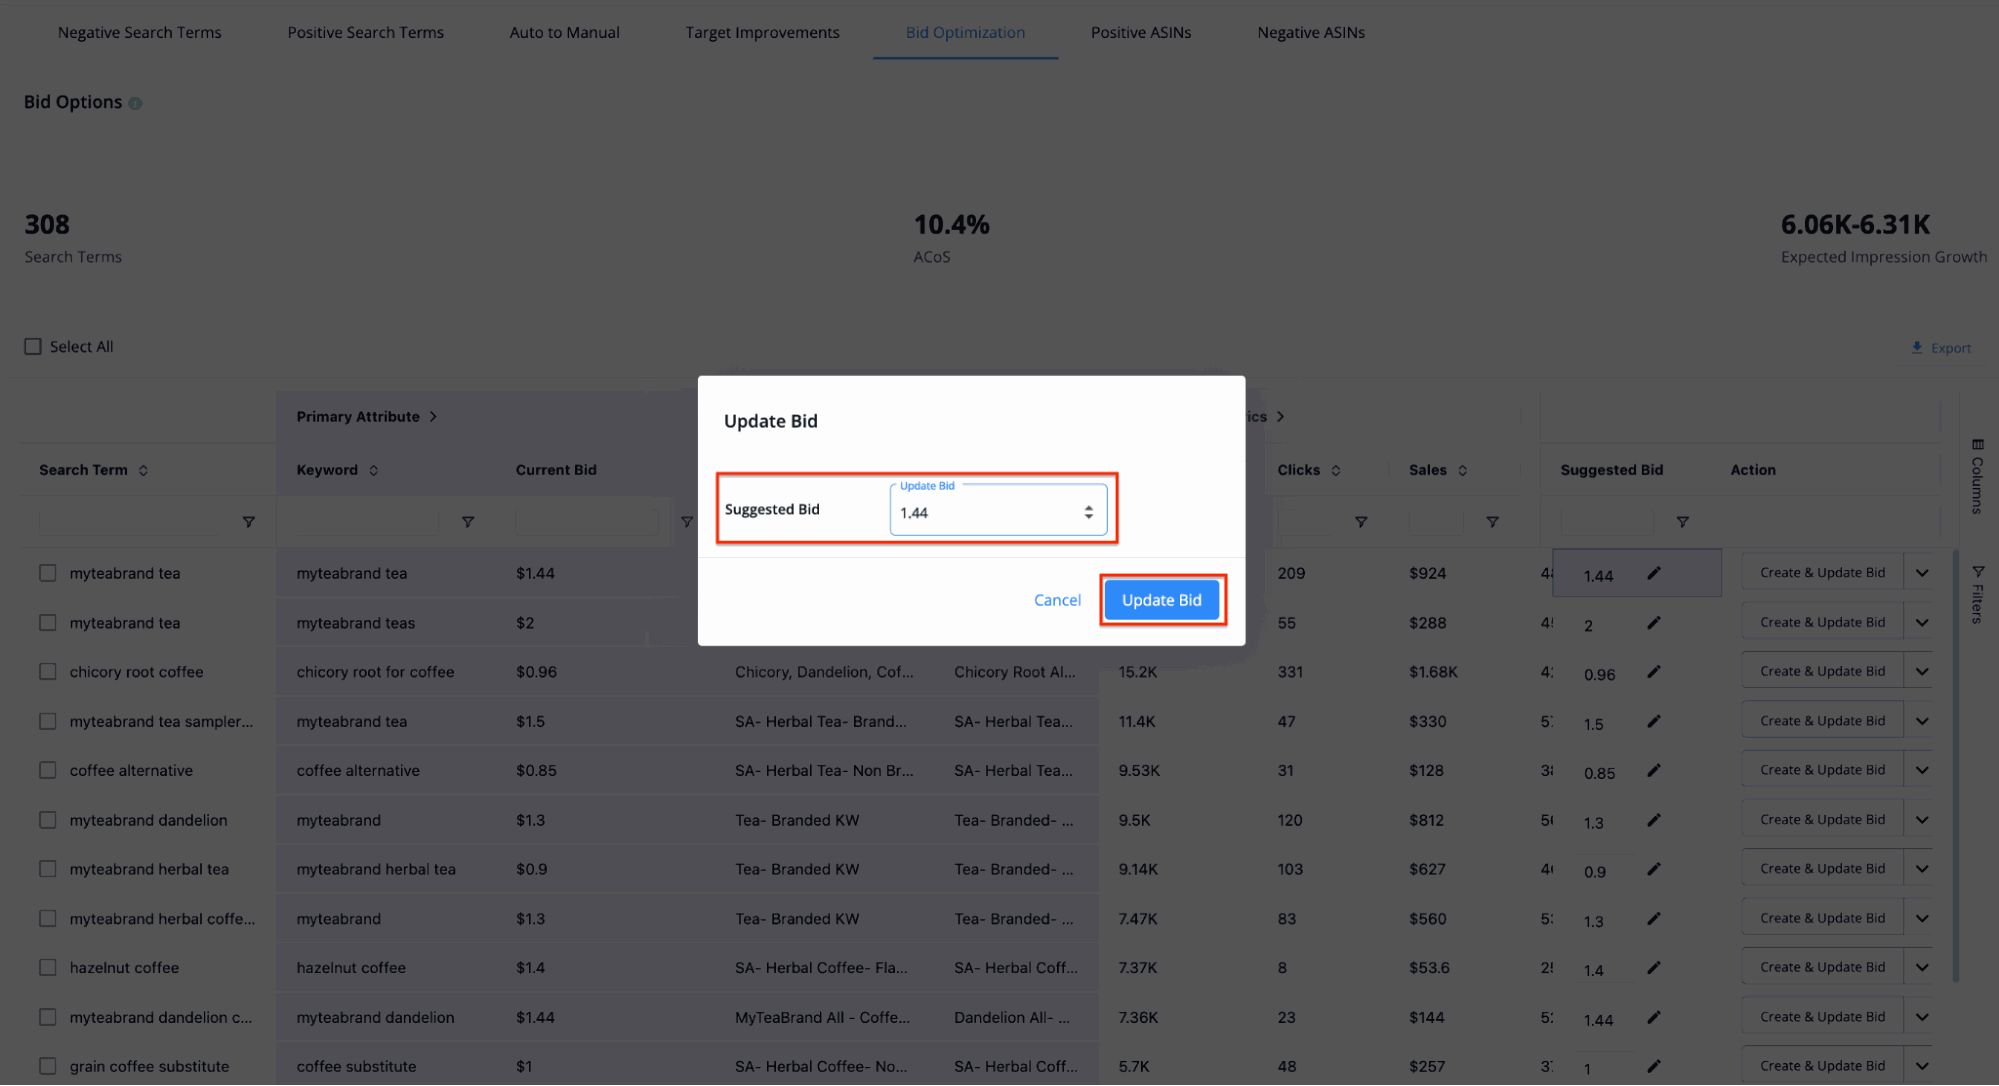
- Click on “Update Bid” to save the new bid for the keyword.
If you need to make bulk changes, follow these steps instead:
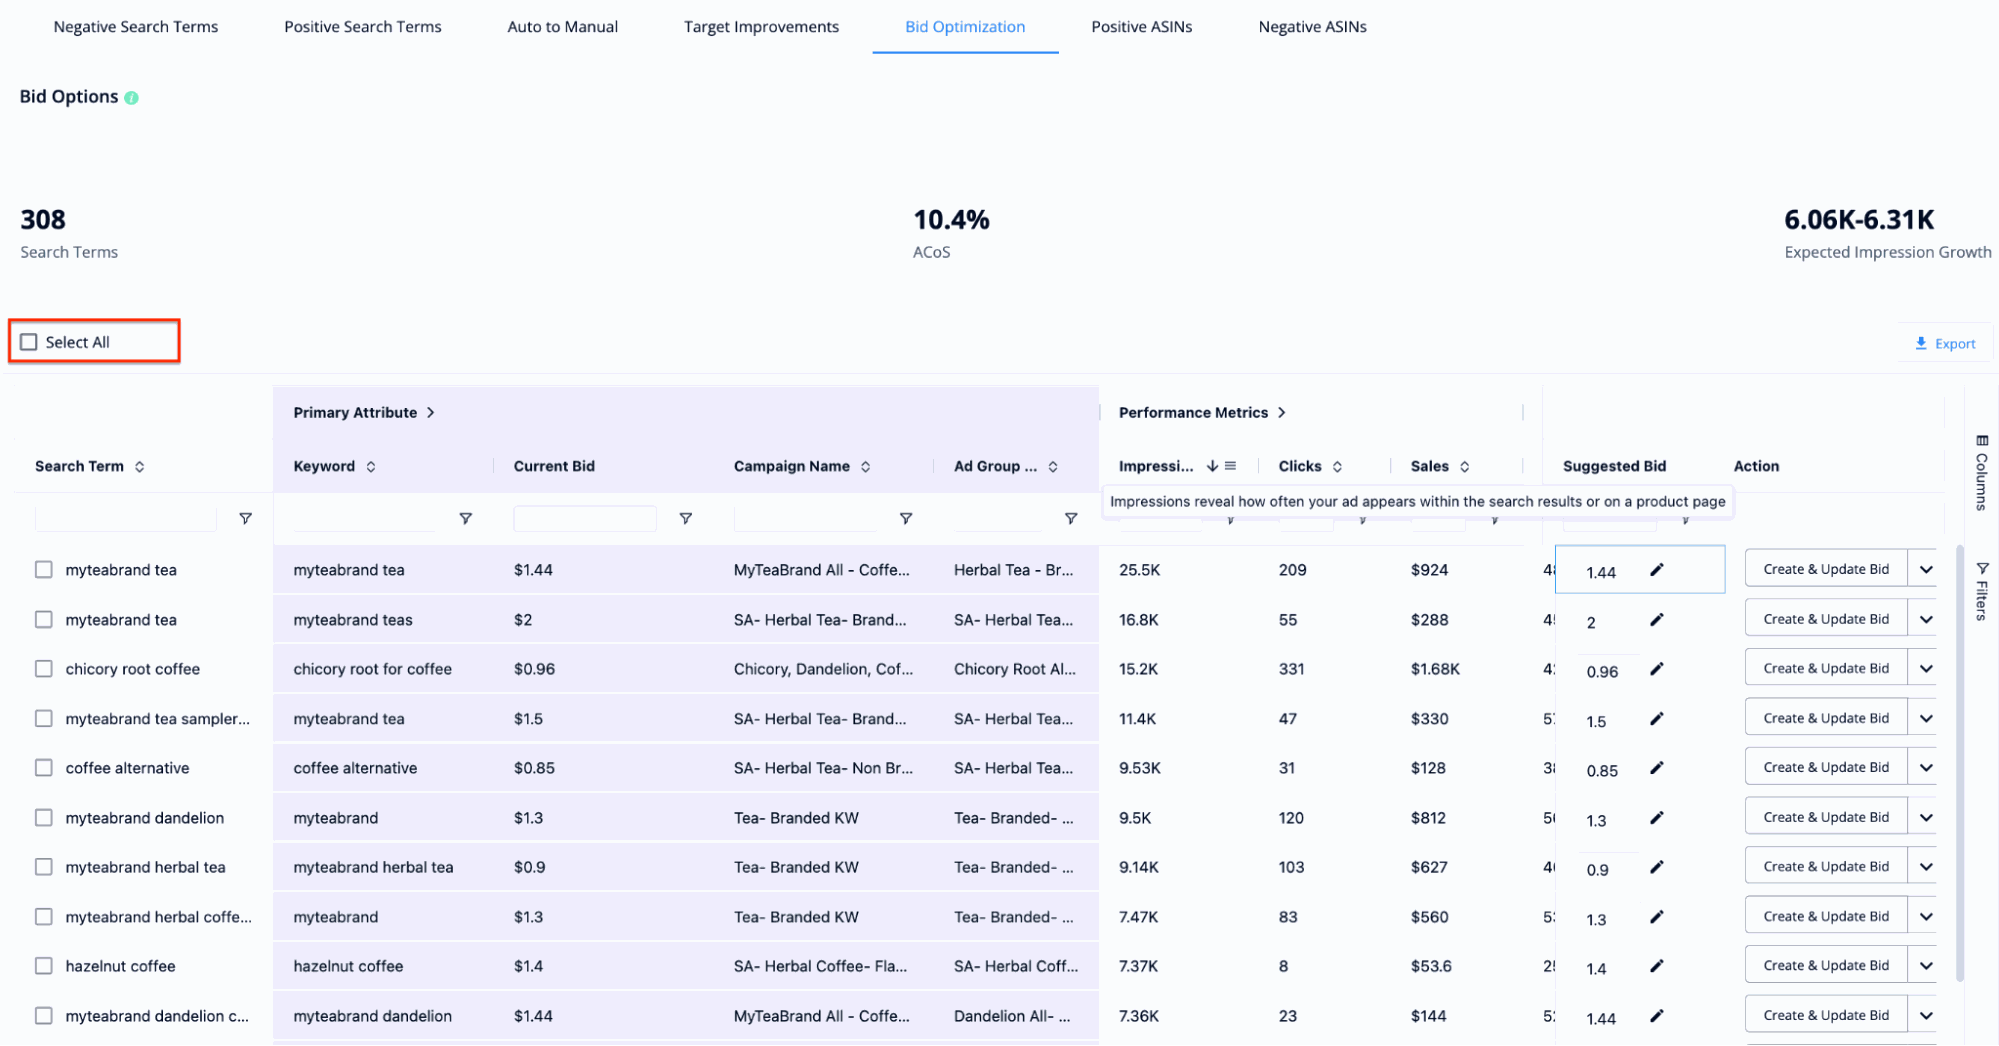
- Click on the “Select all” checkbox on the top left of the keyword list.
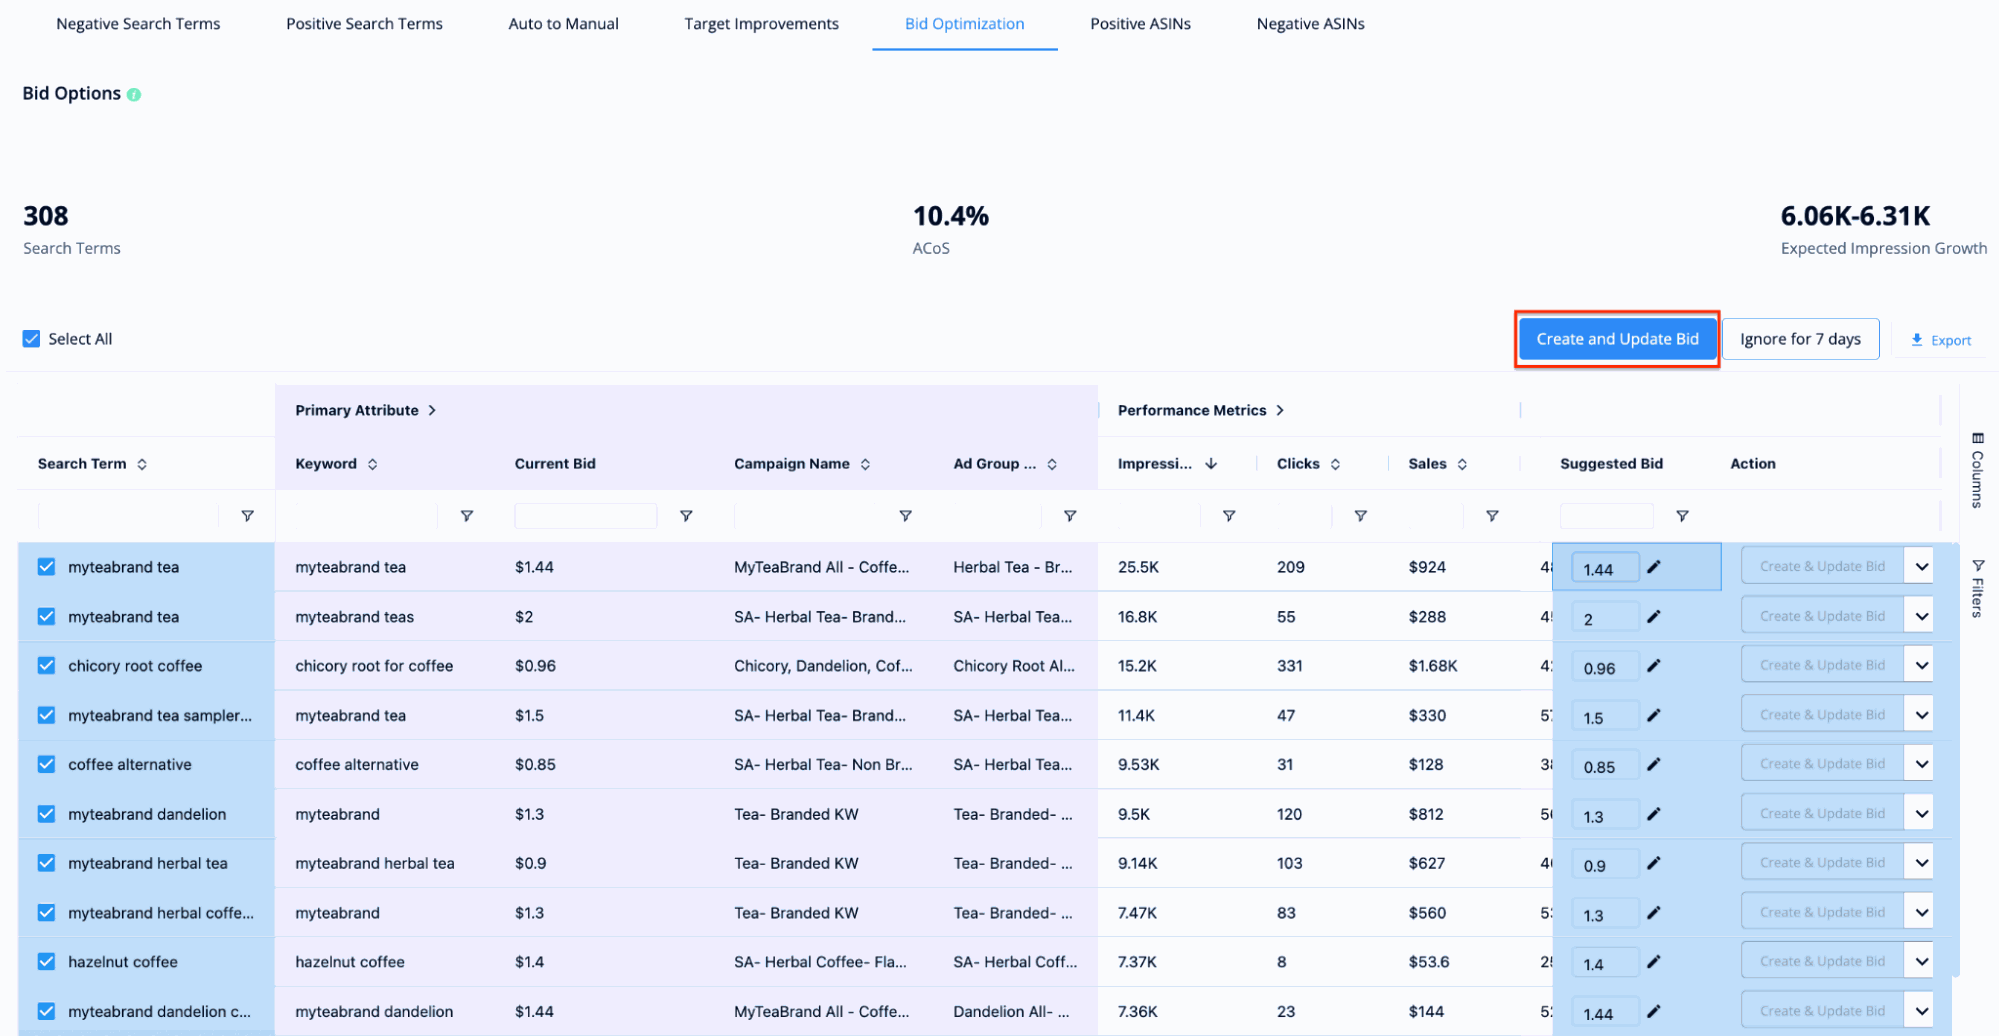
- Click on “Create and Update Bids” to open a pop-up window where you can edit the bids for all selected keywords.
- In the pop-up window, you can edit the bid for each keyword individually or use a bid rule for all keywords.
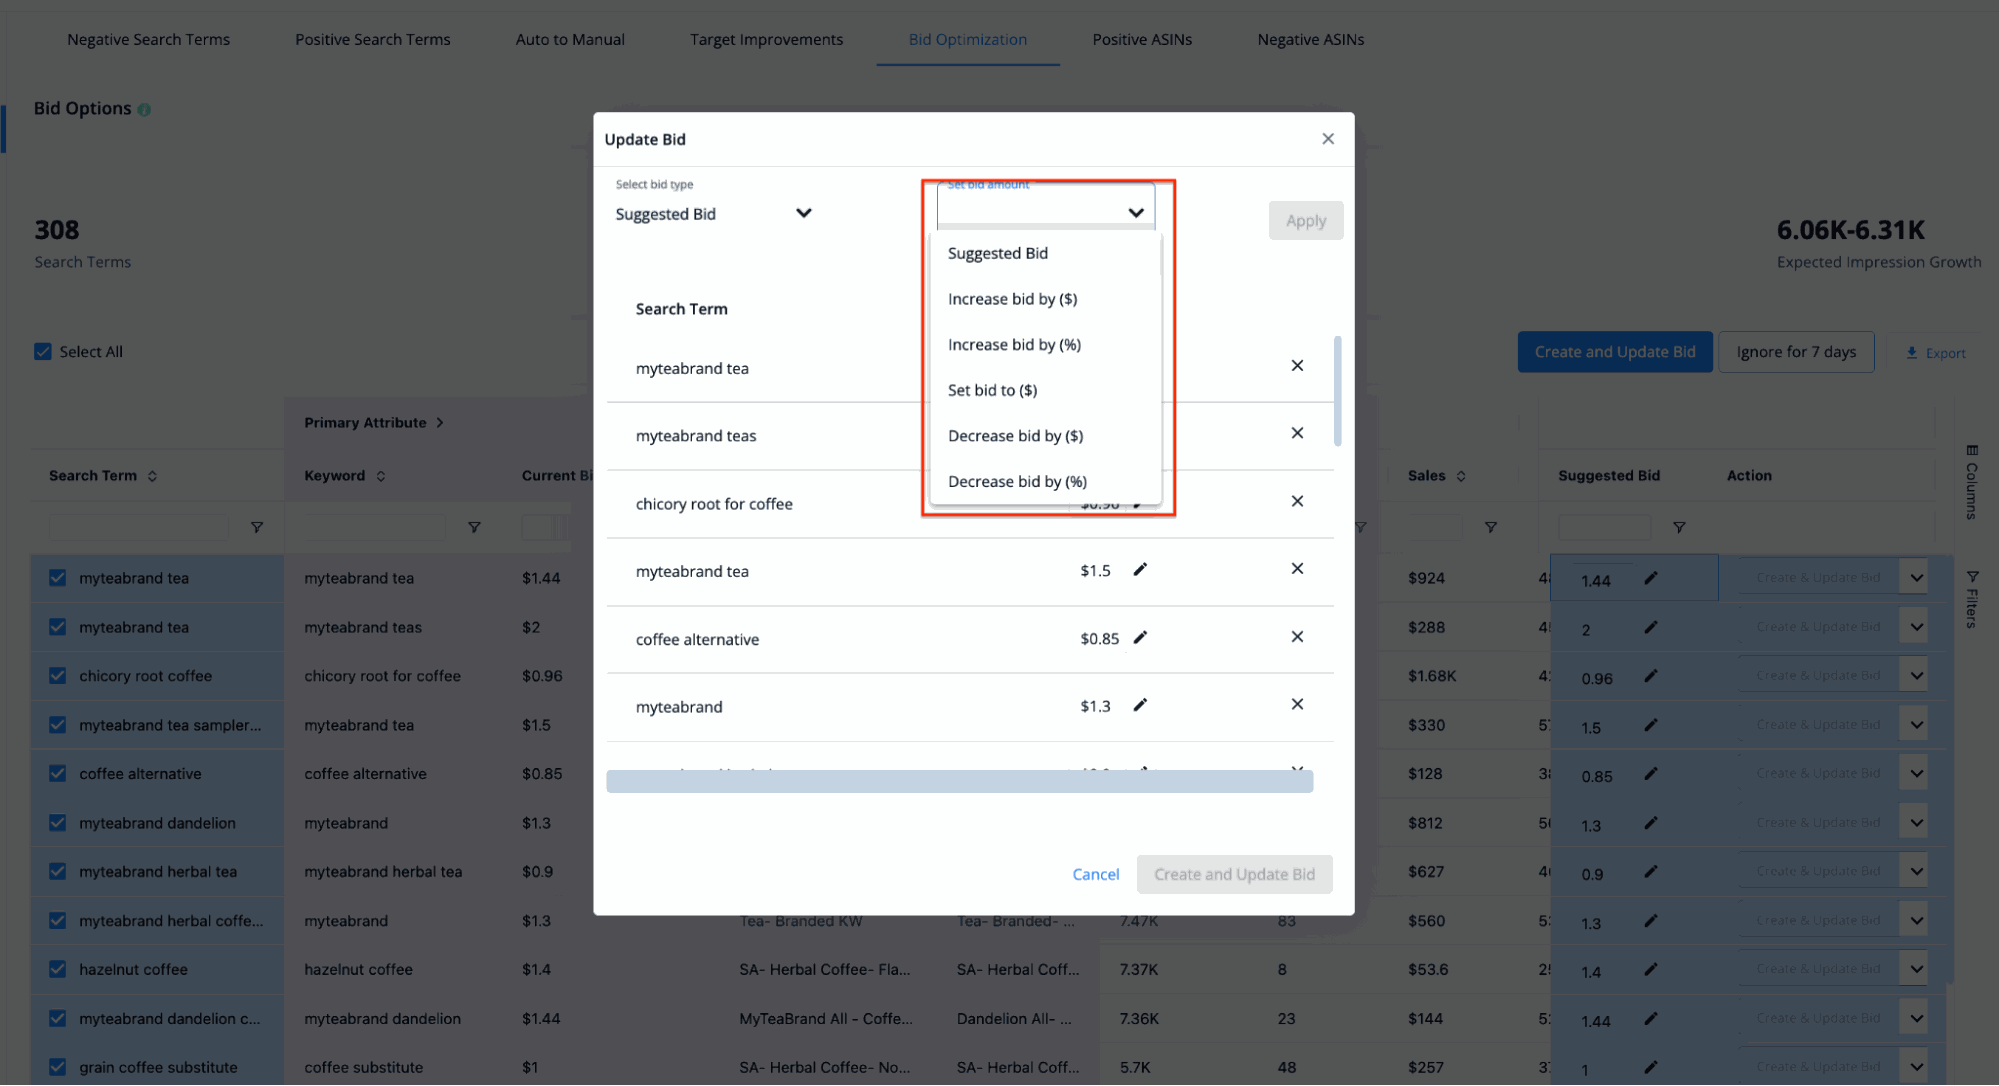
- The bid rules consist of the following options:
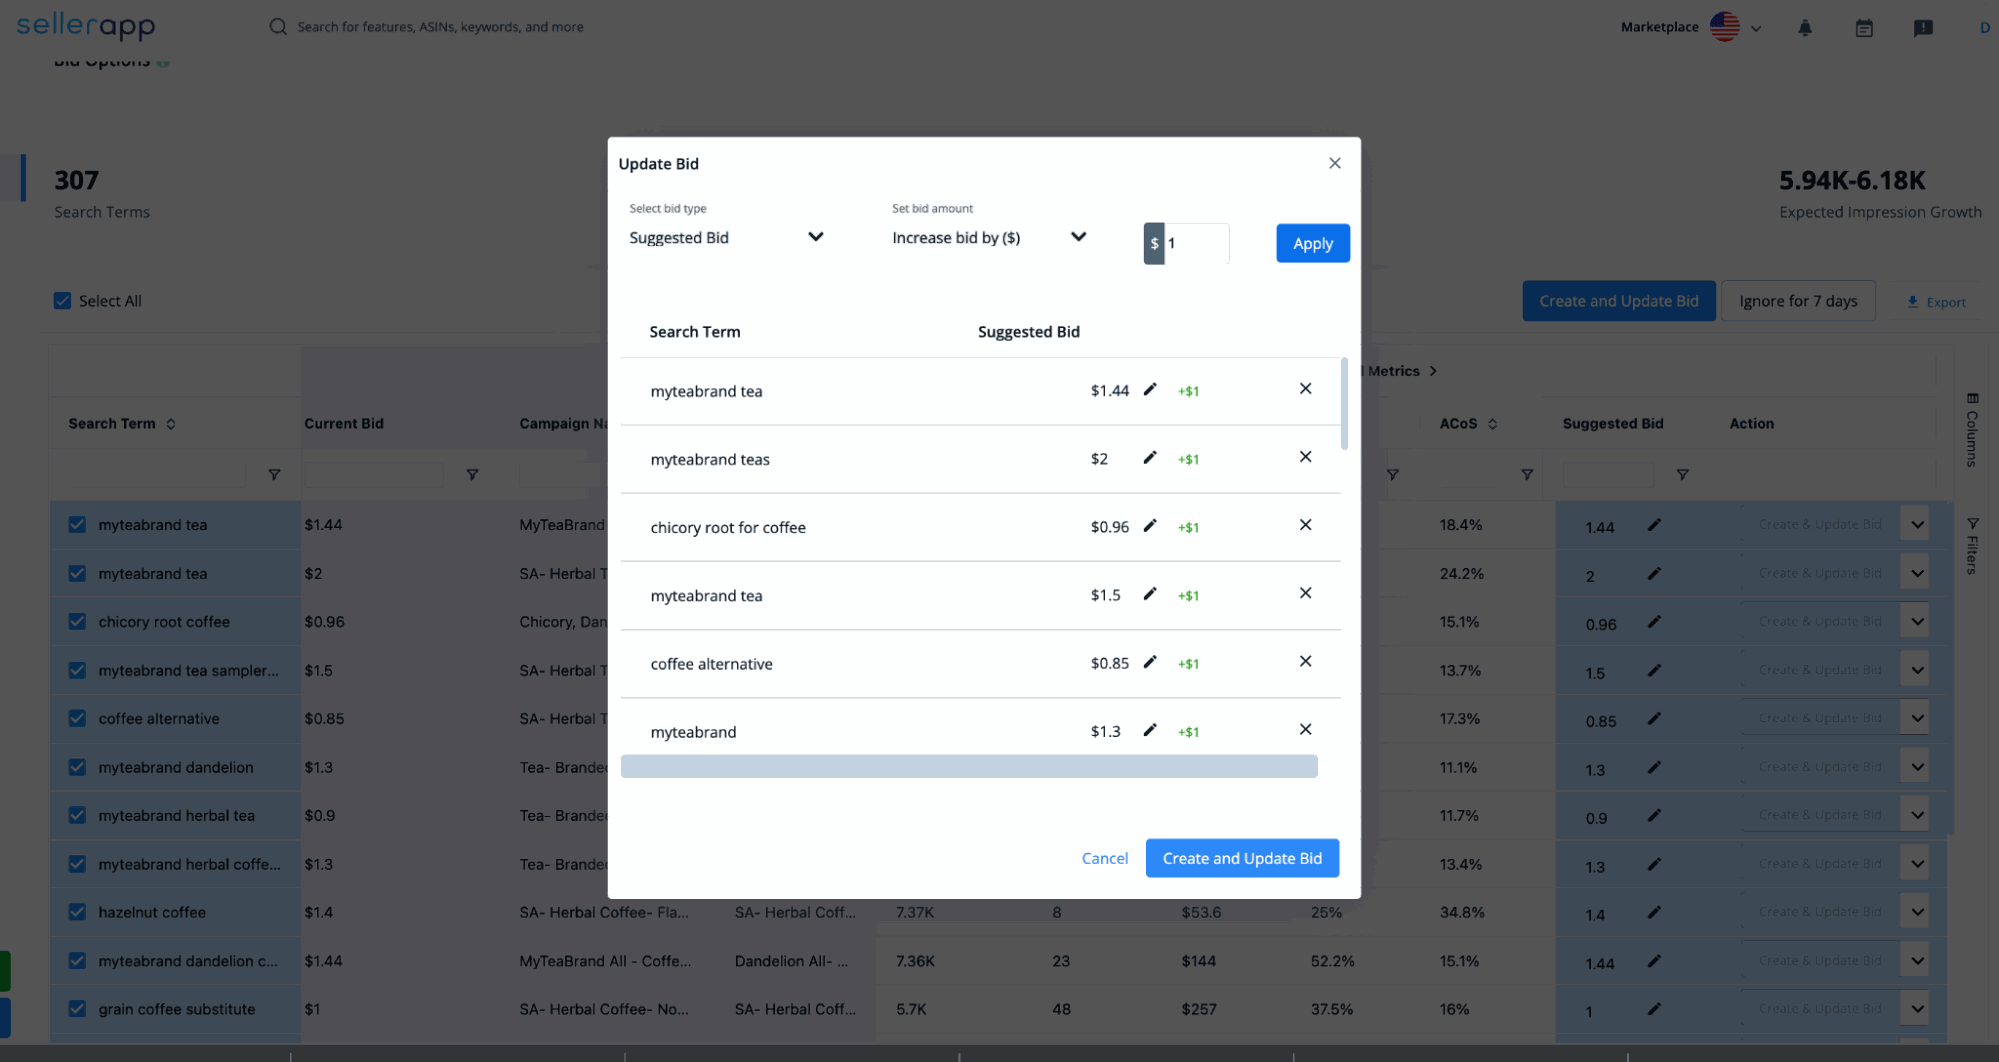
- Increase bid by ($): This option will increase the bids for all search terms by the amount that you specify on the top of the suggested bid.
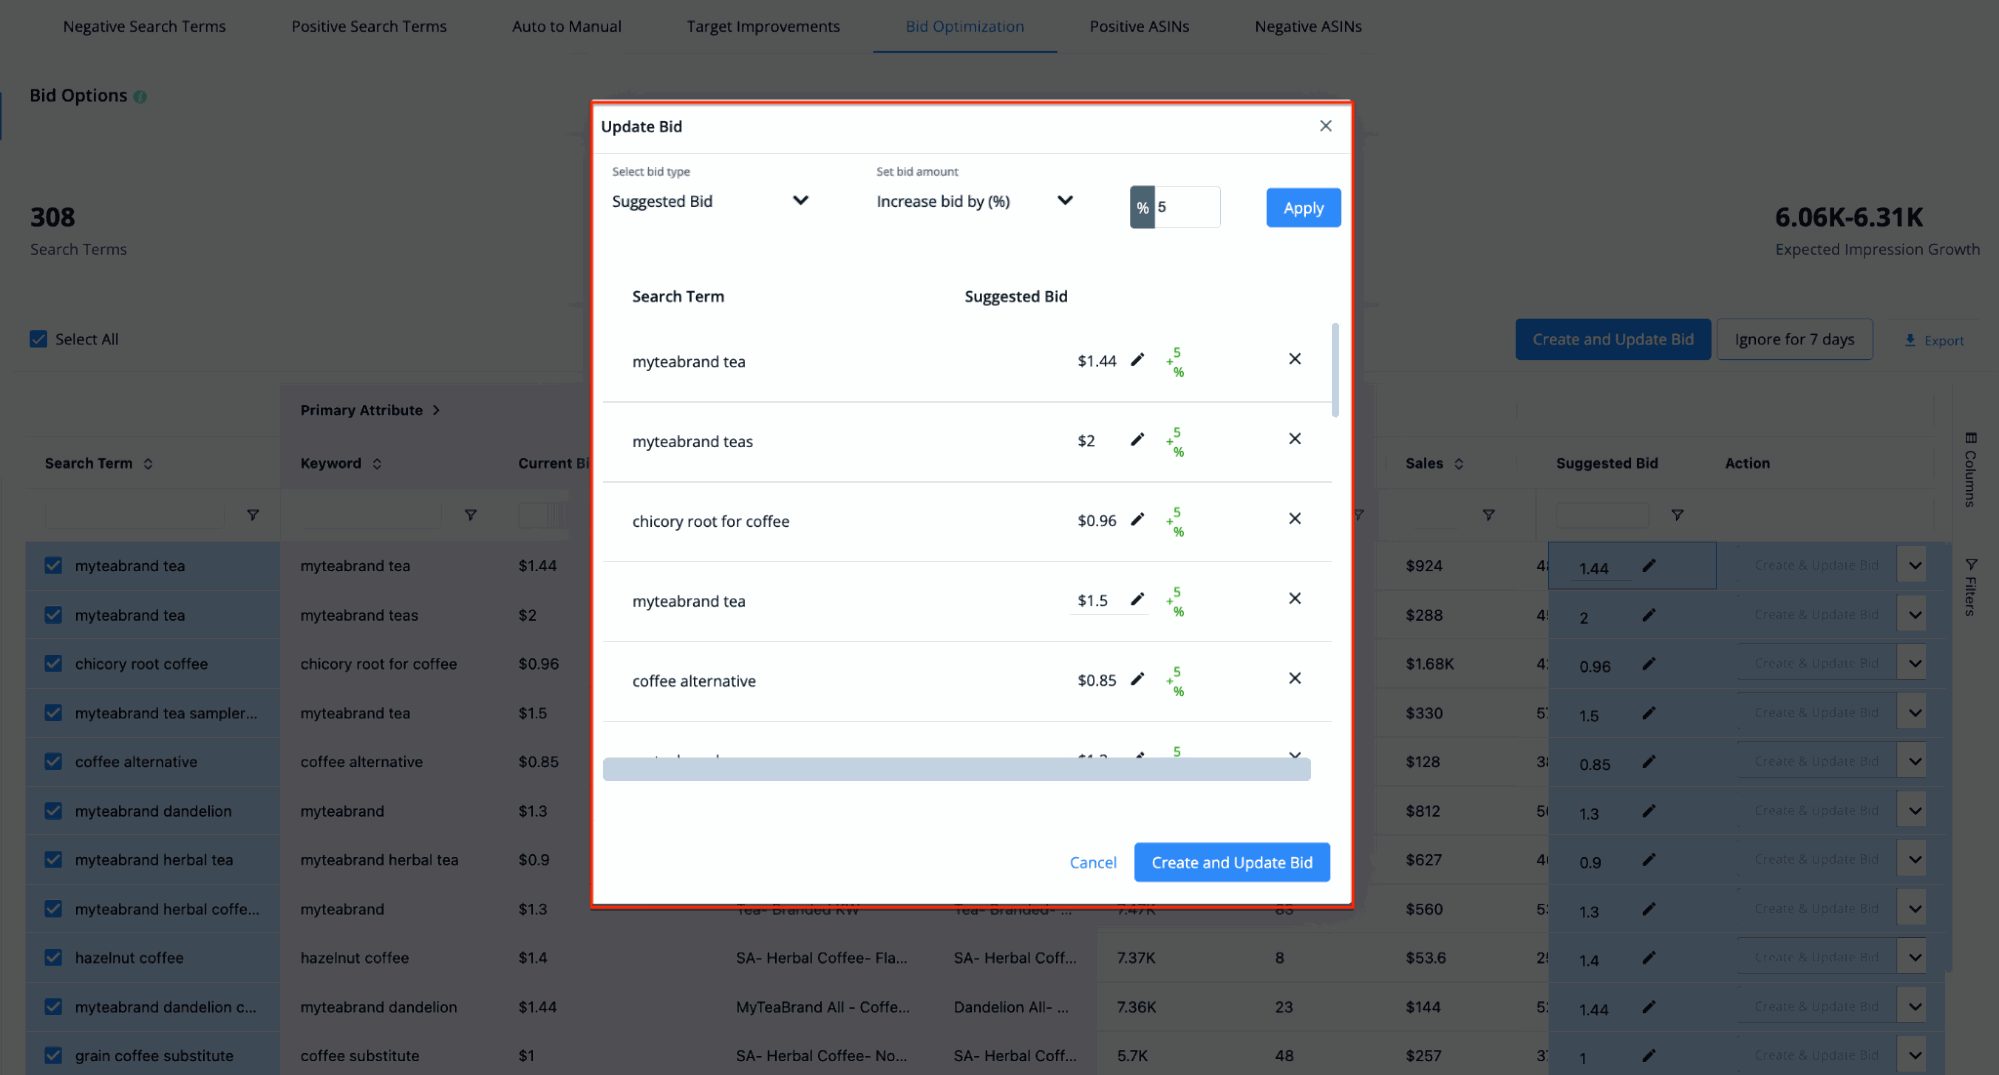
- Increase bid by (%): This option will increase the bids for all search terms by the percentage you specify on the suggested bid.
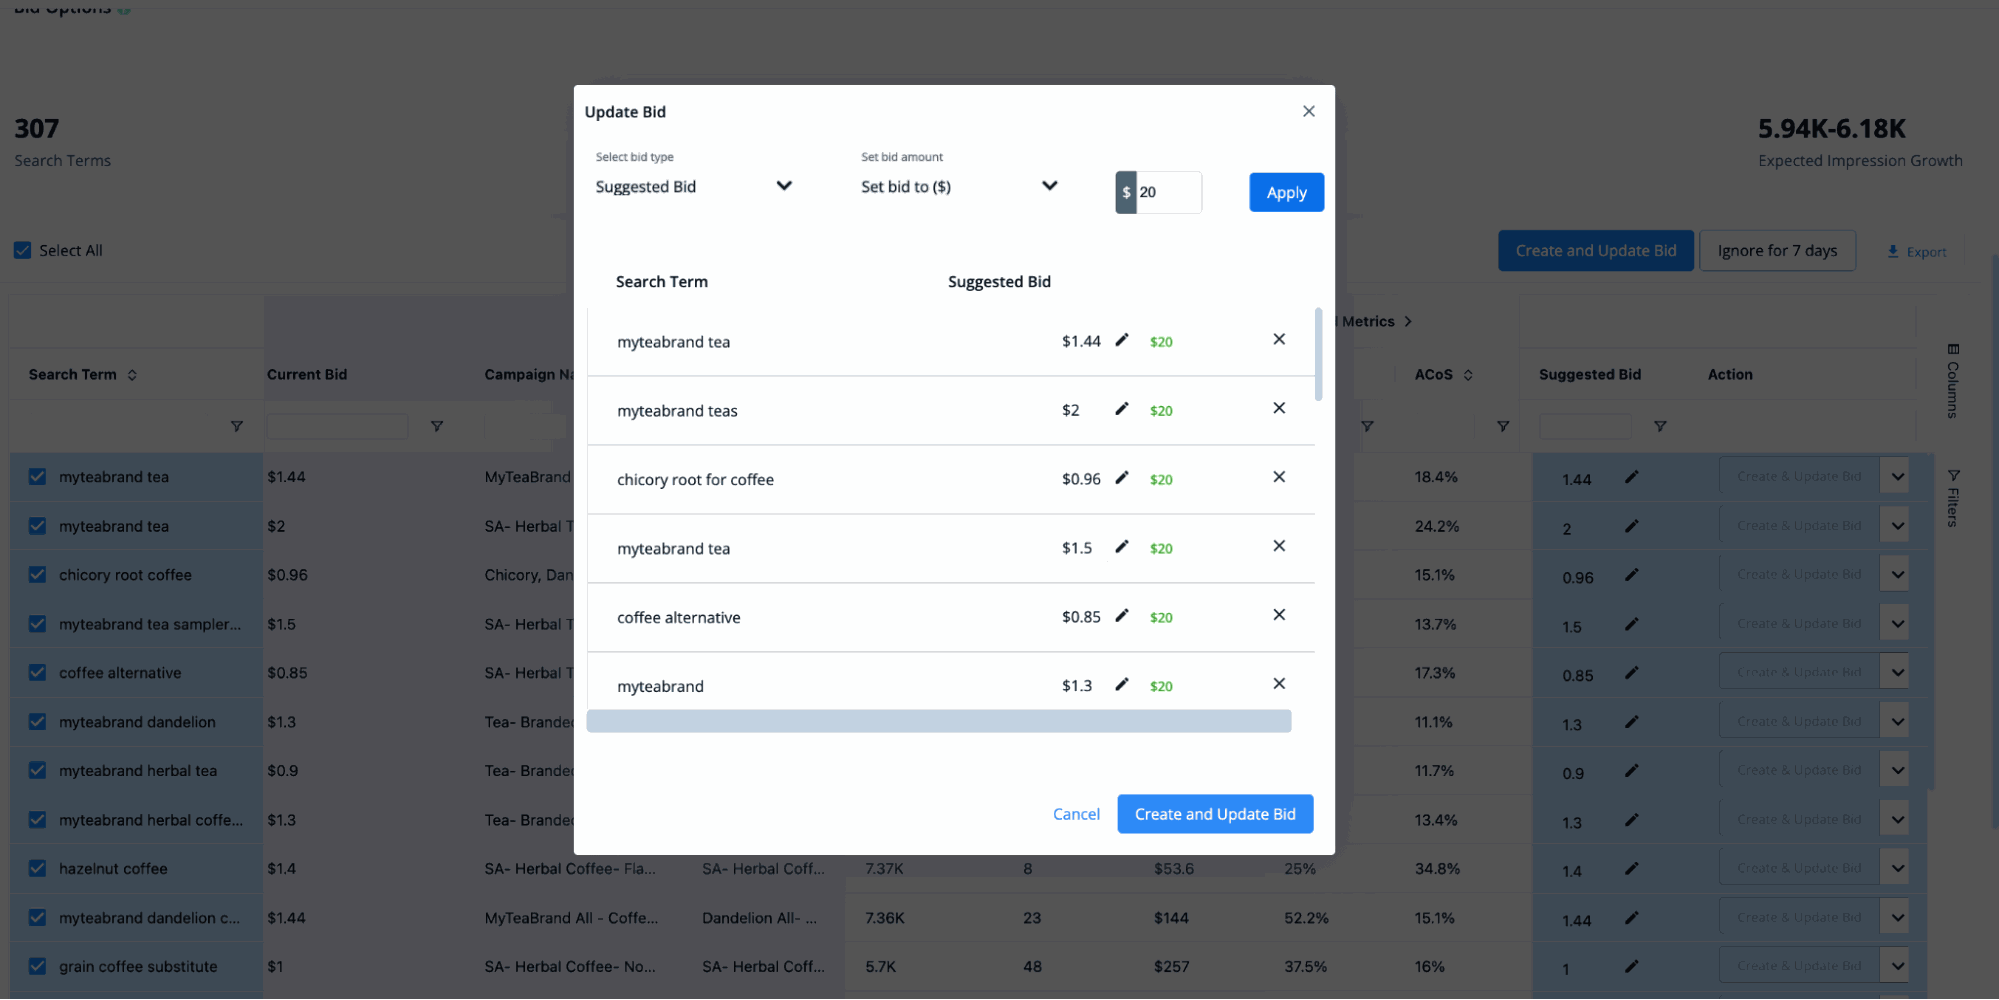
- Set bid to ($): This option will set a new bid for all search terms to the specified amount.
- Decrease bid by ($): This option will reduce the bids for all search terms by the amount you specify from the suggested bid.
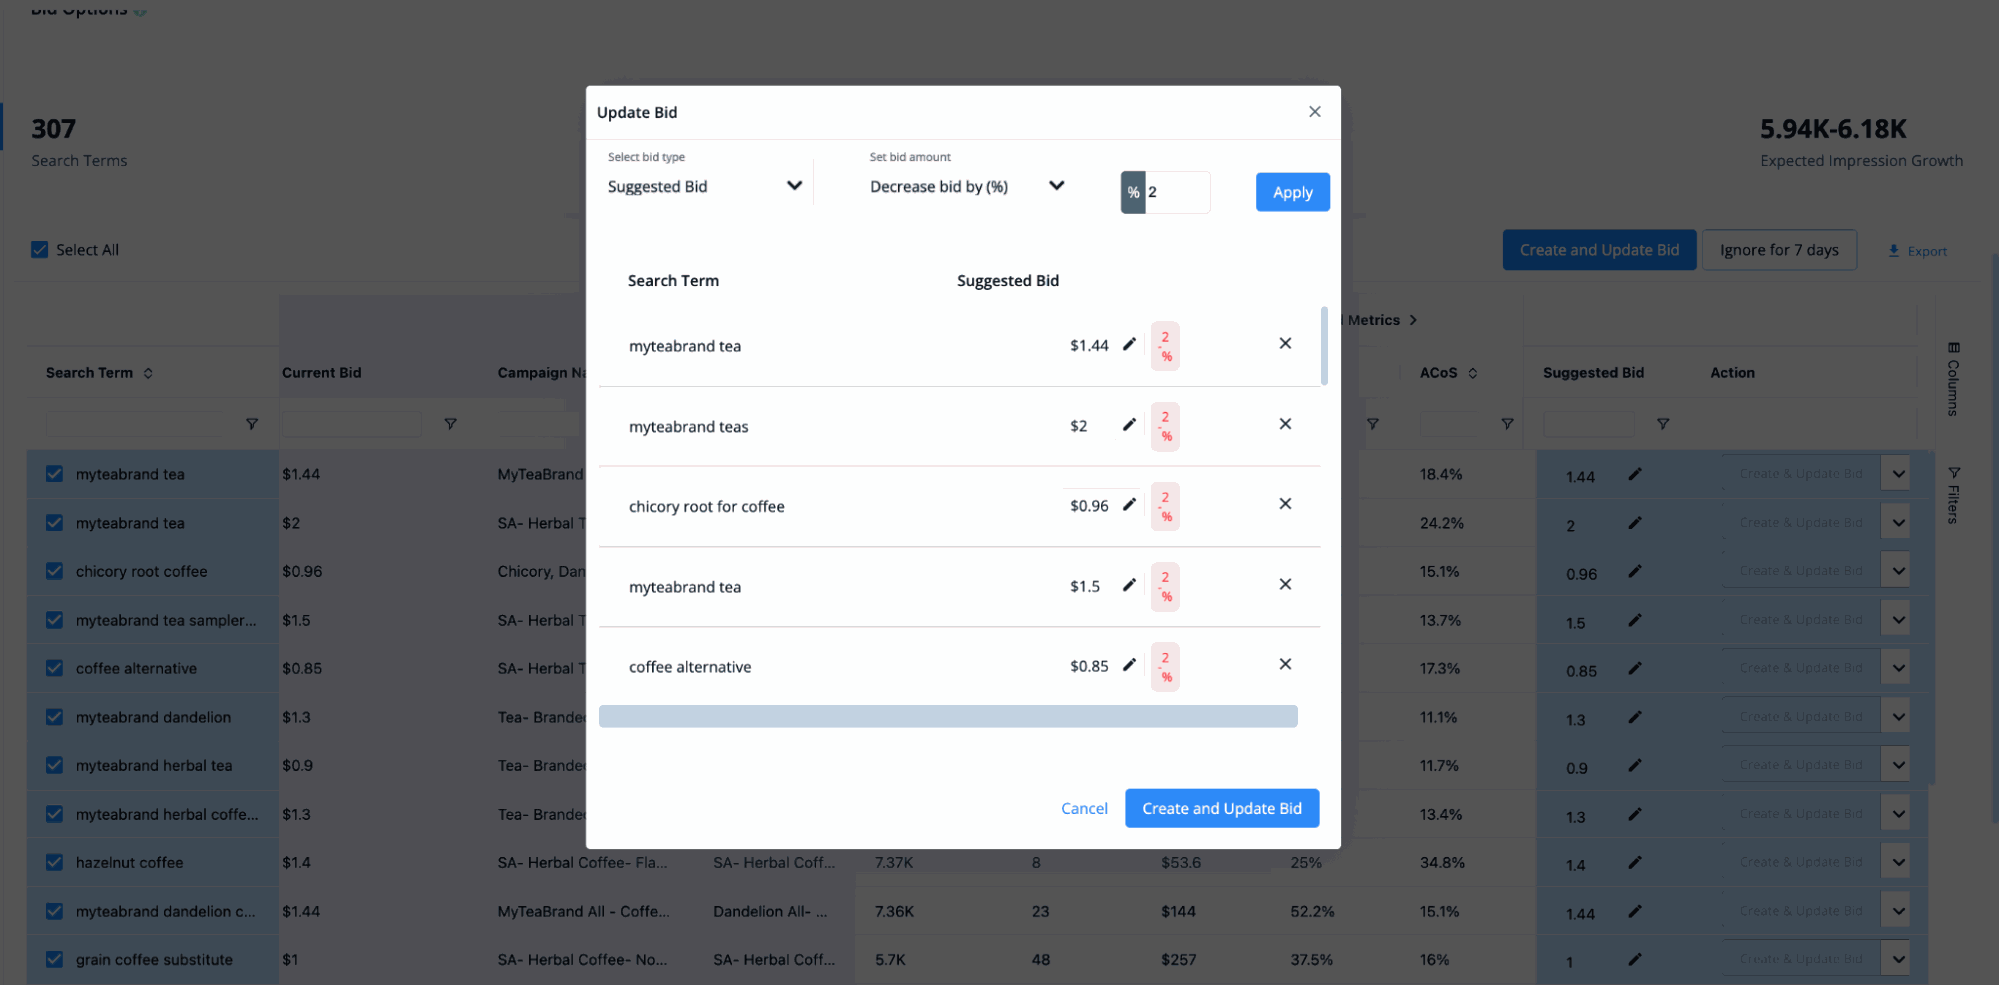
- Decrease bid by (%): This option will reduce the bids for all search terms by the percentage you specify from the suggested bid.
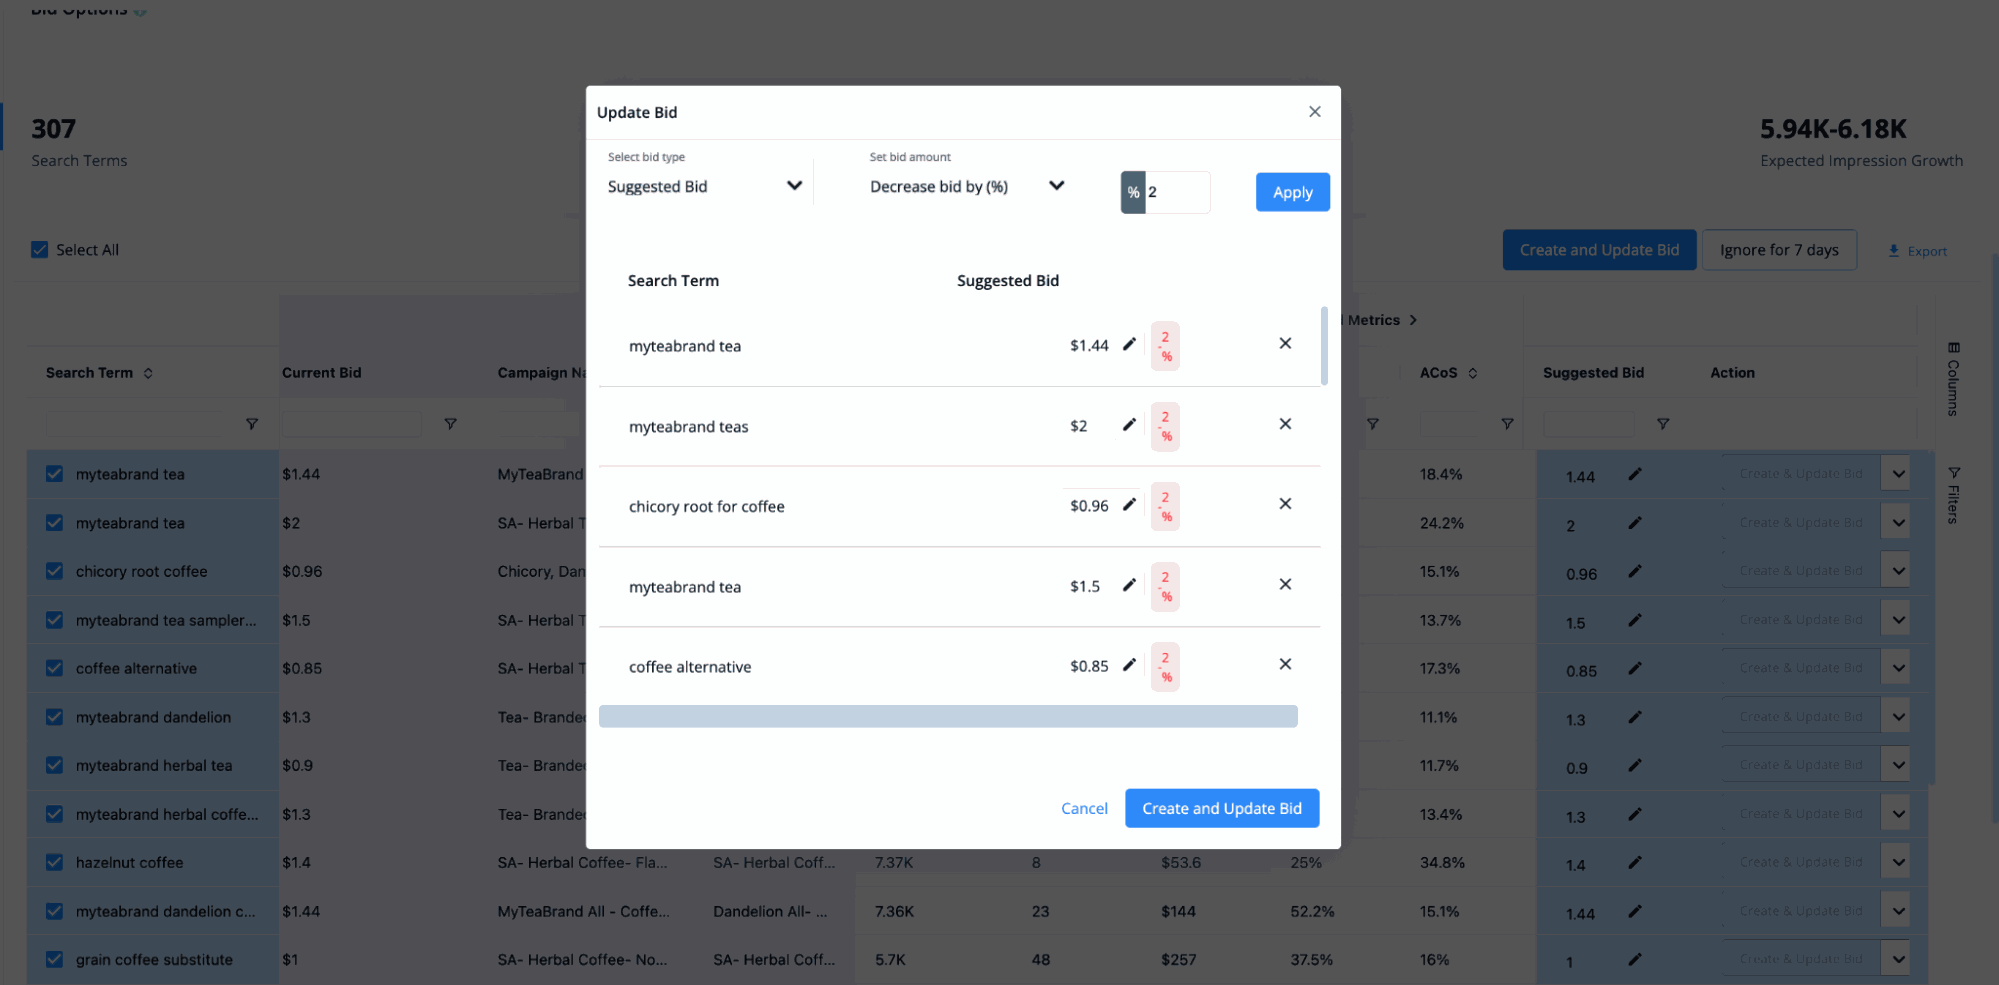
- Enter the desired bid or rule value and click on “Create and Update Bid” to save the new bids for all selected keywords.
- Furthermore, within the same pop-up window, an additional option is available to set custom bids for each search term.
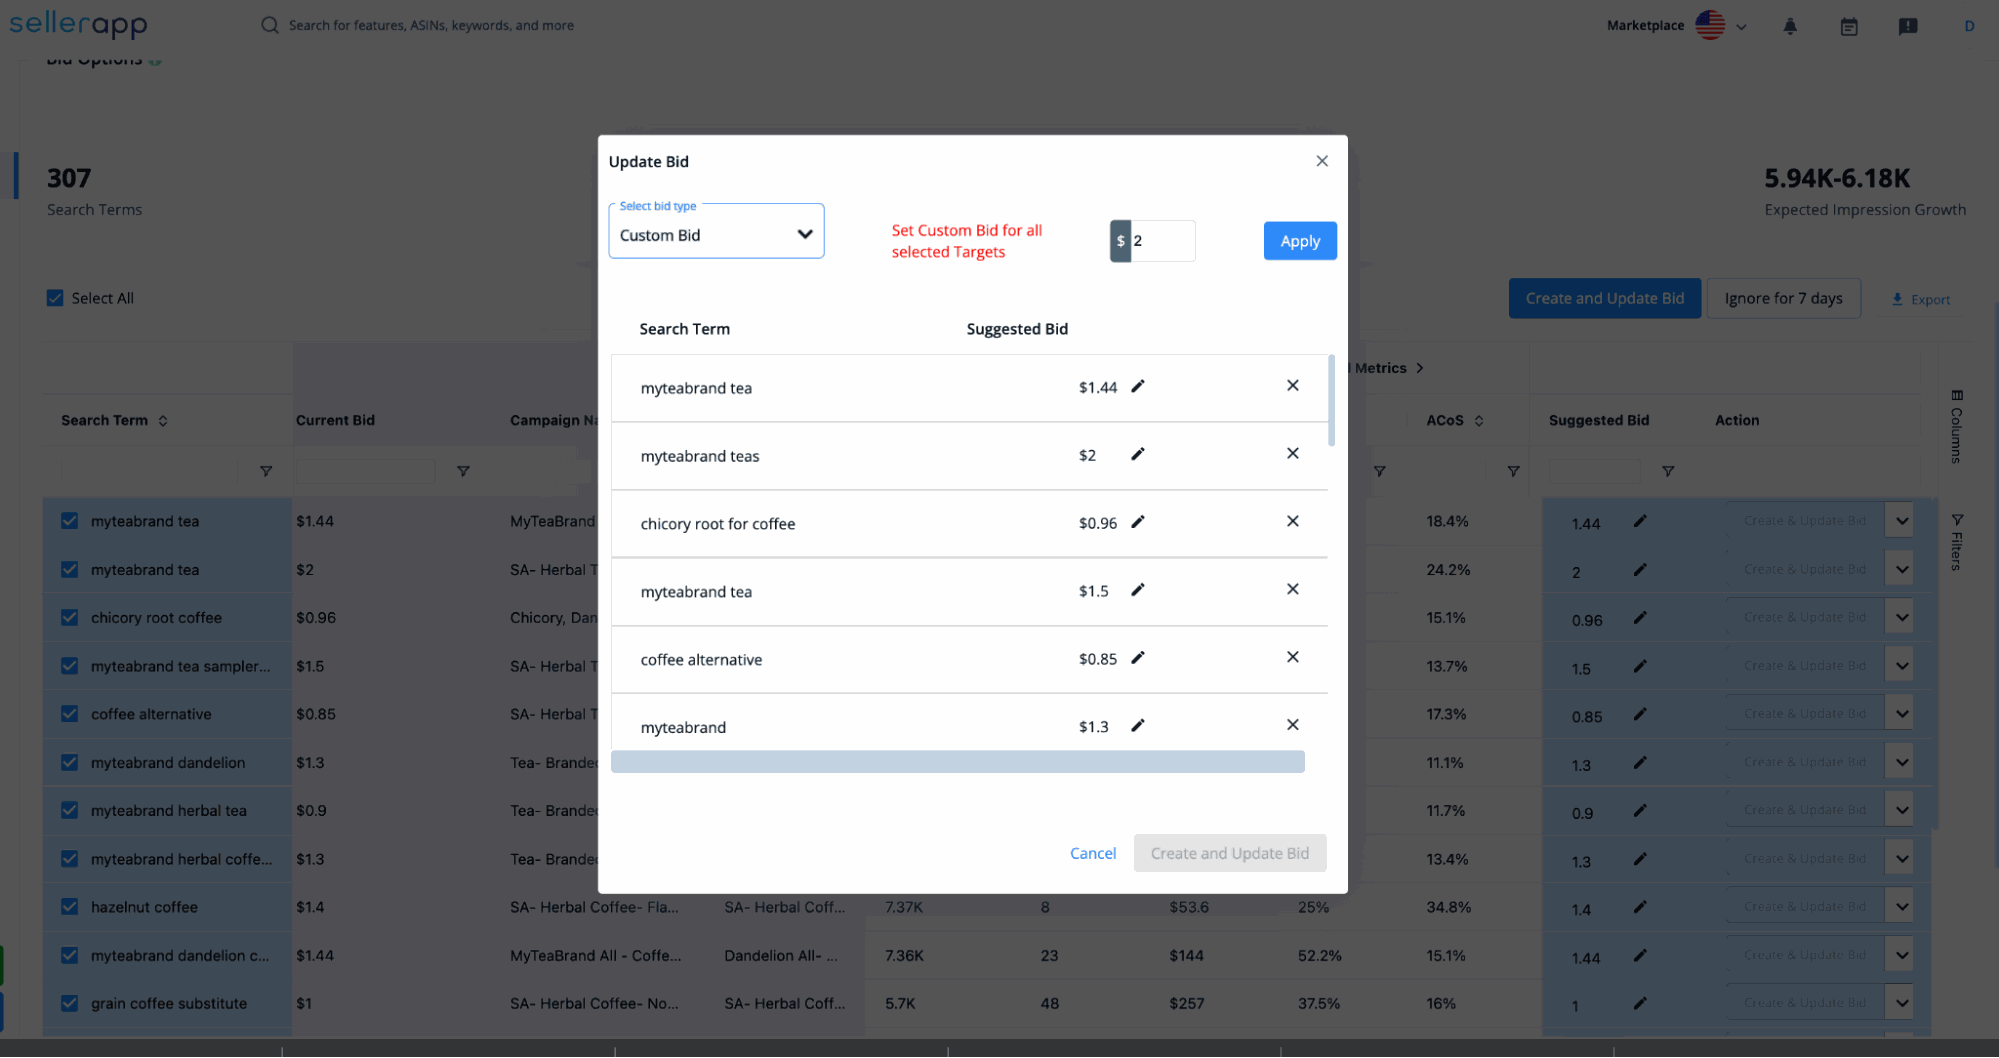
- Simply select “Custom Bid” from the “Select bid type” drop-down menu, add custom bids for each search term, and then click the “Create and Update Bid” option to apply the new bids to the search terms. This option gives you better control over the bidding strategy and helps you reduce ACoS further.
Positive ASIN
The positive ASIN feature is pretty similar to the positive search term tool, the only difference being these are product targeted instead of keyword targeted.
Positive ASIN tool helps you identify the ASIN that generates the most sales for you within your niche.
You can track these ASINs to see the organic ranking improvement of these products and, in the end, reduce ad spends on these products.
The key insights you’ll get here are:
- ASIN
- Campaign name
- Ad group
- Impressions
- Clicks
- Sales
- Spend
- Orders
- CPC
- CVR
- CTR
- ACoS
Tracking a product is easy. Just click on the “Track ASIN” button on the right-most column to track a product.
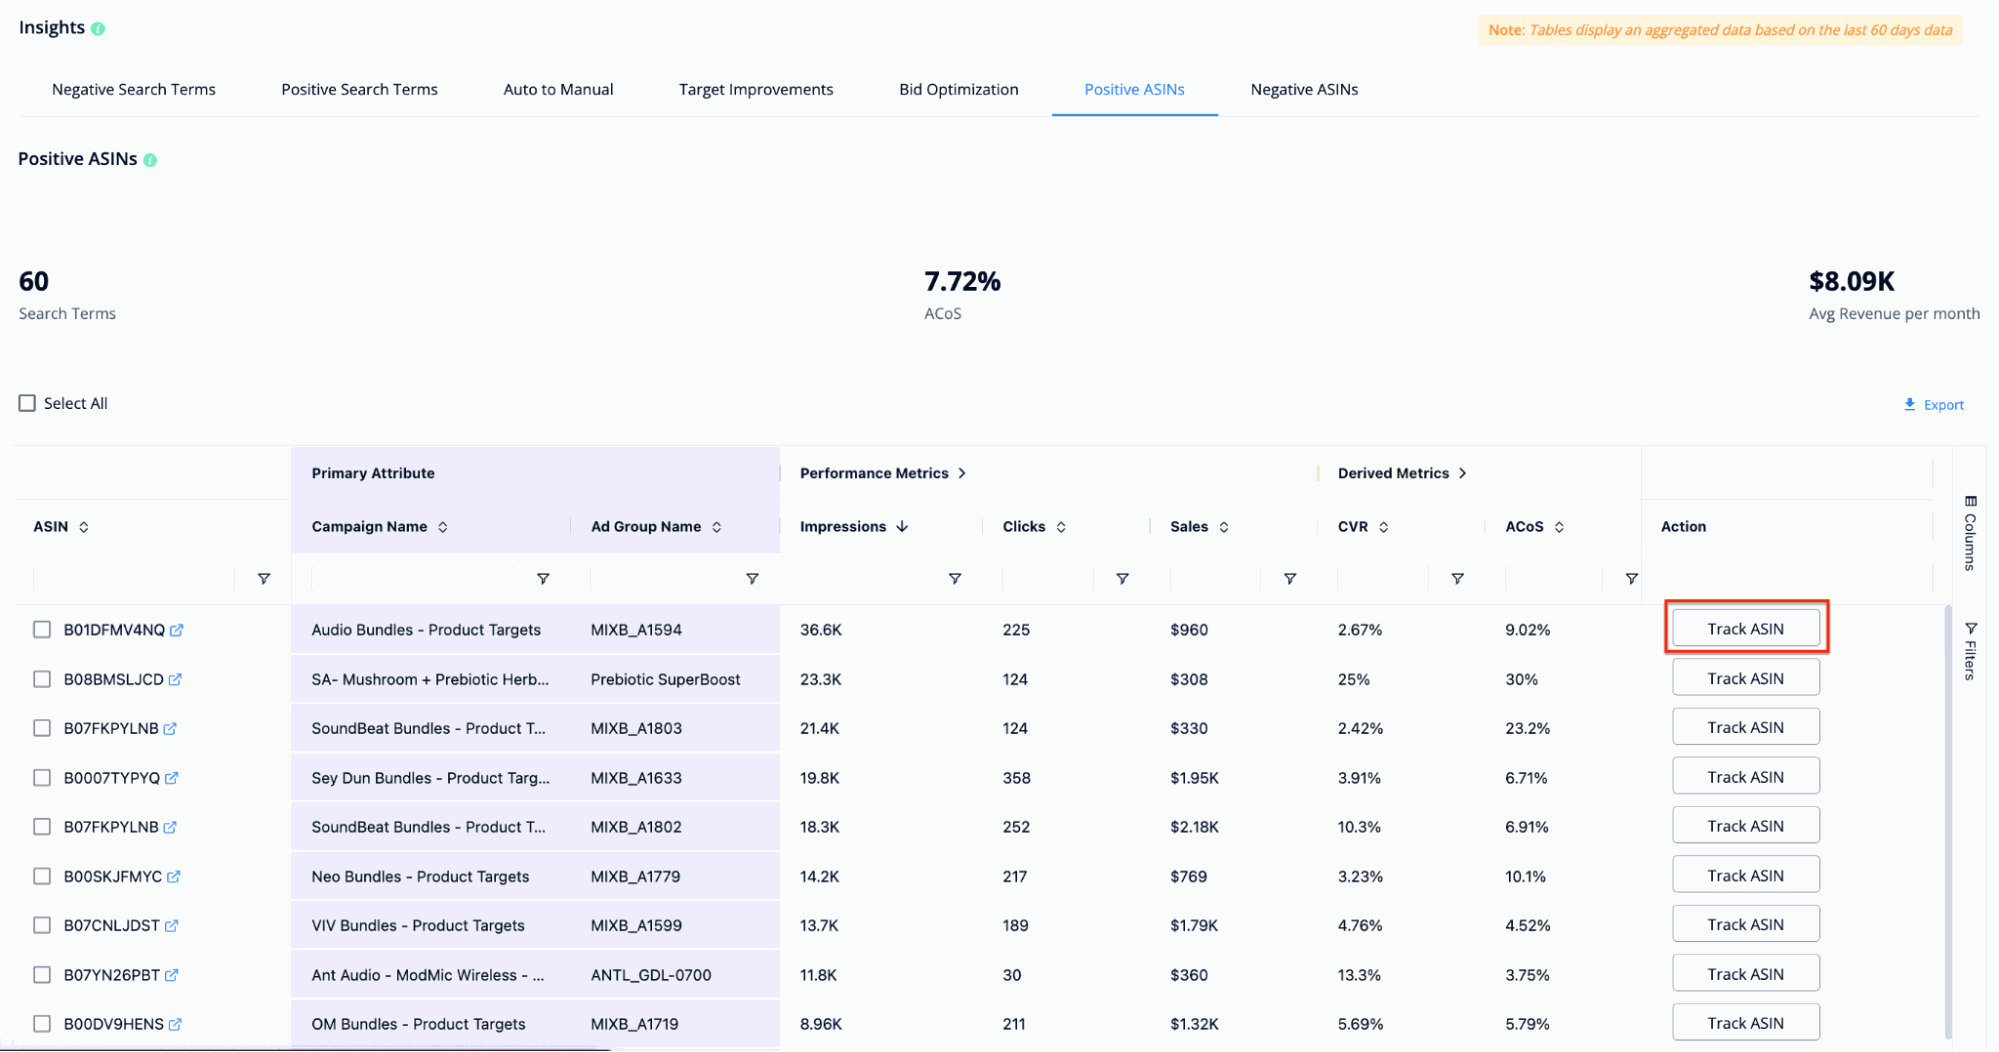
If you want to bulk-track all the products,
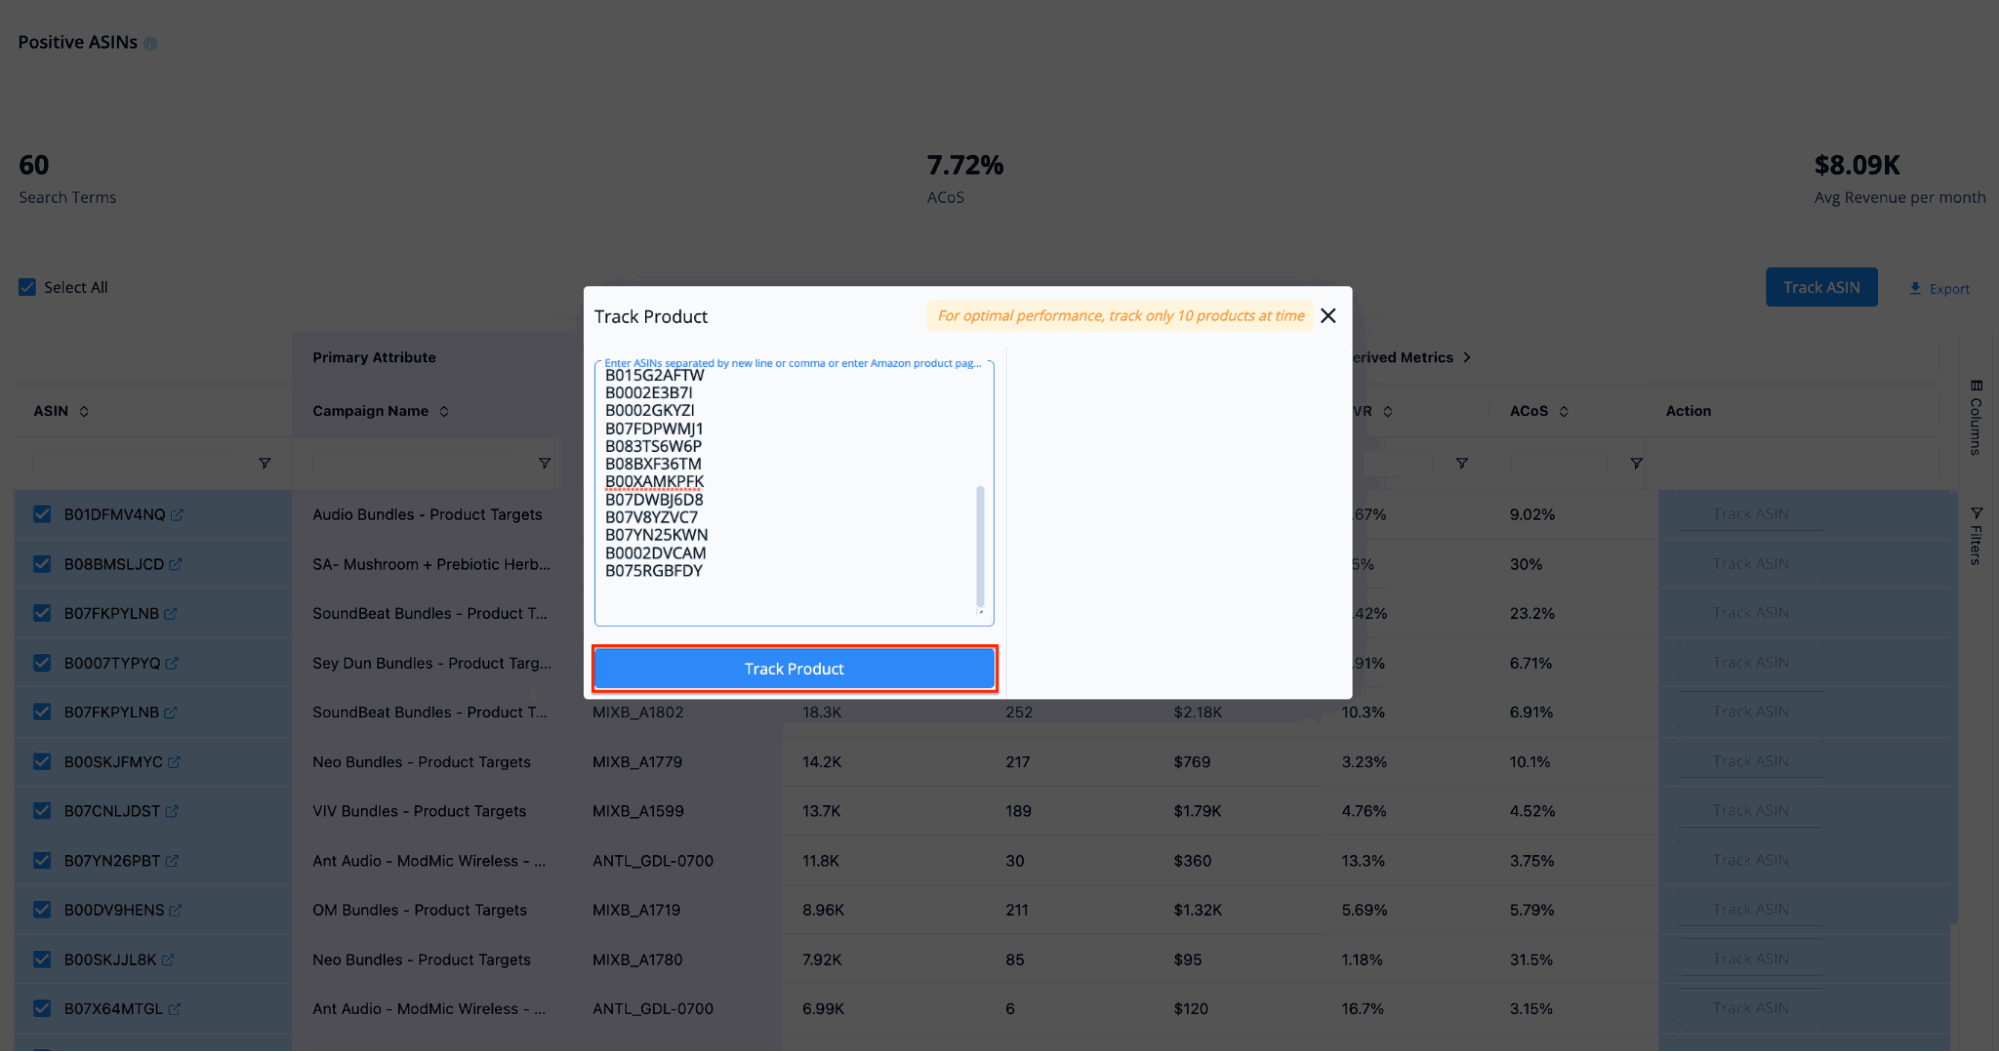
- Click on the “Select all” checkbox on the top left of the ASIN list.
- Click on the “Track ASINs” button in the right corner, then click “Track products” in the pop-up window, and SellerApp will start tracking all your products.
Negative ASIN
Negative ASINs are the exact opposite of positive ASINs. These products don’t generate any sales for your campaign and waste the ad budget.
To prevent your ads from running on these products, you can add them as negative ASINs in your campaign. This will eliminate unnecessary spending and help optimize your ad performance.
To see the current monthly wasted ad budget, look for the figure in the top right-hand corner.
The key insights you’ll get here are:
- ASIN
- Campaign name
- Ad group
- Impressions
- Clicks
- Sales
- Spend
- Orders
- CPC
- CVR
- CTR
- ACoS
To convert a product into a negative ASIN, follow these steps:
- Click on the “Mark Negative” button in the right-most column for the ASIN.
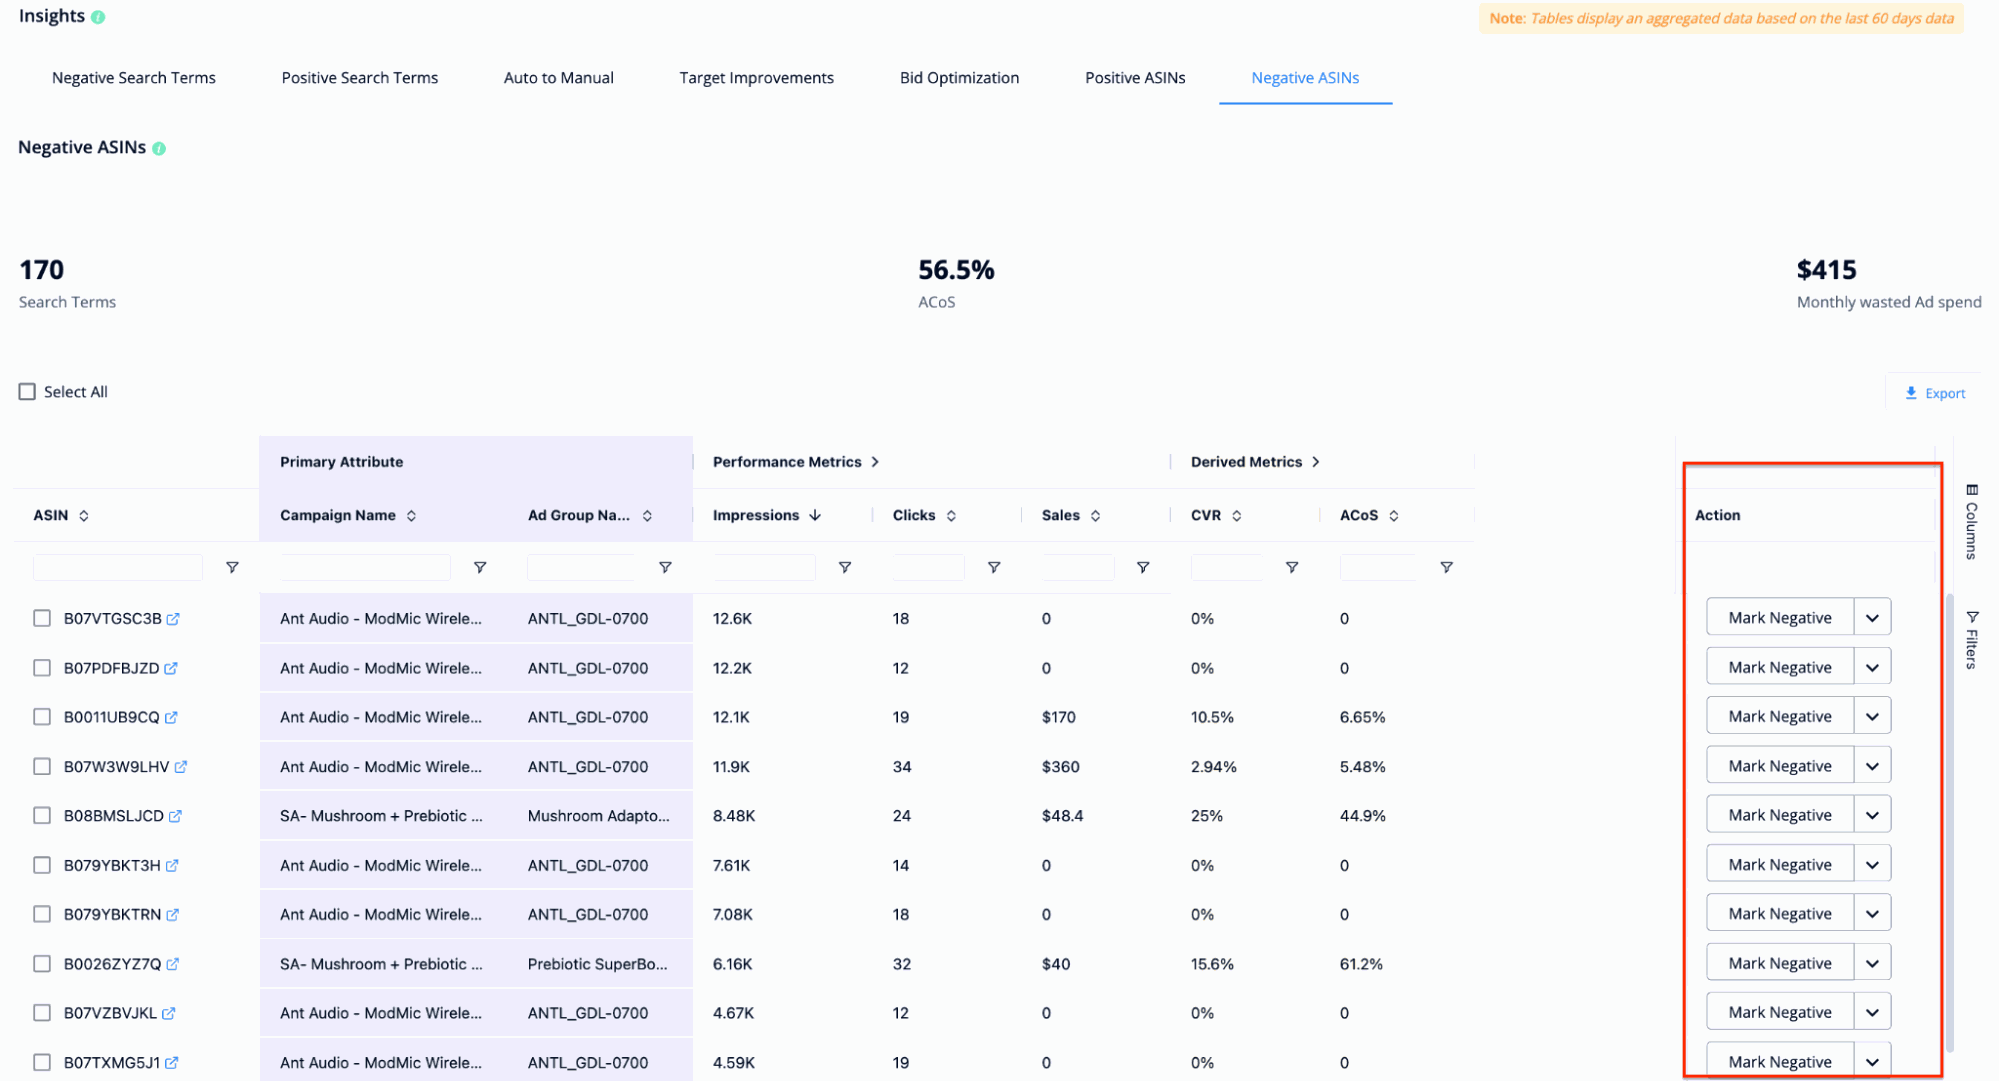
- This will automatically mark the ASIN as negative for the corresponding ad group in the campaign.
If you want to convert all of your products to negative ASINs, follow these steps instead:
- Click on the “Select All” checkbox in the top left corner, and then click on the “Mark Negative” button in the top-right corner.
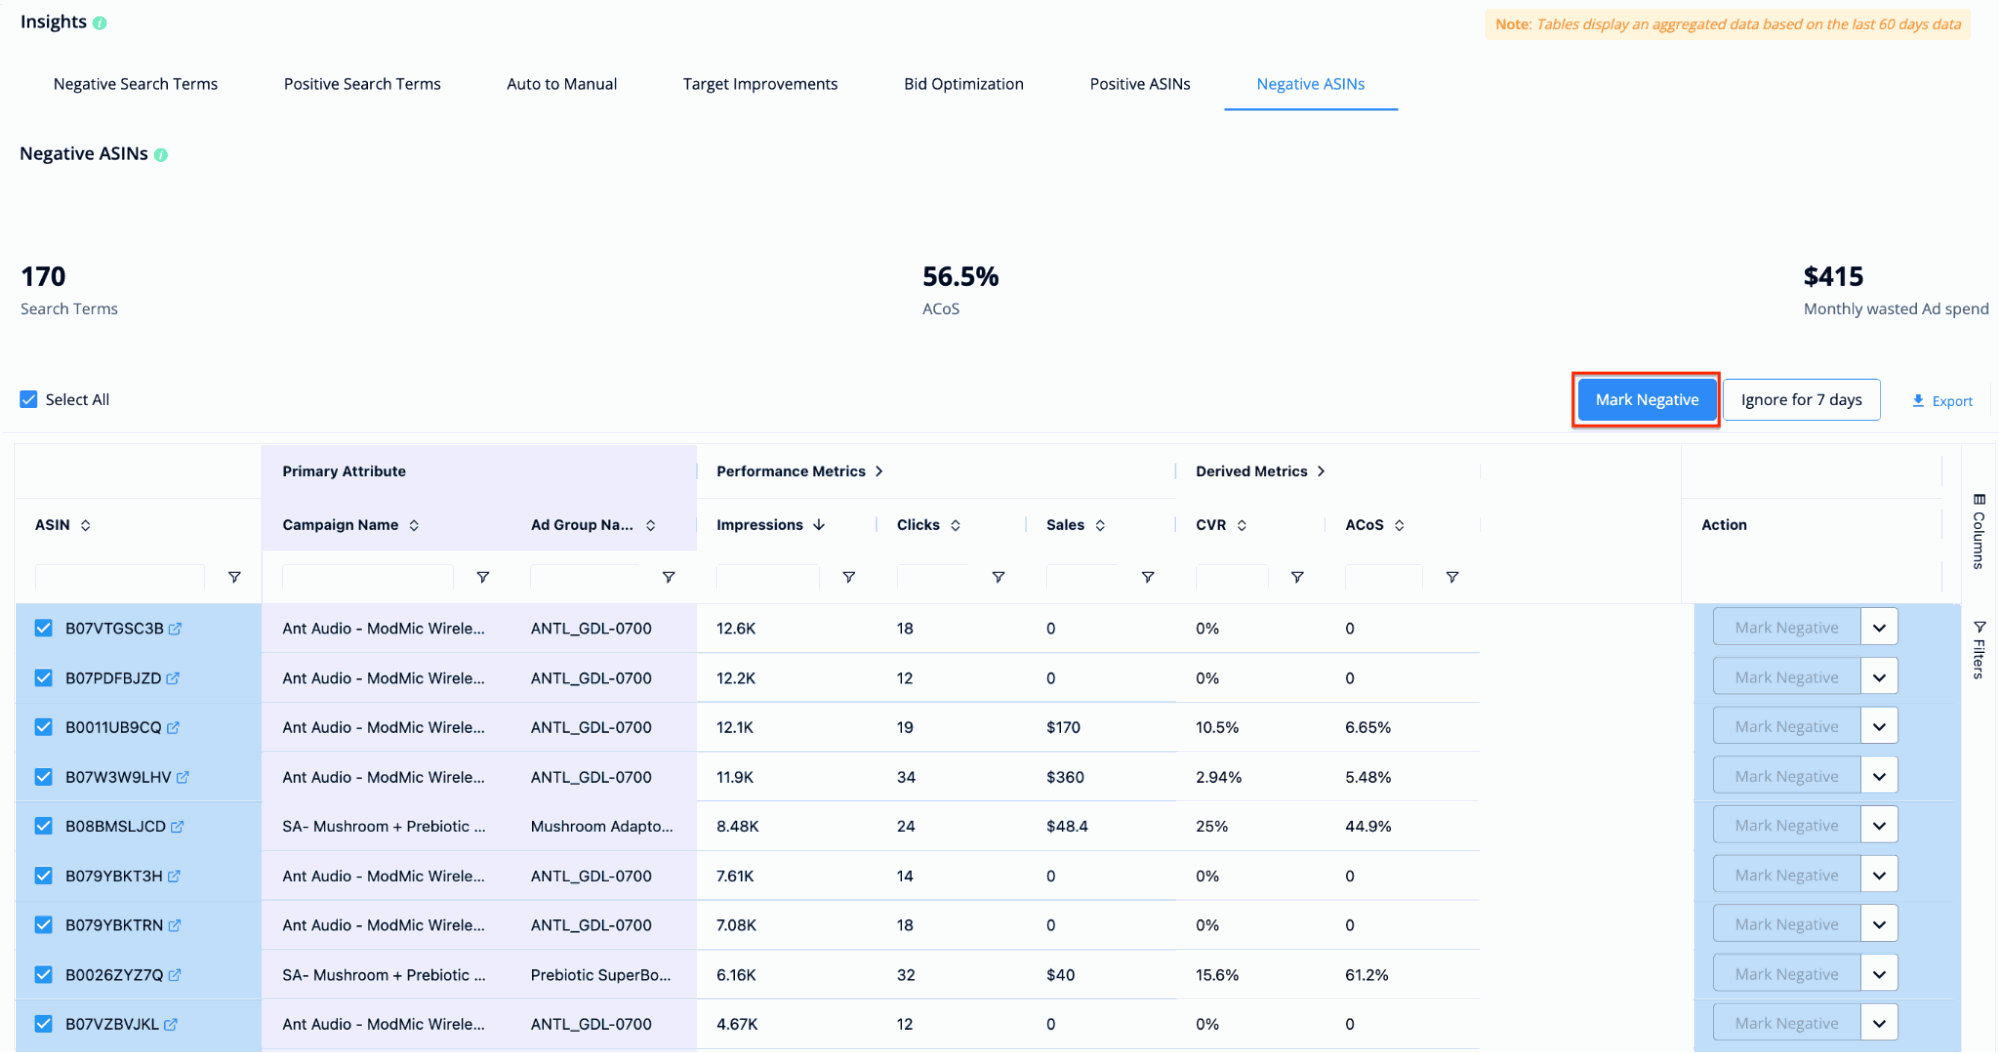
This will automatically add all selected ASINs as negative ASINs in your campaigns.
Learn more about Amazon Automation from the following guide.


