How to Create an Amazon Product Listing That Customers Can’t Resist
Congratulations!
You successfully chose a product with high demand and low competition to sell.
Now, the next step is to determine the best platform where customers can easily find and purchase your product.
Luckily, Amazon is the ideal solution!
With 163.5 million prime users in 2022, it’s the leading e-commerce platform with over $600 billion in retail sales.
And millions of sellers successfully grew their e-commerce business by creating product listings on Amazon.
However, starting on Amazon can be overwhelming. The details involved in creating an Amazon listing can confuse a lot of new sellers.
But don’t worry; We are here to help you create your first Amazon product listing with this step-by-step guide.
Let’s get started, shall we?
Here is a quick peek at the article:
- What is an Amazon product listing page?
- Step-by-step instructions to create a new product listing on Amazon?
- How to list products on Amazon in bulk?
- How to list a product that is already existing on Amazon?
- Why is your new listing not visible on Amazon?
- What to do if your new listing is not visible on Amazon?
- Final Thoughts
What is an Amazon product listing page?
The Amazon product listing is a webpage where shoppers evaluate and purchase your product.
It includes all the details about the product, such as its title, description, features, pricing, images, and other important information, like reviews, ratings, and customer questions, to help customers make better purchasing decisions.
Therefore, properly listing products on Amazon can help you grow your e-commerce business faster.
A step-by-step guide to creating an Amazon listing for new products
Creating a high-performing Amazon product listing is not complicated. Just follow these steps, and you’ll have your product listing up and running in no time!
Conduct keyword research
Even before creating the product listing, compile a comprehensive list of keywords that people search on Amazon to find your product.
Put yourself in the shoes of the customer. What words they’d use to search for your product?
Use tools like SellerApp keyword research and the Reverse ASIN tool to find all these relevant keywords for your product.
Put the seed keyword on the Keyword Research tool, sort the keywords based on relevancy and volume, and select the top 4-5 keywords from the tool to add to your listing.
Similarly, you can also analyze keywords in your competitors’ listings to find high-performing keywords.
Go to the SellerApp Reverse ASIN tool, and search with 3 of your competitors’ ASINs. Filter the results based on relevancy and search volume, and pick the top 4-5 keywords to add to your listing.
When creating your keyword list, consider long-tail and short-tail keywords.
Long-tail keywords are specific phrases that typically have a lower search volume and competition. However, they often lead to higher conversion rates.
On the other hand, short-tail keywords are search terms that have a higher search volume and competition. While they may attract more visibility to your brand, they also tend to have lower conversion rates.
These two types of keywords are necessary for a successful SEO strategy. Long-tail keywords allow you to target customers who convert, while short-tail keywords can help boost your brand’s visibility.
Log in to Amazon Seller Central
After you have the keywords, let’s start creating the listing.
Log in to Amazon Seller Central, open the left sidebar, and go to Catalog → “Add products.”
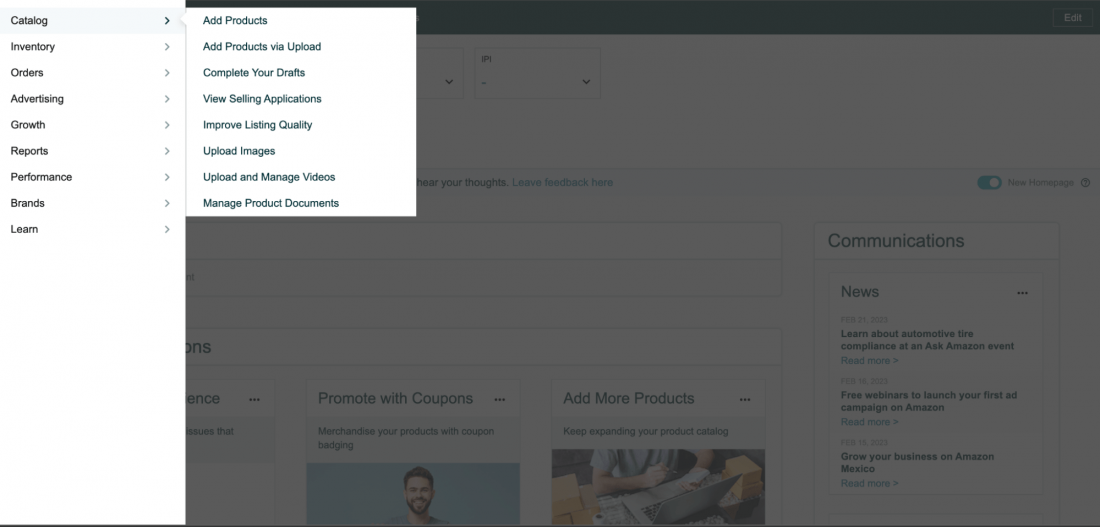
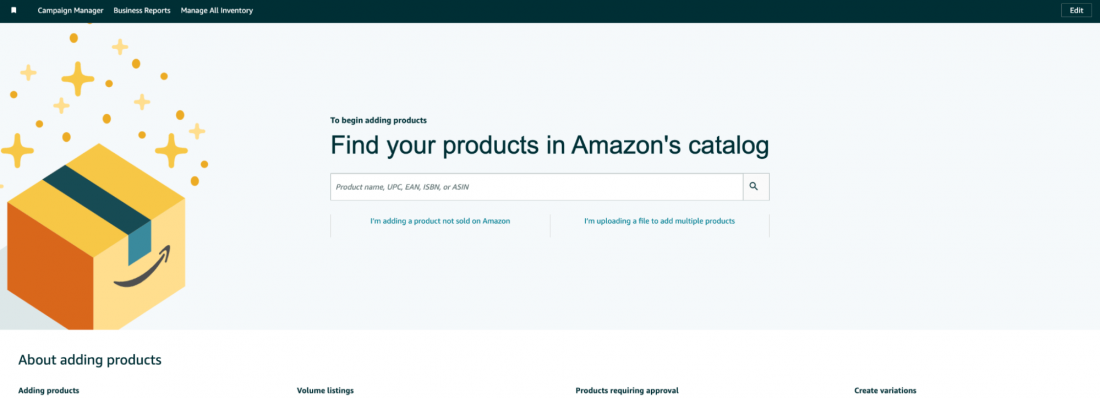
On the “Add Product” page, you have two options to choose from,
- “I’m adding a product not sold on Amazon.”
- “I’m uploading a file to add multiple products” option.
Choose the first option when you’re listing a new product and the second option to bulk upload products. This is particularly useful for business models like Amazon dropshipping or retail arbitrage.
Here we’ll choose the first option.
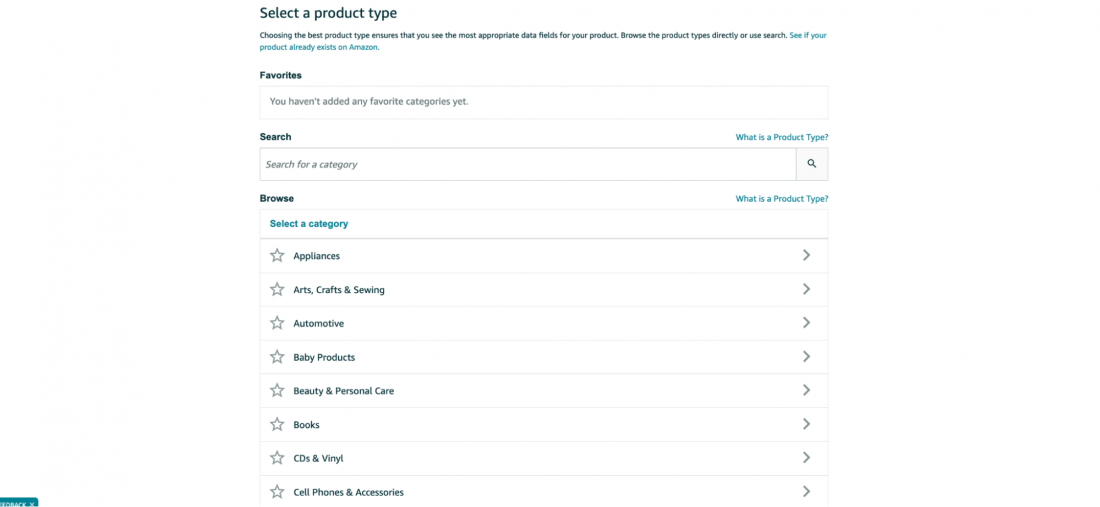
Select the product category and subcategories.
Next, choose the appropriate category and subcategory for your product. There are two ways to do that.
- Search method: Simply search your product type and choose the category that best suits your product.
- Manual method: Choose the parent category from the list, and find the subcategories that fit your product.
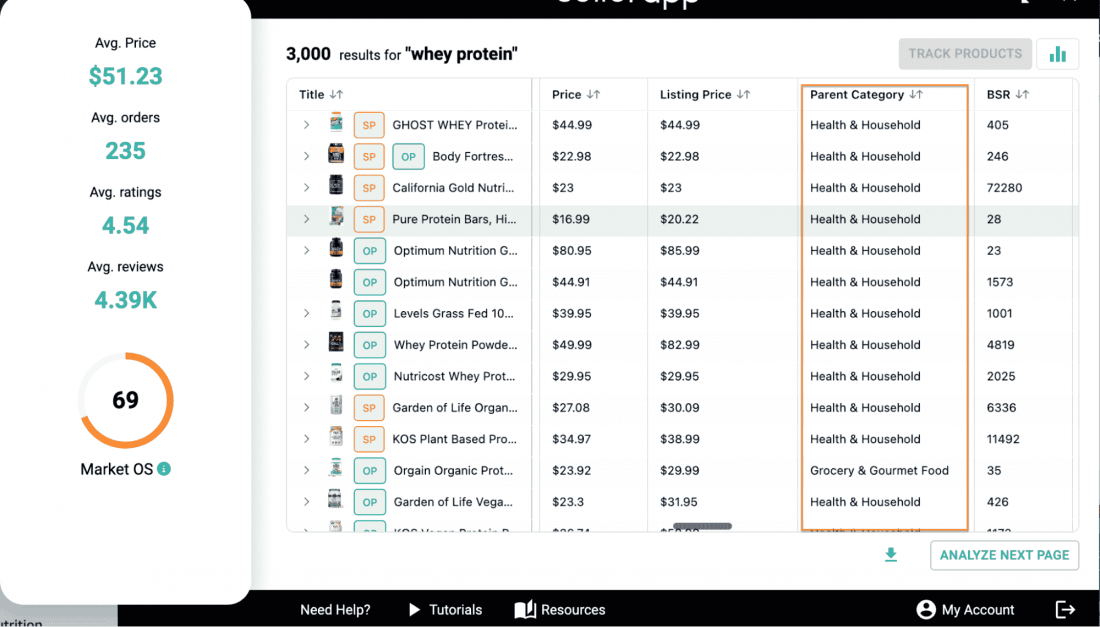
If you’re unsure about the product category, use the SellerApp Chrome extension to find out the category.
Go to Amazon, and search for your seed keyword. Next, open the SellerApp Chrome extension. You can see the categories with similar products in the “Product analyzer” tool.
Fill in the product information.
Now that categories are selected, it’s time to create the listing by filling up product details.
The listing information dashboard is divided into eight tabs:
- Product Identity
- Vital Info
- Offer
- Product Details
- Variations
- Images
- Keywords
Fill in the required details (indicated with red boxes) in all these tabs to create your product listing.
After all the details are filled in, click “Save and complete” to publish your listing on Amazon.
Now, let’s go over every tab to fill up the information.
Fill up the Product Identify information.
In the product identity tab, here are the details you need to enter:
Variations:
Variants are a group of similar products that only differ based on size, color, etc. Select ‘yes’ if you want to list different variants of this product. Select ‘no’ if you don’t have any variant of the products or wish to set up only one variant at a time, and group them later.
Item Name Guidelines (Effective January 21, 2025)
The product title is the first impression shoppers have of your product listing. Therefore, it’s incredibly important to enhance clarity, consistency, and customer confidence. Follow these updated guidelines to ensure you craft highly effective titles:
Key Considerations for Product Titles:
- Ensure you start the title with your brand name followed by your primary keyword. This practice helps Amazon generate accurate canonical URLs.Example: “Gillette Fusion Manual Refills Razor Blades, 8 Count”
- Always capitalize the first letter of each word, except for prepositions, conjunctions, or articles (e.g., “in,” “and,” “the”).
- Keep the product title between 80 and 200 characters, including spaces. Avoid unnecessary words or details.
- Include the brand name, primary keyword, one key benefit, and any relevant product details.
- Use numerals instead of spelling out numbers. For example “2-Pack” instead of “Two-Pack”.
- Avoid using these characters unless part of a brand name: !, $, ?, _, {, }, ^, ¬, ¦.
- Do not use the same word more than twice in a title. (Prepositions, articles, and conjunctions are exempt.)
- Do not include non-language ASCII characters like Æ, ©, or ®.
- Exclude phrases like “Hot Item,” “Best Seller,” or “Free Shipping Worldwide.”
- Hyphens (-), forward slashes (/), commas (,), ampersands (&), and periods (.) are acceptable.
- Use standard abbreviations for measurements: “cm,” “oz,” “in,” and “kg.”
- Include size and color in titles for child ASINs.Example: “Nike Air Max 270 Shoes, Black/White, Size 10”
Compliance and Updates
Starting January 21, 2025, all product titles must comply with these updated guidelines. Non-compliant titles can be reviewed and updated in Manage All Inventory. Brand owners will receive suggested title corrections in Review Listing Updates. You will have 14 days to make changes before automatic updates begin to occur.
Listings will stay active during this process.
Ultimately, by following these standards, your product titles will be clearer, more engaging, and optimized for customer searches.
This is the product title shoppers would see in the product listing. The key is to make sure the
Important Note: As mentioned earlier, always start the title with your brand name and your primary keyword, as Amazon will automatically generate canonical URLs based on the title you give.
A canonical URL is a specific URL on Amazon used to display a product details page. For example: “amazon.com/Gillette-Fusion-Manual-Sharp-Razors/dp/B001A8ADE0.”
Here, “Gillette-Fusion-Manual-Refills-Razors” is the primary keyword for the product.
Brand Name
In this field, give your brand name. Amazon may ask you to provide evidence if the brand is not registered. You can submit images of your product and it’s packaging with your brand name.
Pro Tip: If you’re serious about your e-commerce business, register your Brand on Amazon, as it also boosts your ranking and conversion rate.
External Product ID
Provide a distinct Product ID (UPC, EAN, etc.) in this section. These IDs are assigned to each item for effective product recognition.
A UPC code is required for sellers based in the USA, while those in Europe must provide an EAN number. You can get the codes from the GS1 portal.
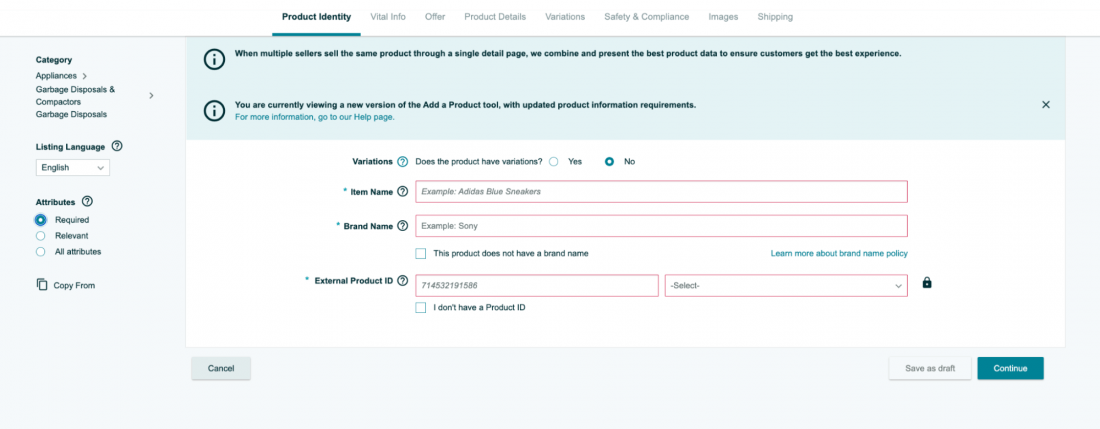
After filling in all the fields, click “Continue” to the next tab.
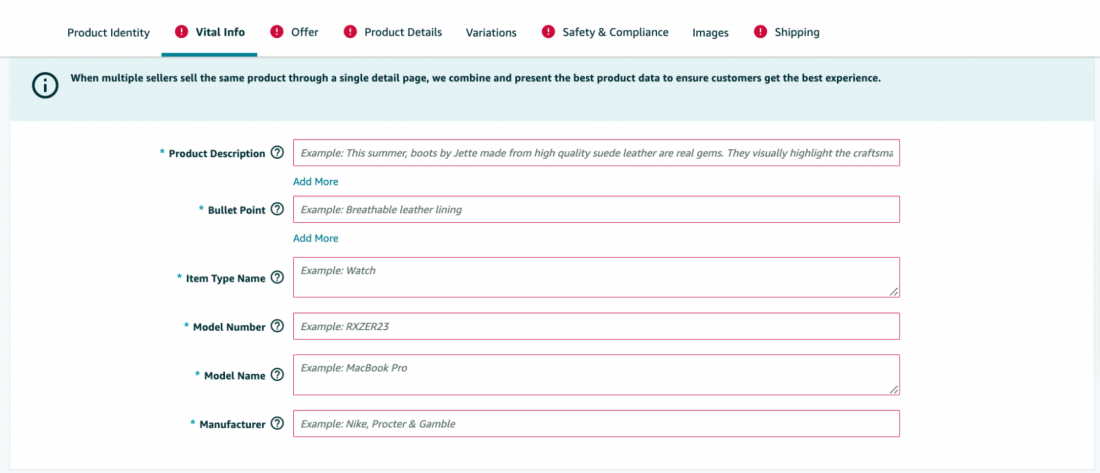
Fill up the Vital Info tab.
In this tab, include all the essential information about the product you’re listing.
Product Description
Here, provide at least one sentence to describe the product.
However, we recommend giving a detailed keyword-rich description to help customers understand, evaluate and purchase the product. You can also highlight some important specifications that are not found anywhere.
Here are some tips to give a high-quality product description:
- Include brand name
- Include specifications such as size and color
- Give material specifications
- Include details about packaging and quality, etc.
Note:
If you’re a brand registered seller, add A+ content to your listing to make it more engaging to the shoppers.
A+ content can increase conversion rates and boost sales by providing a better understanding of the product and persuading customers to purchase.
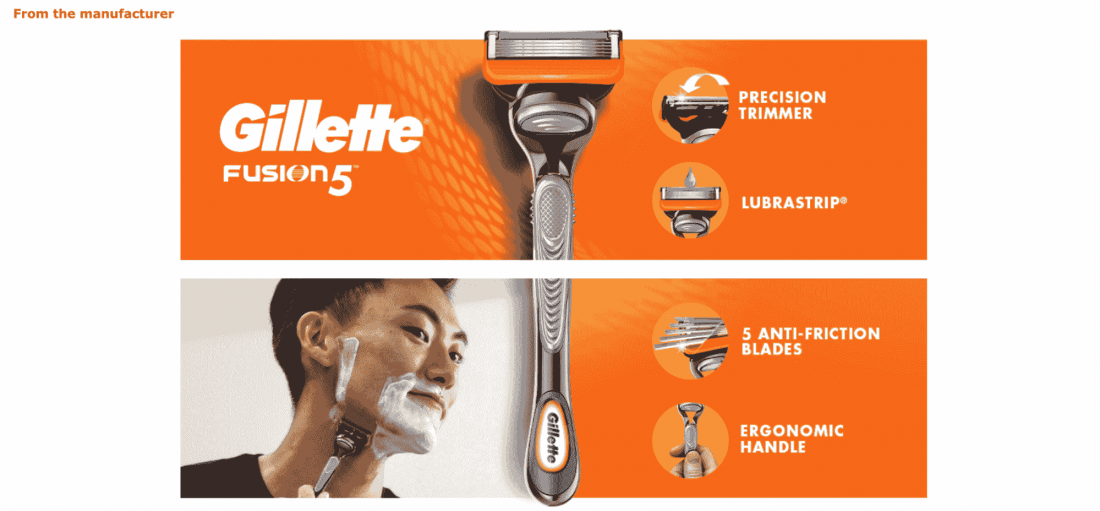
This feature also presents an excellent opportunity for sellers to differentiate their products from similar offerings by competitors. Previously, differentiation was a significant challenge due to limited guidelines from Amazon.
To create the A+ content, log In to your seller central account → Go to Advertising and click on A+ Content Manager.
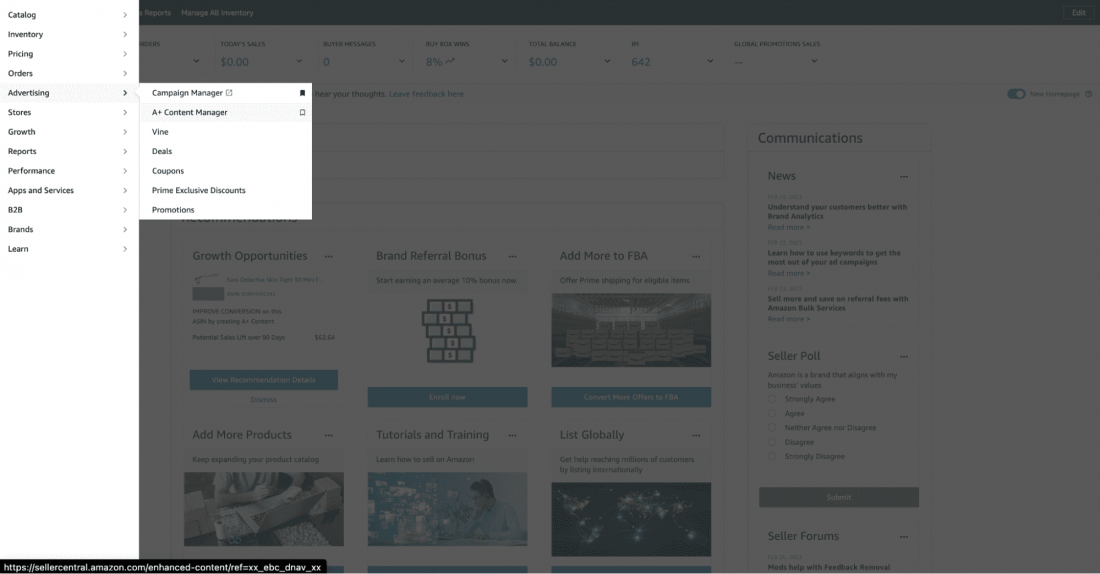
Choose from the two options below:
- Basic: This option lets you create five modules of enhanced content to highlight your product features.
- Brand Story: You can create a brand story with a custom brand logo, picture, description, and frequently asked questions about your brand.
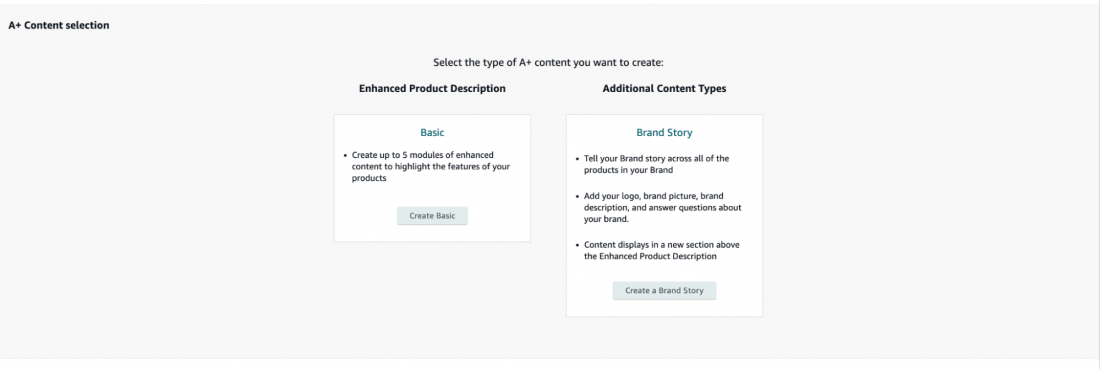
Select an option based on your goal, add the required modules, select the ASIN to apply, and submit it for review.
Amazon will review the A+ content within seven days and make it live on your selected ASIN’s listings.
Learn more about it from the detailed A+ content Guide.
Bullet points
Next, you must add bullet points to the Amazon product listing. These points appear next to the product images and describe your product benefits in detail. You can use relevant keywords in these bullet points to improve your product ranking in the search result.
Here are some more tips for creating the bullet points:
- Start each bullet points with a capital letter.
- Sellers can add five bullet points, and vendors are allowed to add ten bullet points.
- Write as sentence fragments, and do not use ending punctuation.
- Describe five features and benefits of your product in the bullet points
- Ensure all the bullet points have a similar length, not too long or short.
- Avoid using promotional content, discounts, and offers in the bullet points
- Don’t use HTML or other coding elements to create fancy symbols or emojis in the bullet points.
Item type name
Here, give a one or two-word phrase that best describes your product in general. For example, if your product is an organic blackhead removal mask, you can just mention Skin Care.
You still have three more fields to fill up.
- Model Number
- Model Name
- Manufacturer
Simply refer to the manufacturer’s provided information to find the model name and number. Lastly, be sure to give the name of the manufacturing company accurately.
Note: Remember that the vital information required for listing will change based on the selected product categories.
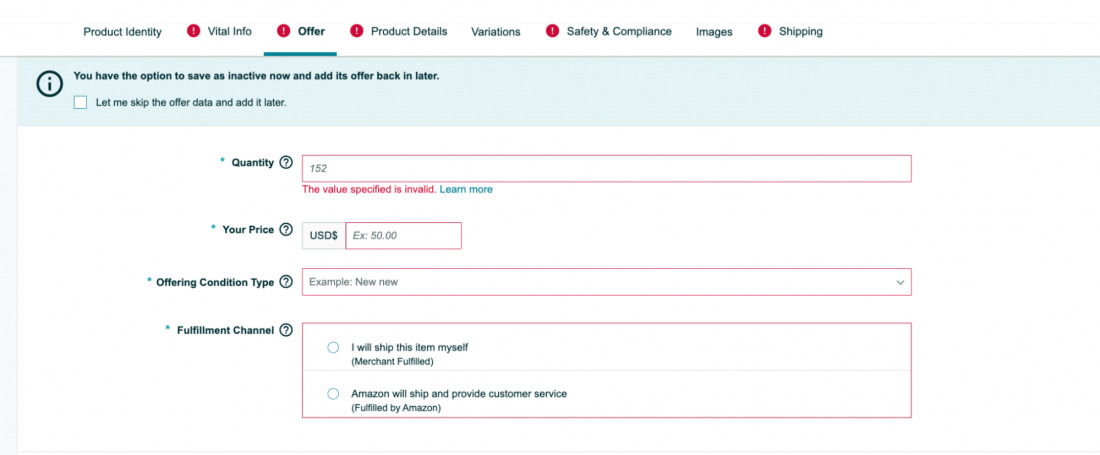
Fill up the offer details.
In the offer tab, provide the following information:
Quantity: Enter the number of items you wish to make available for sale.
Price: Determine the product price for sale. Start with a higher price, gauge the response, and adjust later.
Condition: Choose the product’s current condition that you intend to sell- new, used, or otherwise.
Fulfillment Channel: Now, it’s time to choose the order fulfillment method. This determines if you will be listed as an Amazon FBA or FBM seller. You have two options:
- Fulfilled by Amazon: Amazon takes care of all the shipping and customer service in exchange for a small fee.
- Merchant Fulfilled: You handle shipping and customer service yourself.
Fill up the Product details.
In the product details tab, fill up details about your product bundle, for example:
- Number of items: Give how many items you’re selling under each unit
- Color: Provide what’s the color of the product
- Included components: Specify the components included in the product.

Note: Similar to vital information, the required information for Product Details will change for different product categories.
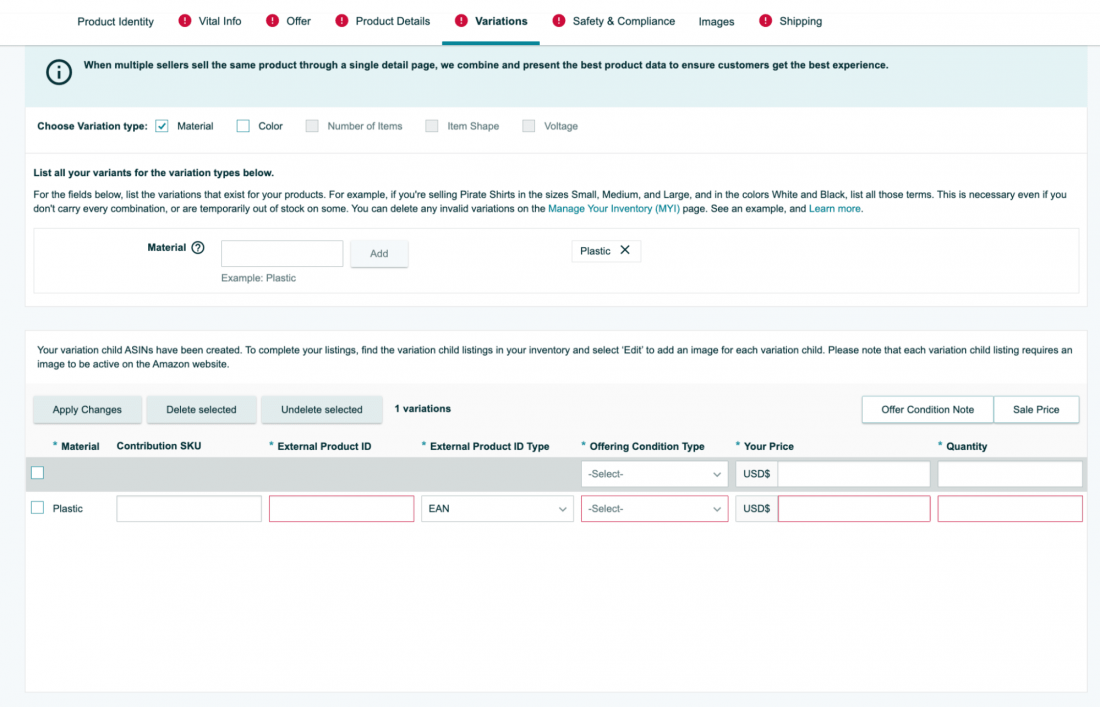
Add Variations
Only make changes in the “Variation” tab if you’re selling multiple variations of your product, such as different colors or sizes, materials, etc. This section allows you to add specific details for each variation, which allows you to organize and manage them seamlessly.
The options in variations will be different based on different categories. To simplify the process, here are some variations you’ll find on Amazon in general:
- Color
- Size
- Number of items
- Material
Similar to product details, for each variation, you need to add the following details:
- Product ID
- Offering condition
- Price
- Quantity
Add Product Images
Images for your Amazon listing are extremely important. Customers can visually evaluate and compare different features of the products with the images.
Add multiple images in the listing that show the product in use from various angles, and highlight different features, to help shoppers make informed decisions.
Here are some tips for adding product images:
- Every detail page must have at least one product image. However, aim for six images and one video in the listing for optimum results.
- Ensure the images are clear, informative, and appealing to the eyes.
- Keep the image background white and ensure the product occupies at least 85% of the image space.
- Keep the image dimensions as 500 x 500 or 1000 x 1000 pixels to ensure optimum quality.
You can also evaluate the image qualities by asking the following questions:
- Does the image match the product description in size, color, and accuracy?
- Is the product recognizable in the image?
- Is the photo a high-resolution photograph, not a drawing?
- Was the photo taken at a flattering angle?
- Is the product focused and well-lit?
- Are close-up shots free from highlights or shadows?
- Does the image show the entire product?
- Is the background simple and clean?
Learn more about product images from the SellerApp product photography guide.
Add Keywords
In the “Keyword” tab, fill up the following two fields:
- Target Audience: Enter your target audience for the product.
- Subject Keywords: These are the most important field in your listing. These are also called backend keywords. These keywords improve the discoverability of your products and allow you to create a readable product listing while ensuring the listing is indexed for all the relevant keywords.
Here are some tips to add these subject keywords:
- Use only generic words
- Include synonyms, abbreviations, and alternative names for your product
- Add only six keywords
- Enter phrases in a logical order of search
- Include applicable spelling variations, but avoid common misspellings
- Use all lowercase letters and skip punctuation such as hyphens and colons
- Avoid repeating words
- Avoid stop words like “a,” “an,” “and,” “by,” “for,” “of,” “the,” and “with.”
- Use singular or plural, but not both.
Furthermore, check our Amazon backend keyword guide to learn more about these keywords.
Save and launch
That’s it! You’ve successfully added all the information. Now it’s time to review it, and hit the “Save and finish” button to create your product listing.
Next, let’s see how to create product listings on Amazon in bulk.
How to list products on Amazon in bulk?
So far, we’ve learned how to create one Amazon listing.
But what if you have hundreds of products to list on Amazon?
In that case, adding products on Amazon individually will take a lot of time. Fortunately, Amazon allows you to create multiple product listings with the bulk listing feature.
Let’s see how!
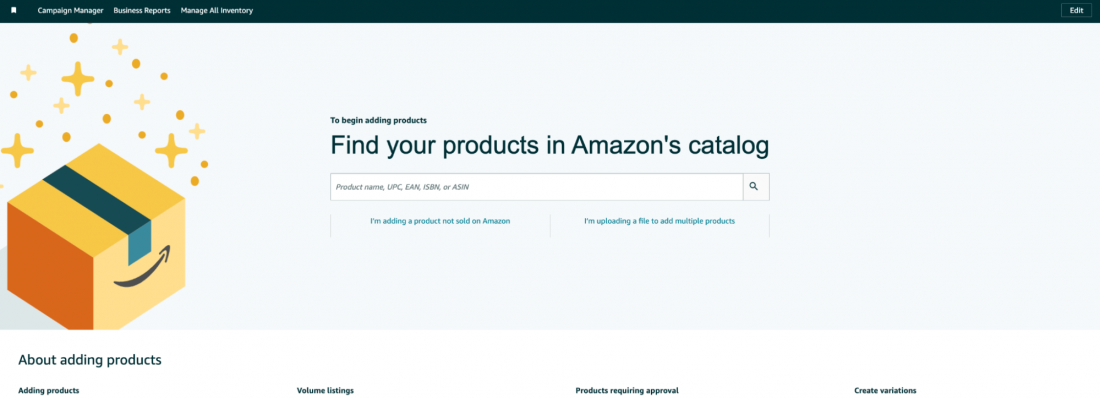
1: In the “Add Product” page in Seller Central, choose the “I’m uploading a file to add multiple products” option.
2: Download the excel template based on your requirements. Amazon provides you the templates for the following situations:
- List products already in Amazon’s catalog
- List products not currently in Amazon’s catalog
- Update price & quantity
- Update product details
- Not sure if the products are in Amazon’s catalog

3: Select the option relevant to your requirements, choose the product category, and generate a template.
4: Once the template is downloaded, fill in all the columns and upload the spreadsheet to the Seller Central dashboard.
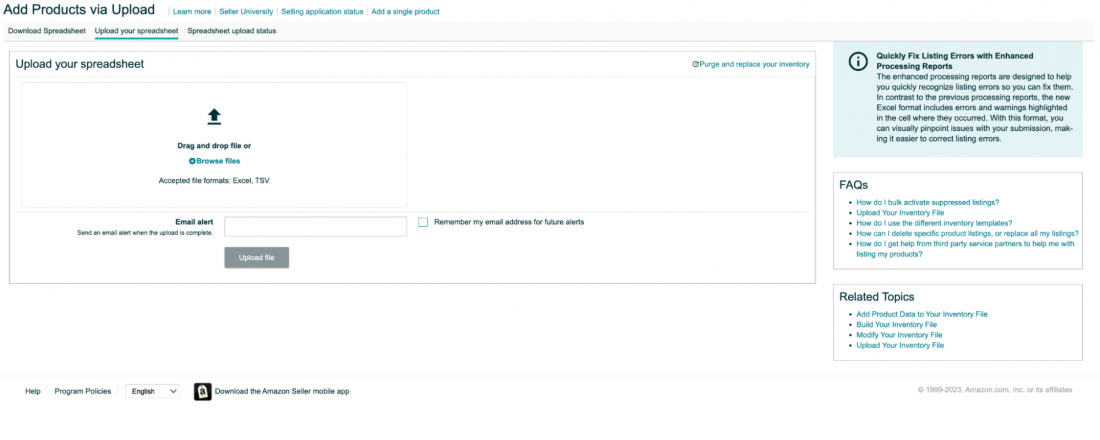
5: You can also check the upload status of your products from the “Spreadsheet Upload Status” tab.
How to list a product that is already existing on Amazon?
Up until now, you’ve learned how to create a single product listing and bulk product listing on Amazon.
But what if you want to run a resale business on Amazon?
In that case, there might already be an active Amazon product listing for the product you want to sell.
But don’t worry – adding your product to an existing listing is simple.
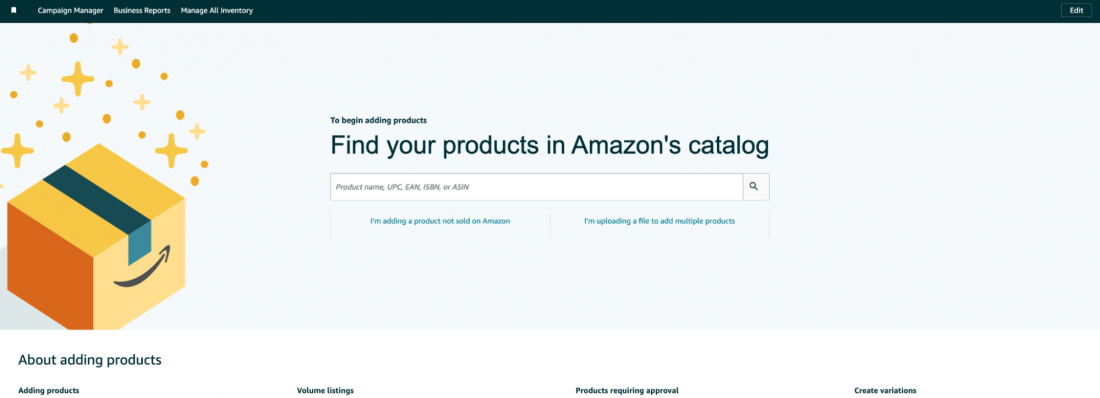
1: Head over to the “Add products” page on Seller Central. Search for the product you want to list by the product name, UPC, EAN, ISBN, or ASIN number.
2: Select the condition of your product, whether it’s new, used, or refurbished.
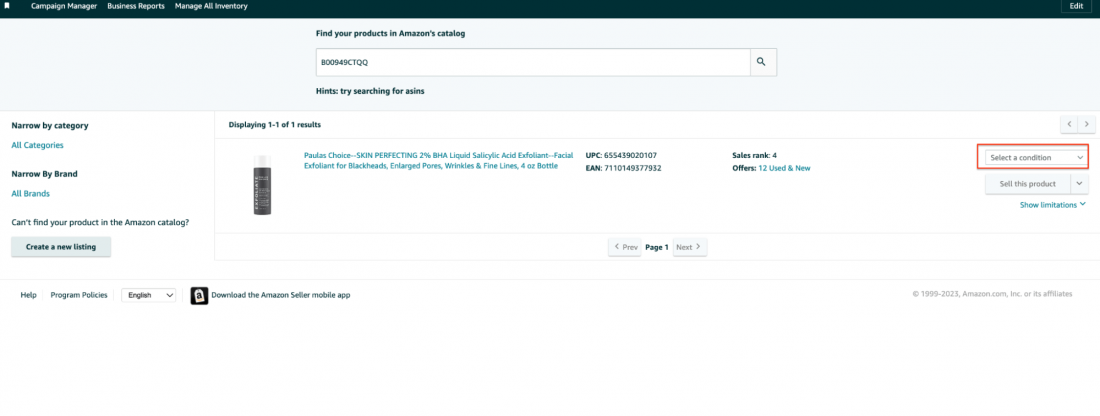
3: Click “Sell the product” to go to the listing backend.
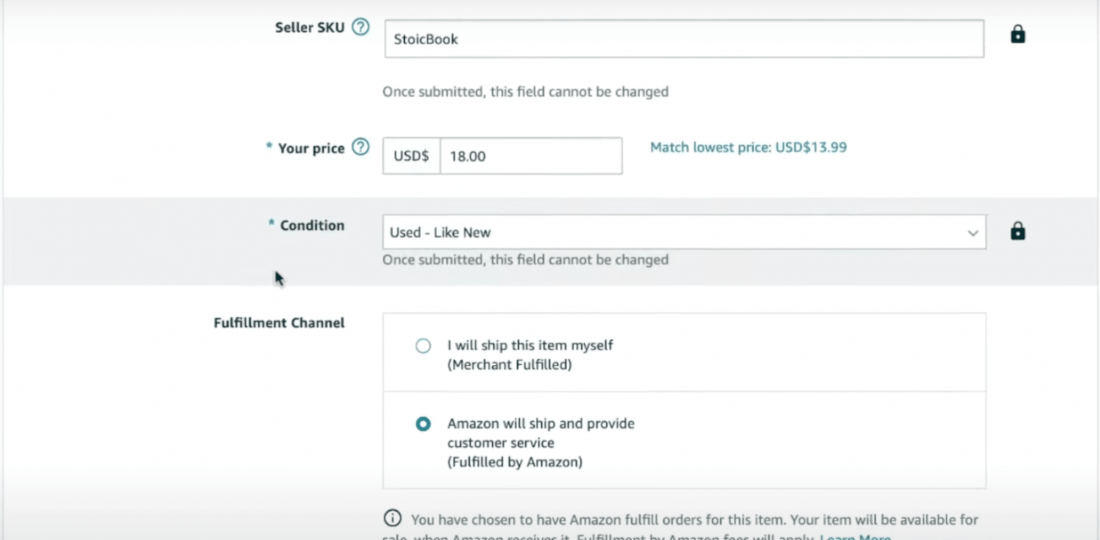
4: Lastly, enter the selling price, select the product condition, choose the fulfillment method, and then hit “Save and complete” to create your product listing.
Why is your new listing not visible on Amazon?
Your listing not showing up on Amazon can be very frustrating for any seller. There are several factors that can contribute to this issue, such as:
- Violating Amazon’s policies: If you violate Amazon’s policies or terms of service, your products will be delisted. A few examples of policy violations include listing prohibited items, manipulating customer reviews, or engaging in fraudulent behavior.
- Poor product quality: If your product receives consistently negative reviews or feedback due to poor quality, Amazon may delist it.
- Intellectual property infringement: If you sell products that infringe on another company’s intellectual property rights, such as trademarks or copyrights, Amazon will delist your product.
- Safety concerns: If your product poses a safety hazard to customers, Amazon may delist it to protect its customers.
- Selling counterfeit products: If Amazon determines that you are selling counterfeit products, your products may be delisted, and your account may be suspended or terminated.
- Inaccurate product information: If the product information you provide is inaccurate or misleading, Amazon may delist your products.
- Listing restricted products: If you list products that are restricted or prohibited by Amazon’s policies, your products may be delisted.
What to do if the product is delisted on Amazon?
If your product is delisted on Amazon, first identify the reason for getting delisted. It’ll help you understand the steps you need to take to relist your product.
Once you have identified the reason, take the necessary steps to address the issue. This may include:
- Correcting any policy violations or inaccuracies in the product information,
- Improving product quality or addressing customer feedback,
- Resolving any intellectual property infringement claims,
- Providing documentation or proof of compliance with safety regulations
- Stopping the sale of counterfeit products or addressing any issues related to product authenticity
- Removing any restricted products from your inventory
After that, contact Amazon Seller Support to request your product to be re-listed. You may need to provide additional information or documentation to support your request.
Note: If your account is suspended or terminated, you may need to submit an appeal or create a new account to get your products re-listed on Amazon.
Final Thoughts
Once you know all the guidelines of Amazon, creating a product listing becomes super easy.
If you’re still struggling, opt for the SellerApp listing optimization service. We helped brands like Phillips and Samsung optimize their product listings with data-driven insights and increase conversion rates by 67%.
Don’t struggle to create effective product listings on your own – schedule a call with us today and start seeing results!
Recommended read:
How can I benefit from these B2B product opportunity reports?
What are Fast-Moving Consumer Goods (FMCG)?
Amazon’s Generative AI: How It Can Help in Amazon Product Listing





Natalie Rae
February 6, 2024I would love to see more great content from you.
Clare Thomas
October 4, 2024Sure, will share it soon.
Michael Thomas
March 11, 2024This would be really helpful!
Clare Thomas
October 4, 2024Thanks.
Lily Kate
April 4, 2024These ideas are very refreshing!
Clare Thomas
October 4, 2024Thanks for your valuable feedback.
Addison Leigh
July 23, 2024I appreciate your thoughts!
Clare Thomas
October 4, 2024Thanks.
Hudson Lee
August 16, 2024That is such a wonderful view, I just love this!
Clare Thomas
October 4, 2024Thank you.
Olivia Kate
September 15, 2024This really resonated with me today, thanks for the motivation!!
Clare Thomas
October 4, 2024You are welcome!