Amazon Seller Central: The Ultimate Navigation Guide + 2025 Platform Updates
Amazon Seller Central might feel like a maze of tabs, tools, and reports. But once you get the lay of the land, it quickly becomes your go-to command center for running a successful Amazon business.
However, navigating through this command center can be challenging. You might be wondering where I list my products? How do I send inventory to Amazon? Can I monitor my sales in real time? How do I give my team members access?
If any of that sounds familiar, you’re not alone. Every seller starts with these exact questions.
This Amazon Seller Central guide will walk you through Amazon Seller Central, so you can confidently manage everything from listings to reports and everything in between.
In addition to that, you can find the updated user flows according to what Amazon selling account or Amazon Seller Central account offers in 2025.
Let’s dive in and make Amazon Seller Central work for you.
Recent Amazon Seller Central updates
Note: Before we dive into SellerApp’s Amazon Seller Central Guide, please be aware that Amazon is still rolling out updates to the Seller Central interface. Additional changes may follow, and we’ll continue to update this guide accordingly. However, you can still switch back to the previous UI, even with the recent updates.
Here are some recent changes to Amazon Seller Central:
- From now on, under Shipping Performance within the dashboard, you can find all the new status updates, which are refreshed on a daily basis. Notifications may become a thing of the past. So, you may have to monitor the dashboard for updates.
- Under Business Reports, now you can filter between business and non-business buyers. You can navigate it under the Sales Dashboard.
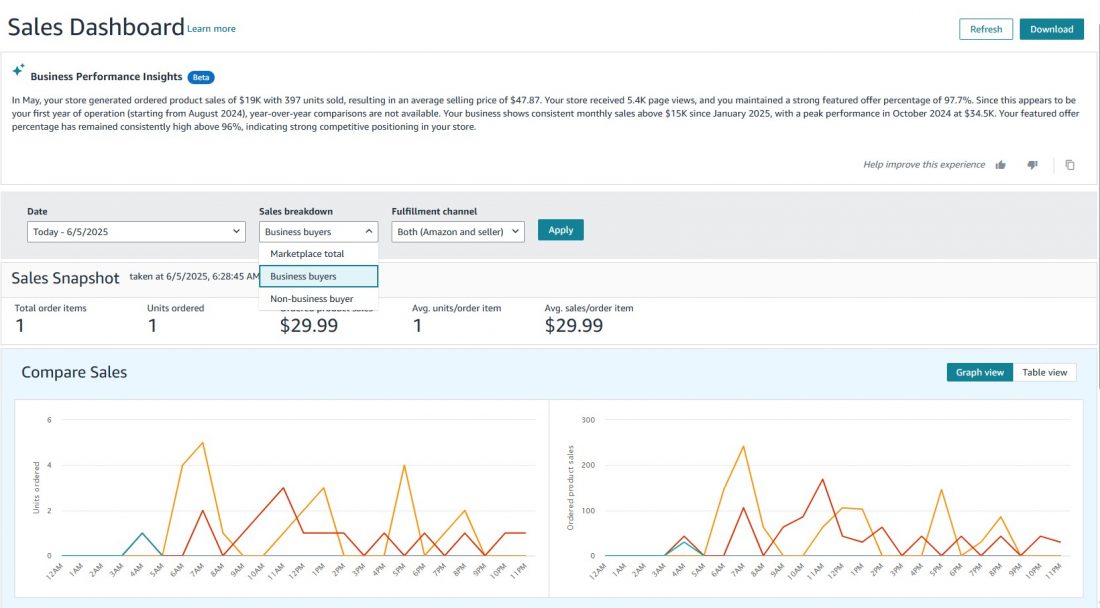
- You also get a feature to ‘Search by ASIN’, which makes performance monitoring even easier.
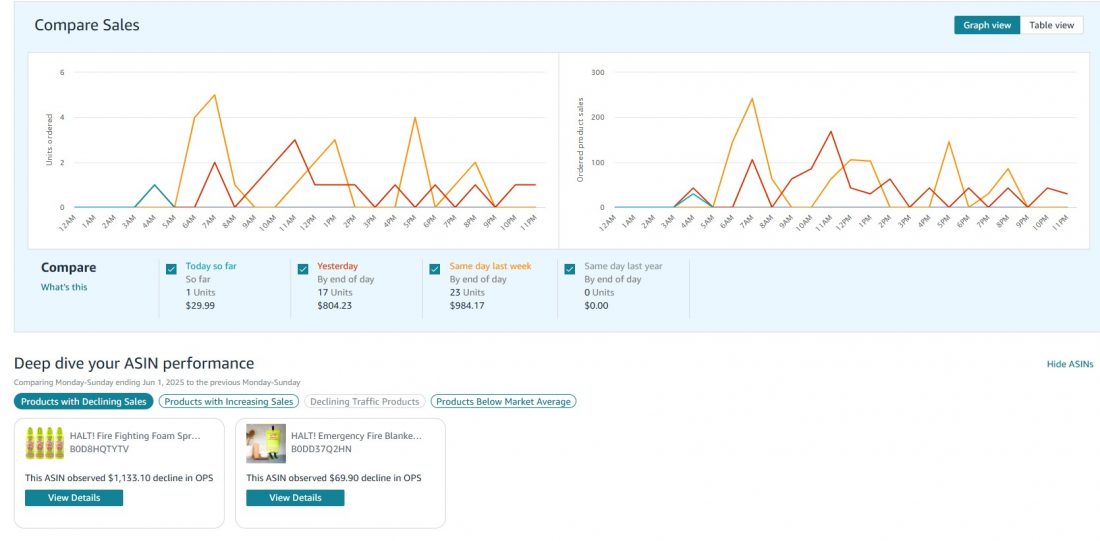
- When comparing sales under Business Reports, you can now find a ‘Deep dive your ASIN performance’ section, where you can find an at-a-glance view of the top-performing ASINS. It contains four sections in total.
- ASINs with declining sales,
- ASINs with increasing sales,
- ASINs with declining traffic, and
- ASINs performing below the market average.
You can view the performance according to weekly data updates.
What is Amazon Seller Central?
Amazon Seller Central is a specific dashboard dedicated to third-party sellers on the Amazon marketplace, which allows them to manage their Amazon store, modify product listings, and do much more.
For example, they can use the dashboard to manage their payments, catalog, inventory, order fulfillment, pricing, advertising, and monitor crucial metrics that can help them be on top of their game.
Having an Amazon Seller Central account is a direct path to maintaining an online business presence within the marketplace platform. All of that without going through the headache of designing and maintaining a personal website. Even complicated procedures of managing/ processing returns are enabled through the Amazon Seller Central USA platform.
If you opt for Amazon FBA (Fulfillment by Amazon), Amazon can take care of the rest of the actions necessary for the fulfillment, like picking, packing, and shipping your orders, making it easier than ever to become an Amazon seller.
Understanding the intricacies of Amazon SellerCentral features can help you better prepare for your journey to becoming a successful seller. So in our next segment, we’ll deep dive into the various capabilities of Amazon Seller Central.
What Can You Do in Amazon Seller Central?
If you’re selling on Amazon, Amazon Seller Central is your control room. All your Amazon business-level decisions get executed through this portal, as we’ve mentioned before.
Whether you’re a brand-new seller just getting familiar with the Amazon Seller Central platform or a seasoned seller simply trying to explore it by yourself, understanding what you can do with this portal is key to running your Amazon store.
Here’s a sneak peek at what it is capable of.
1. List and manage products
You can add new items into your store (represented on the Amazon platform as listings), edit existing listings, upload product images, and write descriptions or upload A+ content. Through Amazon Seller Central USA, you also get to set or modulate pricing, optimize your products for relevant keywords, and choose the fulfillment method (FBA or FBM).
2. Track and manage orders
Through this Amazon Seller hub, you get to track when orders come in, where they’re going (their fulfillment status), and whether they’ve shipped to plan according to actions. You can confirm shipments, issue refunds, and manage returns directly from your Amazon seller panel or dashboard. Easy peasy.
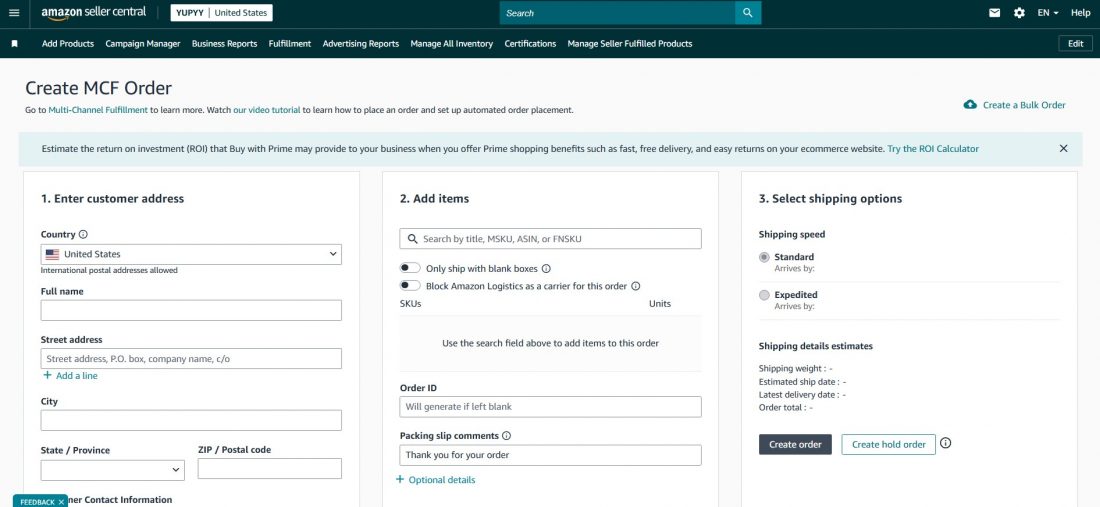
The Orders screen in the Amazon Seller Central Dashboard allows you to create a Multi-Channel Fulfillment for orders.
3. Keep a vigil over the inventory
Whether you store products in Amazon warehouses (FBA) or handle shipping yourself (FBM), a simple Amazon Seller Account login is the gateway to monitoring stock levels, setting restock alerts, and fine-tuning fulfillment settings.
The Inventory tab in the Amazon Seller Central dashboard is where you can monitor stock levels, manage the products you send to Amazon’s fulfillment centers (FBA), and manage restocking. It’s also where you lay the groundwork for scaling globally. How? You get to make sure the listings are active and your inventory matches the requirements.
Click on the “Inventory” option, under which you get different options like:
- Manage All Inventory
- Manage Seller Fulfilled Products
- Sell Globally
- FBA
- FBA Inventory
- Shipments
- Opportunities
- FBA remote fulfillment (for overseas selling)
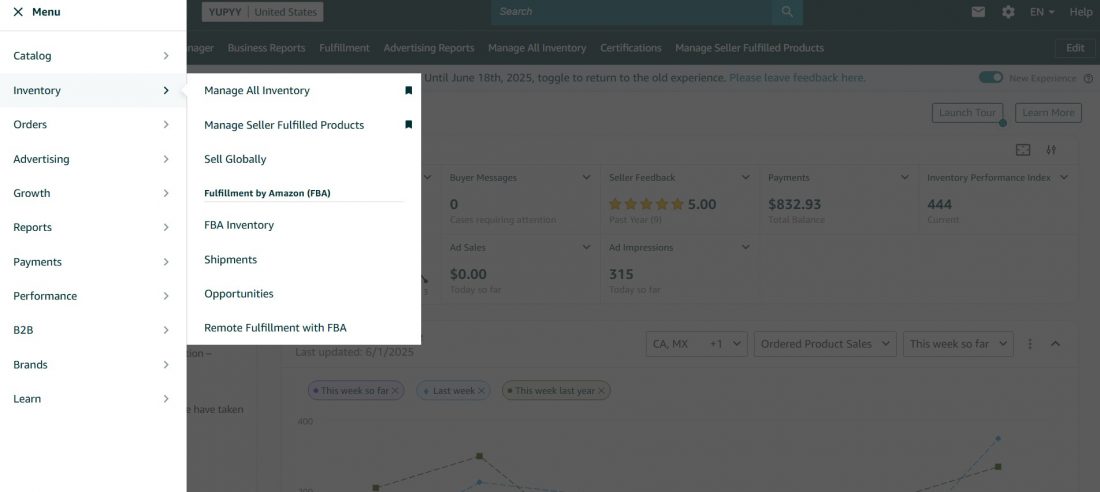
One of the main go-to hub sections for all stock-related queries would be “Manage your inventory.” In this section, you can monitor all your products’ stock levels and add new ASINs to your Amazon store.
With just a few clicks, you can adjust pricing, add new items, and get an instant overview of your sales via reports, manage restocking, view IPI (Inventory Performance Index) to identify areas for improvement, and use pre-filled templates to add multiple product listings or update existing product attributes at one go using Inventory File Templates.

This inventory section is the perfect spot to check for any potential issues with your current listings. If your item is suppressed for any reason, you’ll find it listed under the “Status” column. With such helpful features, you can assure that your inventory is always in top shape and ready to sell.
4. Monitor performance
Amazon Seller Central USA shows detailed performance metrics to gauge your business performance on Amazon:
- Order defect rate
- On-time delivery rate
- Buy Box percentage
These help you stay in good standing and identify areas for improvement, and maintain a steady Amazon Account Health.
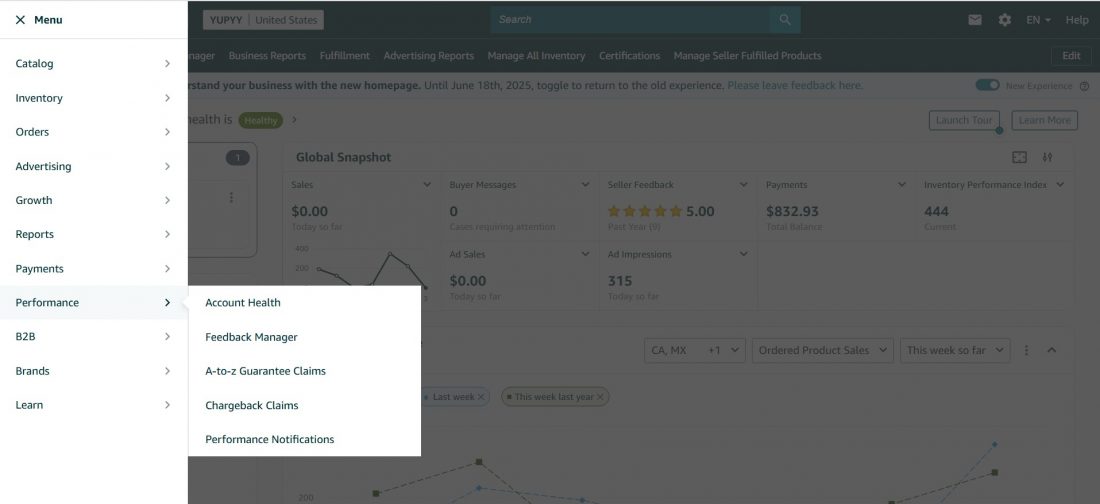
The “Performance” option on Amazon Seller Central US is a hub that provides insights about your Seller Central account’s health. You can view metrics related to:
- Amazon Seller Account Health, which monitors Customer Service Performance, including delivery timings, listing accuracy, etc.
- A to Z Guarantee claims that it looks after the resolution of the same.
- Policy Compliance to keep sellers accountable for performing at Amazon Amazon-level competence.
- Feedback Manager to track buyer satisfaction for a period of time that you can set. You can download feedback reports from there as well.
- You can also address chargeback claims and create alerts for performance monitoring. In case of policy violations or negative seller feedback, this section alerts you, and if not addressed, it could lead to account suspension.
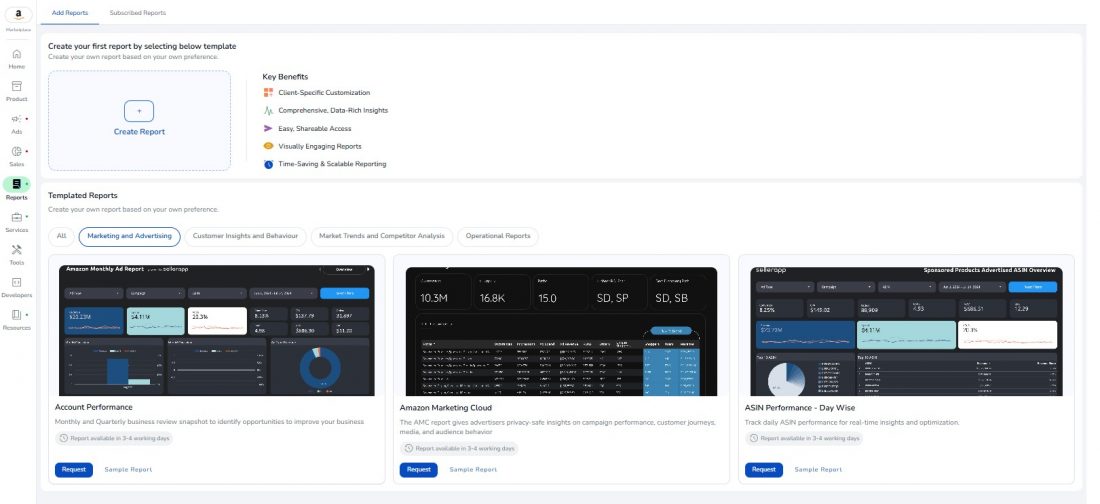
Or there’s another alternative. Use SellerApp’s account performance reports from the dashboard to scrutinize the areas where you can make changes.
Here’s a checklist for a 10-step Amazon account audit.
5. Tool for direct communication
Amazon restricts your communication with your customers for several reasons. But you can reply to buyer messages directly, handle questions about orders, and resolve complaints.
Amazon Seller Central also lets you manage reviews and respond to feedback, which are essential components for maintaining Amazon seller account health and thus your chances of winning the Buy Box.
6. View reports
Access business reports like sales trends, traffic data, and inventory health from within Amazon Seller Central USA. These reports help you make smarter decisions as your Amazon business grows.
Think of it as a source of constructive criticism that helps you maintain your position within the platform and prevents you from facing sudden roadblocks such as suspension or deactivation.
7. Create deals and promotions
Want to run a sale or offer coupons to boost your sales on Amazon and make your brand visible? Through Amazon Seller Central US, you can create lightning deals, apply discounts, or set up percentage-off offers to attract more customers.
This also helps you win badges, which also helps you get a higher level among other competitors.
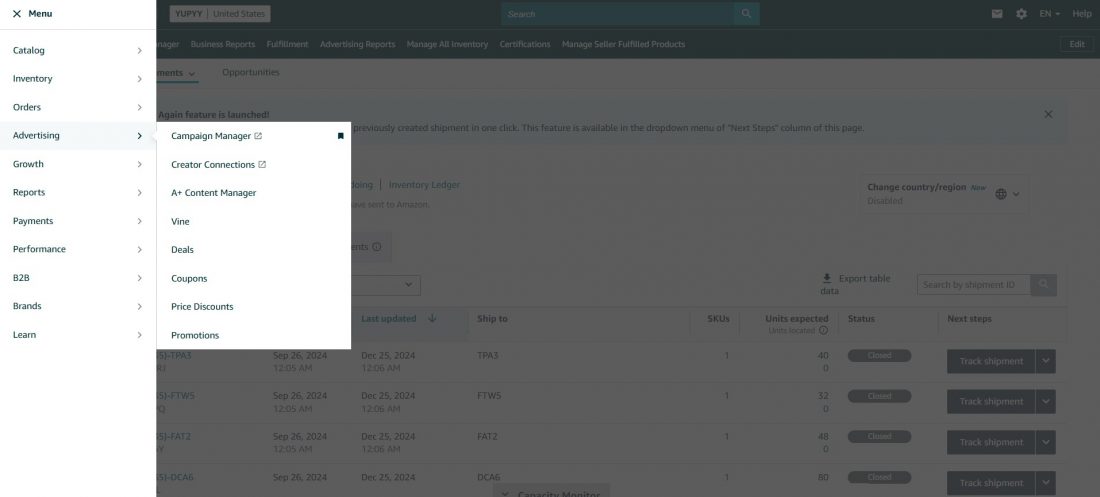
When you head to the ‘Advertising’ section of the Amazon seller panel, you can find options such as deals, coupons, and price discounts from which you can create special offers for different ASINs.
8. Manage payments
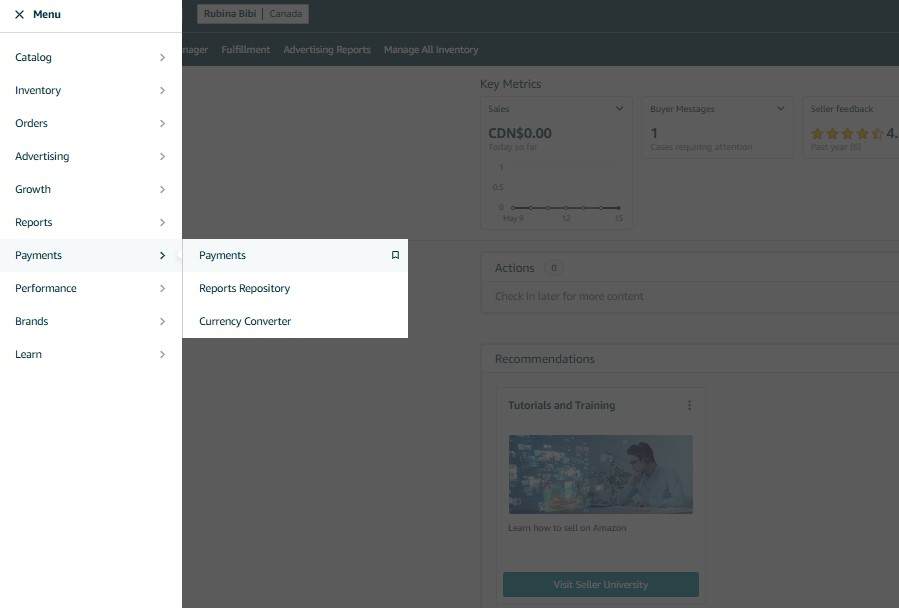
Track your account balance, see pending payouts, and update your bank or tax information with just a few clicks through Seller Central on Amazon.
When you do an Amazon Seller Central login, you’ll see a Menu option on the left-hand side. From there, we get to explore these features extensively under ‘Payments’.
9. Set and fine-tune the pricing of products
With the pricing dashboard within the Amazon seller hub, you can set and observe the price of your products on Amazon marketplace. This allows you to set the pricing of your products, set alerts, and automate the process so that the price of your items changes for your competitors.
Amazon Seller Central Fees and Pricing: How much does it cost to sell on Amazon?
Before listing your products through the Amazon seller panel, you’ll need to select a selling plan. Here are your options:
| Selling Plan | Monthly Fee | Per-Item Fee | Ideal For |
|---|---|---|---|
| Individual | $0 | $0.99 per sale | New sellers or those selling fewer than 40 items per month |
| Professional | $39.99/month | $0 per item | Active sellers and established businesses |
To shed light on the two broader types of Amazon Seller Central accounts that you can have:
1. Amazon’s Individual selling plan
The Amazon Individual Selling Plan is ideal for Amazon sellers with low-volume sales or who are beginners and testing the waters. Hence, it is affordable and convenient. Sellers only pay for the items that they sell, with no requirement for upfront fees or monthly charges.
2. Amazon’s Professional selling plan
The Professional selling plan offered by Amazon Seller Central is the most comprehensive plan designed for established businesses looking to sell on Amazon. We suggest you opt for it only when you start experiencing good sales traction.
You also get access to additional features, such as
- bulk upload,
- inventory control,
- management features,
- reporting,
- Amazon advertising, and
- the Amazon API for connecting with third-party apps.
The benefits are endless. These features are not available for the Individual plan. So if you’re serious about expanding your business, do not shy away from opting for this plan.
Additionally, by opting for the professional plan, you directly qualify for free storage and removals for Fulfillment by Amazon (FBA), advertising credits for Sponsored Products, coupon creation credits, Amazon Vine review credits, and brand owner bonuses.
What necessary information do you need to get started with Amazon Seller Central
To start selling on Amazon, you should begin by setting up your Seller Central account.
Before beginning, make sure you have the necessary information ready so that you can complete the process quickly.
Depending on your business type (Individual or Professional), you’ll need to provide:
- Business name (as registered legally)
- Business address
- Phone number
- Business type (Individual, Sole Proprietorship, Corporation, Partnership, etc.)
- Tax ID or EIN (Employer Identification Number)
Note: Head over to IRS website to find your EIN.
- Email address (not associated with any other Amazon seller account)
- Business owner’s ID (Passport/ Driver’s License/ National ID)
- Bank account number
- Bank routing number (for U.S.)
- IBAN/BIC/SWIFT code (for international sellers)
- Internationally chargeable payment card (Visa, Mastercard, or Amex) details.
- Address proof of owner (for individual sellers), and representative’s (for registered businesses).
- U.S. sellers: W-9 form for Tax deduction.
Note: As of 2025, Amazon has introduced more frequent re-verification checks to prevent fraudulent Amazon seller accounts. Make sure all documents are up to date, clearly scanned, and match the information you submit.
So, be ready with these prerequisites as we proceed to create an Amazon Seller Central account.
How to create Amazon Seller Central account
To create an Amazon Seller Central account, here’s what you do:
1. Go to https://sellercentral.amazon.com/
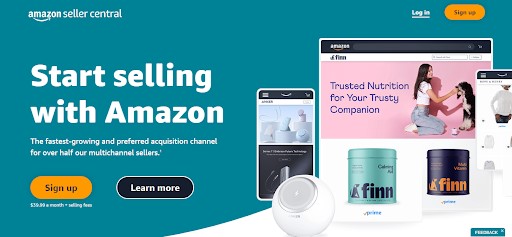
2. Click on ‘Sign up’ on Amazon Seller Central US.
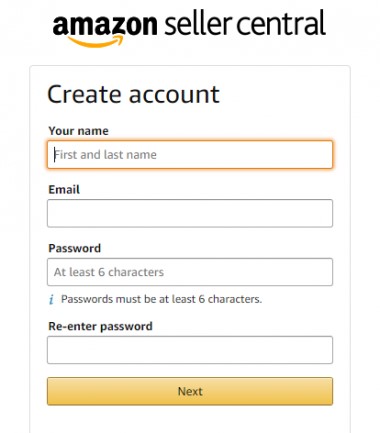
3. Enter your name, email ID, and password.
4. Select your country as business location and business type, and confirm to the terms and conditions. Click ‘Agree and Continue’.
5. Fill up your business address, telephone number, and other required fields.
6. Provide your citizenship, identity proof, bank account information, tax information, etc., confirm the checkbox, and click Next. Your Seller information is now updated.
7. Now comes the billing information. Add your bank account information and hit Continue. Now add payment information, including card details.
Note: Amazon prefers you use a credit card to get through with it at once, so use an authorized credit card while you do an Amazon Seller Central sign-up.
8. Now, for product-level information, enter the required information such as Universal Product Code (the bar codes you scan on your product packaging), diversity certifications (Amazon highlights minority owned businesses), etc, and click ‘Next’.
It is particularly useful for brand owners.
9. This brings us to the last step, which is identity verification. It can be done via uploading an image of your passport (for identity) and any utility bill (for address verification).
10. Finally, get on a call with an Amazon associate or take a selfie for the last step of verification. Click next, and you’re Amazon seller account will be ready in minutes!
You will receive a confirmation email, and your Amazon Seller Central sign-up is done. Click on the link in the email to complete your registration and do an Amazon Seller login.
How to use Amazon Seller Central
Amazon Seller Central is your all-in-one dashboard for managing your Amazon business. Once your Amazon seller account is verified and you do an Amazon Seller Account login, here’s how to make the most of it.
How to use Amazon Seller Central USA to add products to the Amazon Store
Here we are shedding light on two possible cases. Products that are already listed on Amazon and the ones that are not, we have documented the steps for.
Adding a product already listed on Amazon:
- After an Amazon Seller Central login, click on the ‘Menu’ (three horizontal lines) in the upper corner of the Amazon Central homepage.
- Go to ‘Catalog’ and click on ‘Add products’.
- Type in the name or product ID (like the UPC code) of the product you want to sell. (The UPC code, or Universal Product Code, is the barcode found on most products). You can also search by EIN, ISBN, or ASA number.
- Click ‘Submit’.
- Find the listing that corresponds to the product you are selling.
- Select the condition of your product (e.g., ‘new’; for some categories, like textbooks, ‘used’ may be an option). For food products, the only option is typically ‘new’.
- Click on ‘Sell this product’.
- Fill in the product information:
- You can optionally enter a SKU (Stock Keeping Unit), which is a way for you to track your inventory. You can leave this blank if you prefer.
- Enter the quantity of the product you have for sale.
- Set the price you want to sell the product for, keeping in mind the prices of similar products.
- The condition will already be selected.
- Choose your fulfillment channel: it can be Fulfilled by Merchant (FBM), where you ship the product to the customer yourself. This is generally not recommended.
- Or it can be fulfilled by Amazon (FBA), where you send your products to Amazon’s warehouse and Amazon stores, pack them, and ship them when they are sold. FBA makes your product Prime eligible, potentially leading to more sales.
- Select ‘Amazon will ship and provide customer service’ for FBA.
- Scroll down and click ‘Save and finish’.
- If you choose FBA, you will then click on ‘List as FBA and send into Amazon’ to begin the process of shipping your inventory to Amazon.
Creating a new listing for a product not yet listed on Amazon
- After an Amazon Seller Central login, click on the ‘Menu’ (three horizontal lines) in the upper corner of the Amazon Seller Central USA homepage.
- Go to ‘Catalog’ and click on ‘Add products’.
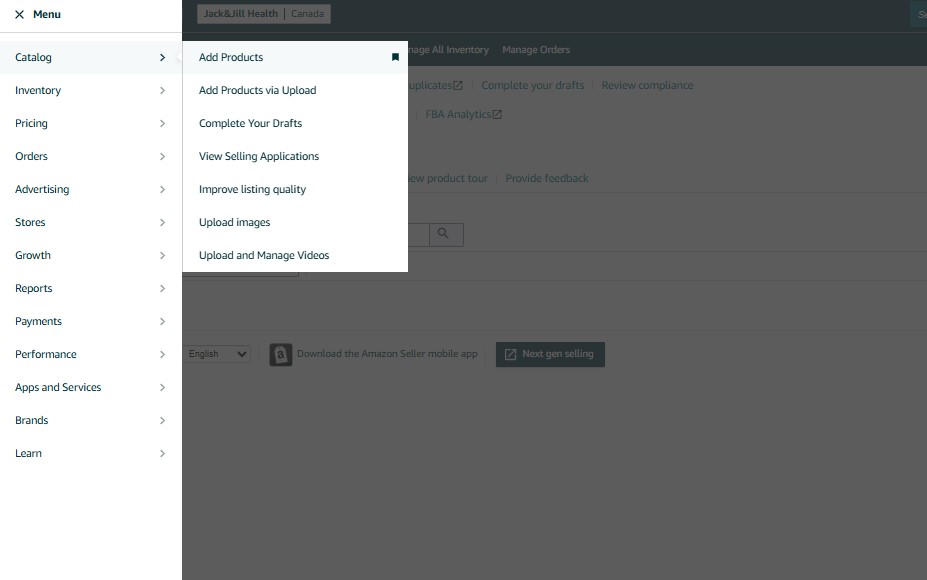
3. Click on ‘I’m adding a product not sold on Amazon’ or the ‘Create a new product listing’ button, or ‘blank form and start now’.
4. You will be asked for the ‘Item name’, which is the product title that customers will see. This is a crucial part of your listing, and you should include relevant search phrases and keywords in the title to help customers find your product.
According to the updated Amazon Guidelines, titles must be 200 characters or less, including spaces, for most categories, with no keyword redundancy.
5. Select the ‘Product type’ or category that best fits your product. Amazon will suggest categories, or you can search for others. You can also check the category of similar products already on Amazon by scrolling to the bottom of their listing page.
6. Indicate if your product has variations (e.g., different sizes, colors, flavors). If you are selling a single product without variations, select ‘no’.
7. Enter your ‘Brand name’.
Note: If your product does not have a brand name, select ‘This product does not have a brand name’. If you are selling your own unique product with a brand, it is recommended to get a trademark through uspto.gov and register your brand with Amazon’s Brand Registry.
8. Enter the ‘External product ID’ (usually a UPC code) and select its type. If you are selling your own unique product, you will need to purchase a UPC code. If your product doesn’t require a UPC, you can select ‘I don’t have a product ID’ and apply for an exemption if you have a brand name.
9. Click ‘Next’.
10. Fill in the ‘Product description’, providing compelling reasons for customers to buy your product and incorporating relevant keywords.
11. Create ‘Bullet points’ that highlight the benefits of your product and include keywords that customers might search for. Consider including a 100% money-back guarantee as one of your bullet points.
12. Upload product images. You can upload up to eight additional images to showcase different aspects and benefits of your product.
13. In the ‘Product details’ section, provide specific information about your product, such as the manufacturer, number of items, special ingredients, whether it’s heat sensitive or unit count, whether it expires, shelf life, and the SKU.
14. Set your price for the product. It’s generally recommended to price your product at least three times its cost. Consider the pricing of similar products to come up with a set limit.
15. Choose the ‘Fulfillment channel’: FBM or FBA.
16. Indicate if the package level is orderable (usually ‘yes’).
17. Review any mandatory cautionary statements.
18. Click on ‘all attributes’ to access additional, often missed options.
What are these missed options?
One key option accessible under ‘all attributes’ is the ability to choose the offer start date as sometime in the future.
By setting a future launch date and planning a launch, Amazon’s A9 and A10 algorithms are more likely to recognize the initial surge in sales and subsequently rank your product higher in SERPs.
This initial boost can potentially create a “Snowball Effect” leading to more organic conversion.
Add ‘Keywords’ in the designated section. These are backend keywords that help Amazon understand what search terms your product should appear for. It is another major factor for a massive visibility boost.
19. Click ‘Save and finish’ to finalize.
Note: If you selected FBA, you must create a shipping plan to send your products to Amazon’s fulfillment centers. This involves specifying the ship-from address, packaging details, prep category, labeling the units with FNSKU labels, and confirming the shipping method and carrier.
How to use Amazon Seller Central to run ads on your Amazon product listings
To run ads on your Amazon products using Amazon Seller Central, you’ll have to primarily rely on the Advertising Campaign Manager.
While this hands-on implementation using an Amazon Seller Central account can be a good start, to scale your brand, in the long run, you need an expert Amazon PPC agency such as SellerApp to plan your campaign.
SellerApp’s data-driven approach not only ensures reduced ACoS but also makes the most of your ad funds. Here’s a step-by-step Smazon seller central guide to get started by yourself using your Amazon Seller Central account.
- Do an Amazon Seller login on Amazon Seller Center.
- On the Amazon Central homepage, navigate to the main Menu and select ‘Advertising.’
- Then click on ‘Campaign Manager’. This is where all your advertising campaigns will be located.
- Click on ‘Create a campaign’. You will then see different campaign types: Sponsored Products, Sponsored Brands, and Sponsored Display.
Here we’ll specifically focus on Sponsored Products. Understanding campaign types is crucial here.
- Set up the Ad Group. It’s recommended that the ad group name and the campaign name match for easy navigation later. The name of the Ad Group must preferably start with a product code, followed by the campaign type, the purpose of the campaign, the source of the keywords, and a number. Using a product code, you can sort campaigns with more ease within the Campaign Manager.
Suppose you are creating a manual Sponsored Product campaign for the FarmFresh Mango Jam (FFMJ001), targeting keywords with exact match type, and using Amazon keyword suggestions. Your campaign name could be: (FFMJ001_SP_MANUAL_EXACT_AMZKW_01)
We understand that this can be slightly confusing. So, we recommend starting with,
Product Code:
- Start with the unique product code: FFMJ001 (for FarmFresh Mango Jam).
Campaign Type:
- Next, specify the campaign type from the image.
- Here, it’s a Sponsored Product campaign: SP.
Campaign Subtype:
- Indicate whether the campaign is Auto or Manual.
- In this example, it’s Manual: MANUAL.
Targeting Type:
- From the image, under Manual, you can choose Keyword Targeting or Product Targeting.
- For Keyword Targeting with Exact Match, use: EXACT.
Keyword Source:
- If you’re using Amazon keyword suggestions: AMZKW.
Sequence Number:
- If you plan to run multiple versions, add a sequence number: 01.
And our final campaign name: FFMJ001_SP_MANUAL_EXACT_AMZKW_01
This tells you exactly what the campaign is about at a glance. At SellerApp, this is our standard practice to promote clarity while structuring and separating campaigns.
- Now, structure your campaign. We recommend a campaign structure with one campaign tied to only one ad group. The reason for this is that Amazon might split the budget unevenly between multiple ad groups within a single campaign. Having one ad group ensures the entire campaign budget is focused.
- Now select products. In the campaign setup, add your SKUs.
- Choose Targeting type. It can either be Automatic or Manual.
For automatic targeting, it’s highly suggested to break down targeting groups into separate campaigns (e.g., one campaign for close match, another for loose match, etc.) as they’re meant to perform differently. This allows you to pause underperforming targeting groups easily and independently.
On the other hand, for manual targeting, you can choose between keyword targeting and product targeting.
In this scenario, we’ll proceed assuming we’re targeting keywords. We recommend using separate match types for separate campaigns only and not mixing them for better segregation. So, choose between broad, phrase, or exact match types.
- As we’re focusing on keyword targeting, add keywords to your campaign. When adding keywords, you’ll be prompted to set a bid. You can choose a custom bid, a default bid, or the suggested bid depending on your budget.
- Set a daily budget. A minimum daily budget of $100 is recommended to see visible conversions. The rationale is that anything lower might not provide enough budget for the keywords to perform adequately. If there’s a heightened competition for a keyword, the CPC is obviously higher, and that will quickly exhaust your ad budget before you reach a significant section of your target audience. However, the budget is dependent upon the competition and the product category you’re in.
In Amazon Central, you can control your actual spending by adjusting your bids and keeping a tab on it. Keeping bids low initially can help prevent overspending even with a higher daily budget.
- You can also add keywords that you don’t want your ads to show up for. These are known as negative keyword targeting. We suggest you launch an automatic campaign through your Amazon Seller Central account, reviewing the search term report to identify unprofitable keywords, and implement them.
- Choose a campaign Bidding Strategy. There are three bidding strategies: Dynamic bids – up and down, Dynamic bids – down only, and Fixed bids. Know more about the bidding strategy to get started.
- Ensure that your campaign is placed in the correct portfolio for your product with Start and End Dates. You’ll typically set a start date in the beginning and let it run as part of an ongoing campaign. This will help you gauge the initial campaign activities upon which further changes can be implemented.
How to use Amazon Seller Central to update listings
Using Amazon Seller Central to update listings can be super easy:
- Log in to Amazon Central.
- Go to the Inventory tab by hovering your mouse over it.
- Click ‘Manage Inventory’.
- Once you are on the Manage Inventory page, enter the ASIN or the SKU and click search.
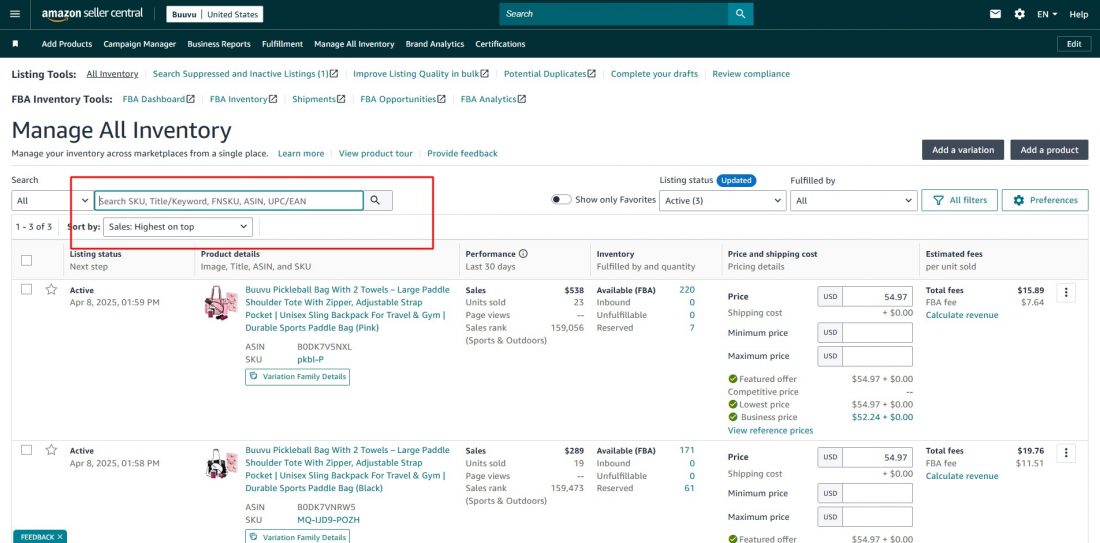
Note: Ensure the filters are set to ‘all’ if you are unsure if the listing is FBA or FBM.
5. Once you find the listing you want to update, click the three vertical dots beside each listing.
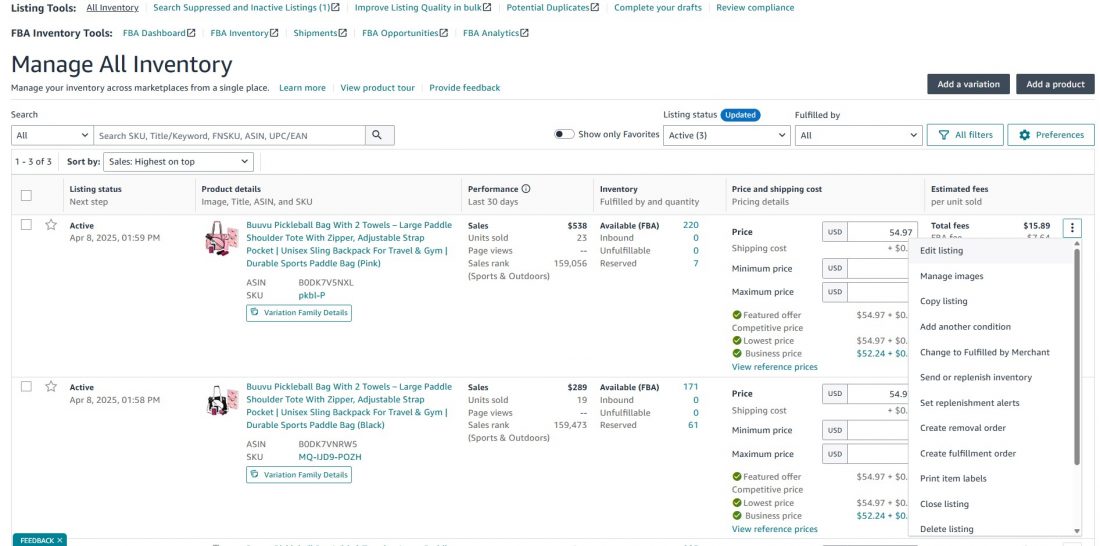
You will see different tabs such as product detail, variations, images, offer, safety & compliance.

6. To update a specific detail, like the product title, look for the relevant field (e.g., product name).
7. Hit ‘Save’ once you are done making the updates.
How to use Amazon Seller Central to access business reports
Let’s say you’re selling two phone cases. One gets 1,000 page views a week, the other just 150. With your business reports available on Amazon Seller Central, you can clearly see which one is catching attention and which one might need a better title keyword optimization for discoverability, a better image for gaining attention, or a lower price to encourage buyers to complete the purchase.
Or maybe your Buy Box win rate is sitting at 30% on a best-seller, which is a red flag. You might need to tweak your pricing to boost your competitiveness. Amazon Seller Central will give you direct insights into what can work well for your business.
Sellers who consistently check their business reports are more likely to catch performance dips early and correct the course instead of losing weeks (or months) of sales.
Inside Amazon Seller Central, you get access to a range of pre-built, powerful analytics reports that answer key questions like:
- What’s selling and what’s not?
- How many people are viewing my products?
- Am I winning the Buy Box, and how often?
Here are some of the most useful reports to explore within the Amazon Seller Central:
| Report type | Details | Insights |
|---|---|---|
| Business Report | Detailed information about your sales and traffic. You can view data such as sales by ASIN, page views, and Buy Box percentage. | Sales performance and making informed decisions about pricing and inventory. |
| Fulfillment reports | Insights into your Inventory, Sales, Payments, Customer Concessions, and Removals for FBA sellers. | For example, you can use the inventory age report to see how long your products have been in Amazon fulfillment centers, and the payment section to view your storage fees or surcharge calculations. |
| Custom reports | You can purchase reports that will give you in-depth insights about aspects that make the most sense to you. | Any information that you’re particularly looking for will be delivered by Amazon. |
| Inventory reports | Inventory Health Report, Active Listings Report, Restock Inventory Report, Stranded Inventory Report, Manage Excess Inventory Report, or FBA Inventory Age Report. | Many sellers set weekly reminders from Amazon Central to review their inventory reports. This habit helps maintain healthy stock levels, avoid unnecessary fees, and maximize sell-through rates. |
| Advertising reports | Helps you identify what’s working (and what’s not) in your ad campaigns so you can optimize spend, boost conversions, and grow profitably. | Search Term Performance, Click-Through Rate (CTR), Conversion Rate (CVR) Insight, Advertising Cost of Sales (ACoS) & ROAS Insight, Spend distribution Insight, Placement Performance Insight, Product Performance etc. |
Here’s how to access Amazon business reports in the Amazon Seller Central platform:
- After an Amazon Seller Central login, navigate to the ‘Menu’ and click ‘Reports’.
- Within the ‘Reports’ section, select ‘Business Reports’.
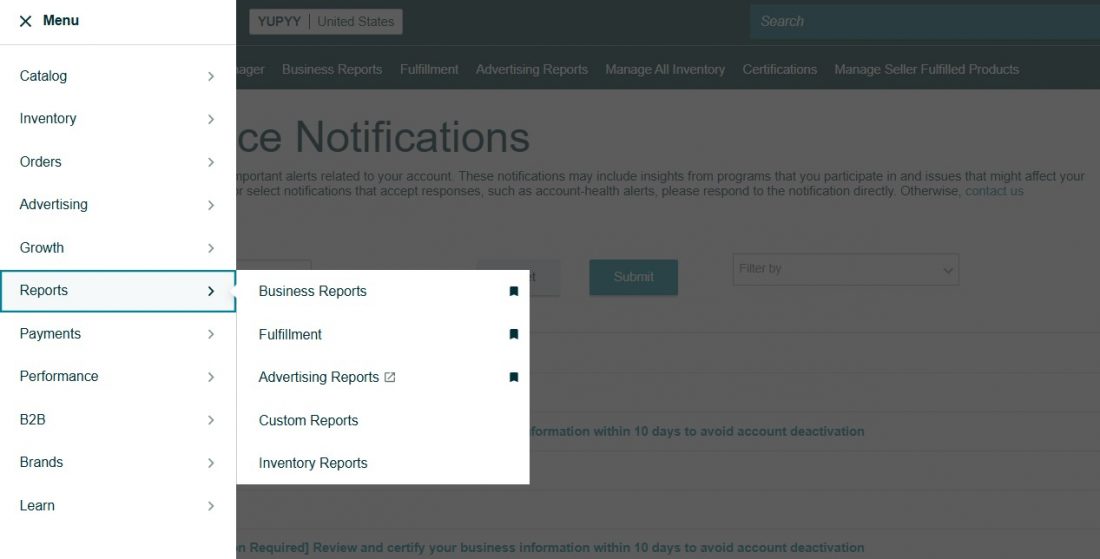
- To access a specific report, simply click on it and then select the report you want to view. Most reports allow you to customize the date range and filter the data to suit the relevance.
You can choose to download the reports in CSV format as well.
Whichever reports you have access to will be shown under the ‘Reports’ section.
By regularly accessing and analyzing these business reports, you can gain valuable insights into your product performance, customer behavior, and overall business health on Amazon Seller Central. Now, how to use the Amazon Seller Central platform to monitor business health? Head over to the next segment.
How to use Amazon Seller Central to view the performance and monitor Amazon seller Account Health
To use Amazon Seller Central to view your performance and monitor your Amazon seller Account Health, follow these step-by-step instructions.
- Log in to your Amazon Seller Central account and go to the homepage.
- Click the Menu in the top left corner of the screen..
- Click on ‘Performance’.
- Select ‘Account Health’ from the drop-down menu.
This will take you to your Account Health Dashboard, from where you can monitor if you’re meeting Amazon’s performance targets, such as policy compliance, late shipment rate, etc.
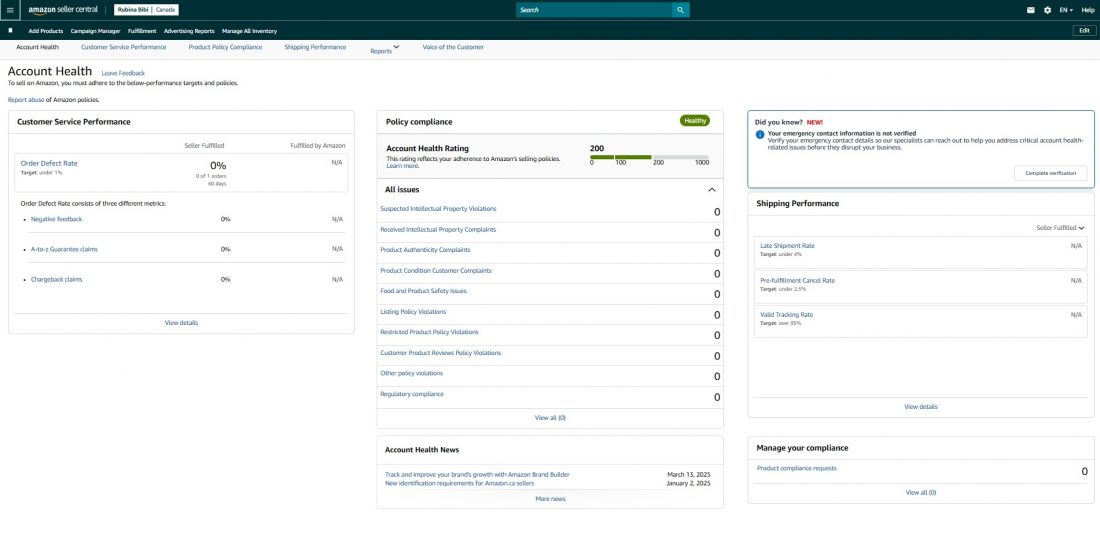
The dashboard is divided into three main categories that determine your overall account health:
- Customer Service Performance
This section helps you measure customer satisfaction based on your Order Defect Rate (ODR). The ODR is affected by negative feedback (two stars or less), A-to-Z Guarantee claims that aren’t denied, and chargeback claims. Your overall ODR target should be less than one percent of total orders during a 60-day period.
- Policy Compliance
This section highlights issues related to intellectual property, authenticity, product conditions, and other policy violations. Your target here should be zero policy violations. You should monitor this section regularly and respond to any warnings about breaches. Any documentation requests will appear under the ‘Product Compliance Request’ section.
- Shipping Performance
This metric helps ensure customers receive the necessary information after placing an order. Key metrics in this section include:
- Late Shipment Rate: The percentage of orders confirmed after the expected shipping date. Your target is below 4% for MFN (merchant fulfilled network) orders.
- Pre-fulfillment Cancel Rate: The percentage of orders you cancelled before shipping during a given seven-day period (excluding customer-initiated cancellations). Your target is below 2.5%.
- Valid Tracking Rate (VTR): The percentage of packages with valid tracking numbers for MFN orders during a given 30-day period. Your target is above 95%.
Note: Fulfillment by Amazon (FBA) orders do not impact your shipping performance or overall account health.
Expert tips for assured success with Amazon selling
Well, before adding a product to your catalog, you’d definitely want an idea of how it can potentially perform in the market. We have the simplest solution that will reinforce your confidence and guide you towards correct decisions.
SellerApp’s Opportunity Score is a tool that enables you to add a similar competitor ASIN or your product ASIN, which will not only give you an overall Opportunity score, but also break down the metrics and areas of improvement.

SellerApp’s Opportunity score considers a product based on its six metrics.
Demand
This metric shows if the product has demand on Amazon. Higher demand implies a better order rate in its category.
Revenue potential
It evaluates the revenue potential of the product. If this product’s estimated monthly revenue is high, you will be getting a good profit.
Competition
It shows the overall competition of the product.
Overhead cost
This feature shows if the product’s overhead costs are low or high, which affects the profitability of the product. If the products Amazon’s fees, shipping, and other expenses are low, they can have good profitability.
Profit margins
It analyzes whether you can make a decent profit with the product. After deducting all the associated expenses, if it’s high, then that product generates more profit from its sales.
PIS Index (Product Innovation Scope)
This metric analyzes whether the selected product has good scope for improvement or innovation.
To check your product’s Opportunity Score,
- Log in to SellerApp dashboard
- Click ‘Product Intelligence’
- Once you click on it, you can see a table view of all the products with a separate column
- Scroll to the right and find the Opportunity score column for the products.
- Once you click on it, you’ll see the ‘Opportunity Score’ section.
Depending on the product’s opportunity score, you’ll find low, moderate, and high values. It goes without saying higher scores the better.

Additionally, ensure that you glance at this checklist to come up with the right product. It makes your job easier. We’re adding a few tips on how to ensure success when it comes to Amazon selling.
- What you’re selling must sell 10 units a day.
- When the top 3 related keywords have 10,000+ monthly searches on Amazon, the product sells better.
- When the product price range falls between $10 and $50, the products gather better sales velocity.
- Products that you’re selling should have year-round demand.
- Seasonal products are only good when you sell them along with other products with year-round demand.
- The product should be small and lightweight (under 2 to 3 pounds) to avoid hefty FBA or FBM fees. If you’ve signed up on Amazon Seller Central USA you can leverage from the Low-price FBA Fees.
- If you’re reselling, there shouldn’t be any brand names or trademarks on the product or in packaging of the product.
Additional Read: Find the most popular items to sell on Amazon
How to manage Seller-fulfilled orders in Seller Central (FBM)?
Here are the steps for successfully managing Amazon FBM fulfilment, focusing on actions within the Amazon Seller Central portal:
- Start by setting your listings to FBM.
- Within the Amazon Seller Central, go to the Menu and click ‘Inventory’.
- Select ‘Manage All Inventory’.
- Under the ‘Inventory’ column for each listed items, you can see its current settings (FBM or FBA)
- Check the boxes for the specific listing you want to change.
- After selecting the listing, click ‘Select group action’.
- Click ‘Change to Fulfilled by Merchant’.
- Set accurate delivery dates and shipping costs.
- Create or update your Shipping Templates, which are found in your shipping settings.
- Then click ‘Shipping Settings’.
- Click the gear icon in the upper-right corner, and then click ‘Shipping Settings’.
Here you can edit shipping fees per region for multiple shipping options like Standard Shipping, Expedited Shipping, Premium Shipping, and International Shipping.
Top 7 Amazon Seller Central KPIs You Must Track
If you’re navigating the Amazon Seller Hub in 2025, the platform is no longer just a control unit but a monitoring unit. And to grow your Amazon business, you need to track the right numbers. Let’s break them down.
1. Conversion Rate (Unit Session Percentage)
This one’s simple. It shows how many people visit your product page, and how many actually bought it. If your page is pulling in traffic but not converting, know something’s off. It could be pricing, lackluster images, weak descriptions, or even negative reviews.
You can find this metric by going to Menu> Reports > Business Report in your Seller Central account. Look for the Unit Session Percentage to have better insights.
A solid benchmark of Conversion rate would be 10%–15%. Anything lower means there’s work to do.
2. Keyword Ranking
Ranking high in Amazon’s search results is gold. This KPI tells you how close you are to that first page when customers search for terms tied to your product. The higher your product ranks, the more eyeballs, leading to higher potential sales.
This is a core part of Amazon seller services like listing optimization and PPC, and every smart seller keeps an eye on it.
3. Inventory Performance Index (IPI)
IPI is Amazon’s way of grading how well you manage your inventory. If you’re often out of stock or hoarding excess inventory, your score drops and that affects your ability to store goods in FBA warehouses.
You’ll find it on your Amazon seller panel under Inventory > Performance Dashboard.
Tip: Keep your IPI healthy by monitoring sell-through rates, staying stocked on high-demand items, and clearing out what’s not moving.
4. TACOS (Total Advertising Cost of Sales)
TACOS measures how much of your total revenue goes into advertising, be it organic and paid combined.
A TACOS under 10% is generally a good sign your ads are supporting long-term growth. A rising TACOS, however, could indicate your ads are losing efficiency or your organic traffic is drying up.
5. ROAS (Return on Advertising Spend)
ROAS flips the TACOS equation and shows you how much revenue you’re generating for every dollar spent on ads.
The higher, the better. A ROAS of 10 means you’re earning $10 for every $1 spent. That’s solid return, and essential to scaling your Amazon business profitably.
6. ACOS (Advertising Cost of Sales)
Think of this as the micro view of ad spend. It’s just looking at the sales you get from ads.
For most sellers, keeping ACOS between 15% and 20% ensures you’re not bleeding money. Higher ACOS might make sense if you’re aggressively launching a product, but in the long run, it should trend downward.
7. Account Health
One of the most overlooked but critical metrics. Your Amazon selling account could be at risk if your Account Health dips too low. You can set notifications for account health fluctuations as mentioned above.
Amazon tracks factors like:
- Late shipments
- Order defect rate
- Policy violations
You can find all of this under the Account Health in Seller Central. To stay in the clear, follow Amazon’s policies, ship orders on time, and keep your customers happy. If you run into trouble, Amazon Seller Central Customer Service is your go-to for resolving urgent issues.
How to contact Amazon Seller support using Amazon Seller Central?
While running an Amazon business as a seller, you may come across unforeseen obstacles, maybe due to your performance or due to an unknown Amazon glitch. The way to address it and resolve the issues is to contact Amazon Seller Support for assistance from Amazon Seller Central customer service.
- You can click on ‘Get Help and Resources’ from the top right corner of the Seller Central homepage.
- Choose your region of marketplace, issue, and proceed by hitting the ‘Continue’ button.
In this way, you can request a call, email, or live chat communication from the Amazon seller portal.
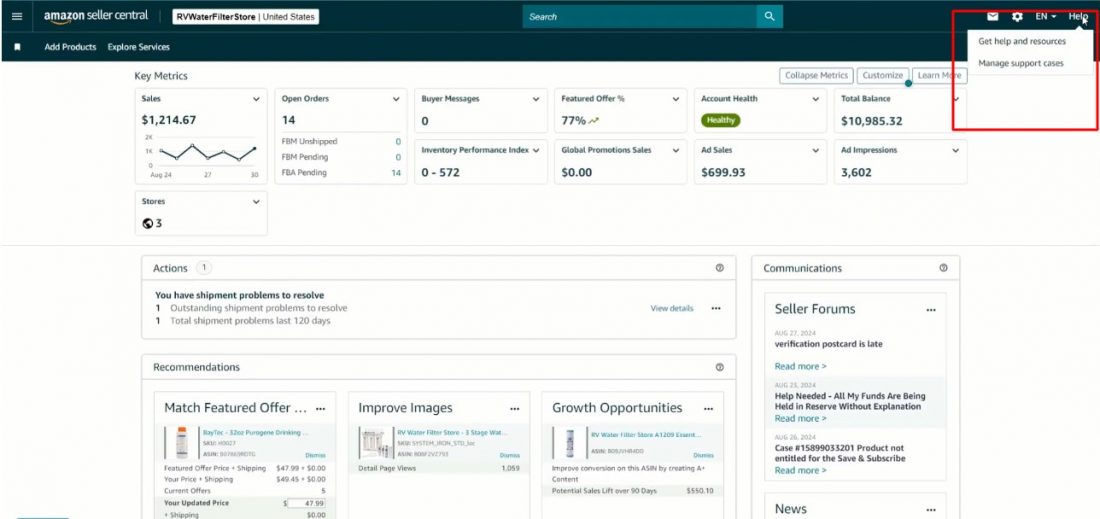
No matter what method you choose, Amazon Seller Support is available to help you with any questions or concerns you may have as a seller.
How to use Amazon Seller Central to create discounts and deals
You can use the new price discounts dashboard to create and manage product discounts on Amazon Seller Central.
- After Amazon Seller Central login, go to the homepage.
- Click the ‘Menu’ in the top left corner of the screen. Then navigate to ‘Advertising’.
- Click on ‘Price Discounts’.
If you don’t see this option, it might be because you are logged in as a user, and the primary account holder needs to permit you.
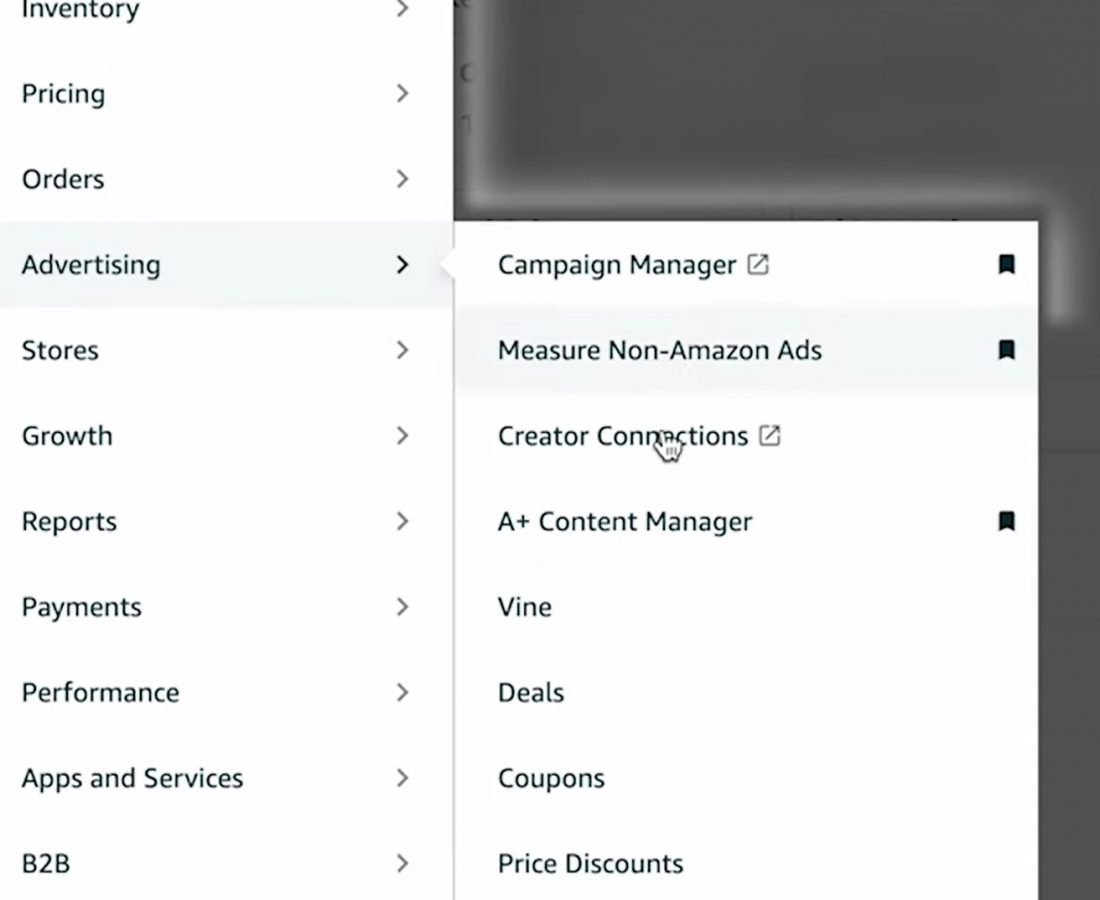
- Click on ‘Create a price discount’.
- Enter campaign details. Choose the specific marketplace where you want to offer the discount (e.g., US). If you manage multiple brands, select the relevant brand account. Select the start date and end date
Note: A sale can only last for up to one month.
Don’t forget to add an internal description for your own reference, for example, the product name and the discount percentage “Product X – 10% off”.
- You can search and select products to add to the discount.
- Select a parent ASIN to include all its variations. You can click “add” for each product or click ‘select all’ and then ‘add’ to include all displayed products.
- Set a discount. Enter the discounted price you want to offer. The system will calculate the percentage discount.
- Select committed units that will allow you to control the number of units eligible for the discount. Once this number of units is claimed, the sale will end, and the price will revert to the original.
- After setting the discounts and committed units, review everything and then click ‘Submit’.
Note: It might take a little time for the discount to activate.
The dashboard allows you to edit your active price discount campaigns. You can change the discounted price or the number of units committed and then submit the edits. This new price discount dashboard is a significant improvement over previous methods, where you often had to remove and recreate coupons or manually edit product listings.
How to change the account information using Amazon Seller Central?
Follow these steps to change account-level information on Amazon Seller Central USA.
1. Log in to your Amazon Seller Central account.
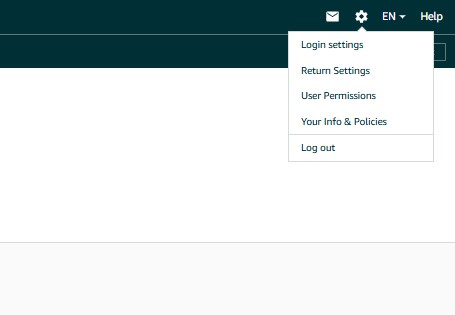
2. Head over to the ‘Settings’ option at the top right corner.

Click ‘Account Info.’
4. Choose the aspects that require change and make the changes one after the other.
6. Click ‘Save’.
At this point, before confirming, review the changes to make sure they are correct.
8. Click ‘Submit’.
Your changes will reflect within 15 minutes to 24 hours, depending on what changes you made.
Note: For title, bullet points, description, images etc. It usually takes 15 minutes to 1 hour to get updated. Whereas, backend keywords and Amazon A+ Content may take up to 24 hours.
Can you give another person access to your Amazon seller account?
You can share your Amazon Seller Central account access with a reliable source of choice. After all, there should be someone in your business who can take care of these functions when you’re unavailable.
This is specifically beneficial if you have employees or virtual assistants who help run your Amazon business.
To give your Amazon Seller Central access to a third person, you must
- Go to ‘Settings’ in the top right corner
- Click ‘User Permissions.’
Here, you can add a third person as a user to your Amazon seller account.
Final thoughts
Mastering your Amazon Seller Central is an essential component of any successful seller.
If you can efficiently manage them, then it can help your Amazon business.
With the help of this guide, you should now better understand Amazon Seller Central and how to best manage it.
Amazon definitely holds great significance today, and the internet is full of success stories of people who highlight how Amazon helped them quit their 9-to-5 corporate jobs. As you progress, learn to understand all the key features so you can maximize the benefits of the platform.
Do you find this article useful? Do share your thoughts in the comments below!
You can also follow the SellerApp blog as we bring you the latest seller updates, tips, and strategies to help you make the most of Amazon as a seller.
Additional Guide:
What Are The Common Amazon PPC Mistakes
How to create an Amazon wish list
Types of Delivery Services Offered by USPS






Robert
May 10, 2021Thank you for all this great informative stuff and blog posts!
Arishekar N
June 15, 2021Glad you liked the article.
Sabra
May 19, 2021Your blog provided us valuable information to work on. You have done a marvelous job!
Arishekar N
June 15, 2021Glad to know.
David
November 25, 2022I’m so glad I stumbled upon this guide. As a beginner Amazon seller, the information provided was clear, concise, and easy to understand. I especially appreciated the tips and tricks for increasing sales.
Arishekar N
January 17, 2023Thanks for sharing your feedback.
Ayisha Hafeez
January 9, 2023Great post! As a new Amazon seller, I found the information in this guide to be extremely helpful. The step-by-step instructions and screenshots made it easy to understand how to navigate Amazon Seller Central. Thank you for sharing
Arishekar N
January 17, 2023I’m glad you enjoyed the post. Your feedback is always valuable to us.