© 2023 Powered by SellerApp
Amazon Bid: The Ultimate Guide to Dynamic Bidding Strategies
To win big and remain relevant in the Amazon industry, sellers should have a keen understanding of how bidding works, and the different bidding options available to them. Mixing and matching the right strategies along with the right conditions can do wonders for your campaigns by driving your competitor traffic in no time.
Before diving into the nitty-gritty of this subject, I want to make this concept as easy as ever for you. So, take a look at this blog and understand the key concepts of bidding. In case you are too reluctant to do so much reading, watch our short video here.
Whether you are an advanced or a novice seller, this article will definitely clear all your doubts about Amazon’s bidding strategies and provide you with a smooth understanding of how these features can be implemented to benefit your business.
The topics we will cover in this article are –
- What is Amazon Bidding?
- Basics of Amazon Bidding
- What are the different types of Amazon Bidding?
- How does Bidding by Placement work?
- Best Amazon Bidding Strategies to maximize returns
- How to calculate your Amazon Bid?
- Optimize your Amazon Bidding with SellerApp
Before we start, we recommend you measure your overall ad ROI by benchmarking your advertising KPIs.
What is Amazon Bidding?
Advertising on Amazon is nothing but an auction system where sellers bid on keywords and the seller with the highest bid and best-targeted keywords finally usually wins the auction. How? The bidding strategy becomes successful when the customer’s search term matches with the seller’s targeted keywords and the ad is served to them.
Therefore, it is not the Sponsored Product or Brand ad that you will pay for, but the ad clicks you get on every impression.
Amazon has recently introduced a huge list of new Amazon PPC features — among them, the most innovative has to be ‘Campaign Bidding Strategies‘ and ‘Adjust Bids by Placement‘.
These two Amazon PPC features are brimming with clickbait for many reasons — some sellers think it’s intriguing and risky because even the tiniest of mistakes that involve bidding have the ability to ruin all their existing well-optimized campaigns.
Recommended to read: What Are The Common Amazon PPC Mistakes.
However, many Amazon sellers are very enthusiastic about these new Amazon bid opportunities. They view this upgrade as an opportunity to outwit their competitors and bring in huge profits to their businesses.
The truth is – this difference between the two opinions of Amazon sellers is a direct result of competence. Some of them have leveraged these features so successfully that they have witnessed some brilliant sponsored ad results while some are still in their learning stage.
Additional Read: Amazon Advertising Grading Checklist for 2023.
Learn the Basics of Amazon Bidding
Here, we will start from the basics and help you build the foundation of your Amazon bidding strategy in the most effortless manner. Understanding ad ROI, tracking costs, commissions earned by Amazon through clicks, and ACoS (Advertising Cost of Sale) is fundamental to this foundation as this will save you wasted ad spend and improve your conversion rates.
Additional Read: How To Improve Your Amazon Mobile Conversion Rates.
By measuring cost – you will finally figure out the power of your ads and how much profits they can generate with a few steps – so you can make more informed decisions about where to spend and how much to spend on ads. Next, we’ll talk about types of Sponsored ads and types of targeting, and which is the best for your business.
So, let’s begin with the basics of Amazon Bidding concepts –
Profit-Oriented Bidding
One major idea that underpins all other Amazon bidding aspects is profit. Profit-oriented bidding for Amazon ad campaigns. In layman’s terms, ad profits are nothing but the portion of revenue that you acquire after incurring all the other ad costs.
Costs:
To better understand the huge impact that your bidding decisions have on your entire ad campaign, you’ll need to be aware of the costs incurred when those bids convert, i.e. brings sales. The biggest expenditure is usually the cost of the items, or the amount required to replace the sold items. It’s always recommended to add this amount on the ad group level, to simplify bidding decisions.
Recommended Guide: How Much Does Amazon Advertising Cost
Commission:
Do not miss out on commissions that you owe to Amazon. Typically, these charges are around 15 – 20% of product sales but can be as high as 45% based on the item that you are selling. Hence, you must take note of all these extra costs before you decide on advertising your listings.
Recommended to read: Amazon Profit Margin: All that Finally Matters.
ACoS
ACoS is typically used to determine how profitable your campaigns are. For most sellers, a lower ACoS of 15-25% is the ultimate goal achievement as it is a key parameter that determines campaign performance and provides room for optimization.
It is calculated by dividing the total ad spend by total sales and converting it into a percentage. For example, if your total sales from the ad are $25 and you spent $5 on the ad, your ACoS will be 20%. It is used to evaluate the effectiveness of your ad campaign. The lower the ACoS, the more profitable the campaign.
| ACoS = Total ad spend / Total Sales * 100 |
RoAS
RoAS is the reverse of ACOS. It determines the return of investment on your Amazon ad campaigns. To calculate ROAS, divide your total sales yielded from the ads by the amount spent on the ads. For example, if you generated a revenue of $20 from your ads and spent $4 on them, your ROAS is 5%.
| RoAS = Total Sales / Total ad spend, |
However, similar to ACoS, it cannot be the only determinant of your overall ROI as it does not take into account the cost you incurred in acquiring the products, such as inventory cost, cost of goods, shipping costs, etc.
Types of Sponsored Ads
Sponsored Product ads
Sponsored Product ads are a type of Amazon PPC ad that you can view in Amazon SERPs and product listing pages. They are very much similar to organic listings, thereby, making it the most preferred type of third-party sponsored ad.
When crafting Sponsored Products Ad campaigns, there are two types of keyword targeting strategies to keep in mind – automatic targeting and manual targets – which we will explore now!
To understand Sponsored Products Ad even better, read our in-depth guide on Sponsored Products Ad Vs Sponsored Brands ad.
What is Manual Targeting?
With manual targeting, you can manually intervene in the process and select the keywords that best represent your listing. You may either bid on the ad group level or on the keyword level. SellerApp recommends bidding on the keyword level as it fosters a good level of granularity and is highly suited for occasions and holiday seasons.
Based on your advertising campaign goals, you can choose from three keyword match types for Manual Targeting. They are –
- Broad match: Your ad will be triggered when a customer searches for your keywords in any order, along with other key terms that closely resemble your targeting keywords. While broad match keywords do not guarantee the most relevant results, they are a great way to gather data. Start with a broad match to find new keywords and increase ad visibility to a wide range of shoppers.
- Phrase match: Your ad will be displayed if a shopper uses those keywords in the same order, including suffixes or prefixes.
- Exact match: The ad will only be displayed when a shopper uses the exact targeted keywords. The search term will not include any other words or phrases. This is the most refined targeting option. It generates highly-relevant traffic, higher conversion rates, and reduces ad spend.
Note: Amazon searches are not case-sensitive.
You can choose different match types for these keywords and can decrease bids or eliminate poor-performing key terms, if necessary. This also gives Amazon advertisers more control over their ad spend and overall ROI than automatic targeting.
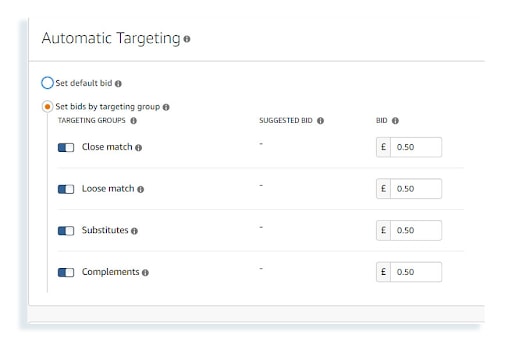
What is Automatic Targeting?
With automatic targeting, you cannot intervene in your ad campaign much. You let Amazon do most of the things for you. All you can do is set a CPC bid and insert all your relevant keywords while Amazon decides how to display it and which customers to target.
Under Automatic Targeting, sellers can choose from four different match types.
- Close match: Keywords closely related to the items.
- Loose match: Keywords tangentially related to the items.
- Substitutes: Display ads to customers who visit product pages of similar items.
- Compliments: Display ads to customers who visit product pages of items that complement yours.
Based on the ACoS or the RoAS for each target type, you could decide to ride out a few. Additionally, you can raise or reduce the bid for your specific ad group.
Auto campaigns are often not the best campaigns for driving sales and increasing profits, yet they help discover new, high-converting amazon long-tail keywords.
Note: Automatic Targeting is available for Sponsored Products campaigns only.
In the case of Automatic Targeting, advertisers can adjust bids via ad group, but if several listings are present in a single ad group, then there’s no way to identify which listing or targeting is yielding the best results. Therefore, we recommend limiting the number of listings per ad group – for example, adding only one listing per ad group or adding only closely related segments.
Sponsored Brand Ads
Sponsored Brands allows Amazon sellers to build brand awareness for several listings simultaneously, with more innovative visuals than Sponsored Products. With two formats available – headline banners at the top of search results or a video further down on the page – this ad type is highly eye-catching and drives traffic in no time.
This is more beneficial for brands that sell luxury items or have already established their brand in the marketplace and are currently looking to position their brand in a way that only its name must drive sales.
Sponsored Display Ads
Sponsored Display ads are the newest type of PPC, but third-party Amazon sellers don’t utilize it much. The main goal of Sponsored Display Ads is to retarget existing customers or site visitors who have already visited their product pages and are aware of their brand. Unlike Amazon Sponsored Product or Brand ads, Display ads can be seen anywhere on Amazon’s affiliated sites like Instagram, Netflix, and other mobile apps.
ASIN Targeting
Within Amazon PPC, the product targeting feature enables you to improve the efficiency of your ad campaigns. Sellers can target individual listings, categories, and filter them based on price, rating, or listings.
Amazon Sponsored ads ASIN targeting allows you to target particular ASINs for which you want to campaign.
What are the different types of Amazon Bidding?
Now that you know the fundamentals of Amazon Bidding, the next step is to build your Amazon campaign bidding strategy and decide on the type of bidding strategy you want to leverage. Do you have budget problems, or have you set a good amount of money aside for Amazon ads? Do you want complete control over your bids, or are you okay with letting Amazon make a decision about your ad spend?
Once you have the answers to the aforementioned questions, you can finally decide on the type of bidding you want to go for. There are four types of Amazon Bidding. They are –
Additional Read: How to Answer Customer Questions on Amazon.
Dynamic Bidding(Down Only)
What is it?
Amazon will lower your bids — up to 100% — of your ad is less likely to make a sale. This phenomenon reduces your ad costs.

When to Use Dynamic Bidding(Down Only)?
This was Amazon’s previous default option and it’s the most profitable strategy to drive maximum profits. It optimizes ad spending in situations where your ads aren’t able to make conversions. We recommend using this if you are still not confident with ad campaigns.
Focus: Cost reduction
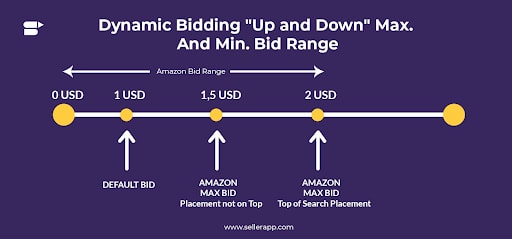
Dynamic Bidding(Up and Down)
What Is It?
Amazon will increase your bid — by up to 100% — if the likelihood of making a sale is high, and lower your bid when there isn’t enough conversion. Note: 100% bid raises are reserved for top-of-page placements (other ad bids have an upper limit of 50%.)
When to Use Dynamic Bidding(Up and Down)?
You can leverage this strategy and ensure a profit-oriented ad campaign for your well-optimized ads! It may even be a better idea if your bids are highly volatile, i.e. the market makes your bid variable in nature since it offers more flexibility than the other bidding options. While using this type of bid, you must keep an eye on your ad spend and be confident in spending more than 100% of your bid, if needed.
Focus: Sales and efficiency.
Fixed Bids
What Is It?
The bid you choose will be set as default here and no matter what adjustments you make — it will not change on the basis of conversions.
When to Use Fixed Bids?
We don’t recommend using this option. You will most certainly overspend for a sizable portion of your clicks since Amazon will use your bid to absolutely every placement without considering the conversion rate at all. There are a few occasions where sellers use fixed bids:
- During product launch.
- To increase brand visibility.
Focus: Impressions and sales.

Rule-based Bidding
What Is It?
Amazon recently launched the ability to implement rule-based bidding to target a specific ROAS. It is a recent innovation in the Amazon Bidding methods that allows sellers to take action based on pre-set rules and conditions, ranging from simple to complex, that they themselves have to enter into the system. This type of bidding system requires the user to set manual conditions based on “if/then” rules that would trigger bid and keyword changes whenever the set conditions are met.
When to use Rule-based Bidding?
Rules-based bidding can be advantageous for sellers who want more control over their PPC campaigns.
Key Features
Sellers can specify a target ROAS at the campaign level to allow Amazon to adjust the bids in real-time based on the likelihood of meeting the set guardrails. Some of its key features are:
- Amazon will adjust bids up or down to improve conversions up to the ROAS limit.
- Sellers can set a particular bid threshold guardrail where Amazon guarantees they will not go beyond the bid guardrail by more than 25%.
- Amazon will not guarantee its achievement of the target ROAS and will switch back to the original settings if the campaign is able to reach the ROAS target within a 21 day period.
- The rule-based bidding is only available for Sponsored Product ads.
- This rule can be implemented for Auto, Keyword, or Product Targeting campaigns but the ad campaign must run for at least 30 days with at least 30 conversions in the previous month.
Focus: More control over ad campaigns
How to bid on Amazon PPC Campaigns? (For Beginners)
Most sellers use two of the techniques to bid – Inch Up Method; Fast and Sloppy Method. If you are a PPC Beginner, trust me, these two techniques are the best ways to go about your campaign optimization.
Fast and Sloppy Method = High ACoS
Day 1 = $5 bid, 10 Clicks, 1 conversion
Day 2 = $5 bid, 9 clicks, 1 conversion
Day 3 = $3.5 bid, 10 clicks, 1 conversion
Total Cost = $130
Total Clicks = 29
You might be thinking that it’s a huge amount of money spent on ads that acquired only 3 conversions, totaling $200 of revenue and a whopping 65% of ACoS. But when you repeat this technique over and over again, you will end up with lots of data and yield a report which will help you figure out the best keywords for your campaign.
The Inch-Up Method = Low ACoS
Avoid over-spending using the most recommended PPC bidding method – Inch-Up.
Day 1 = 10 cents, 0 clicks, no conversions
Day 2 = 20 cents, 0 clicks, no conversions
Day 3 = 30 cents, 1 click, no conversions
Day 4 = 40 cents, 4 clicks, 2 conversions
Day 5 = 50 cents, 6 clicks, no conversions
Day 6 = 60 cents, 10 clicks, 3 conversions
This is the most recommended method where you spend only $10.9 and get 21 clicks and 5 conversions of revenue of $50, with an ACoS of 22%. The Inch-Up Method, allows you to find the lowest bid that yields you the most information. Once you actually get a conversion, well, then you know exactly how much to bid. The fundamental of the bidding process is that if your ACoS is below 25% and the keyword you are bidding on is yielding you over 2% conversion, then you must bid more aggressively on that.
This process of the Inch-Up Method saves a lot of money over the course of thousands of keywords over the course of months and increases your Ad ROI greatly.
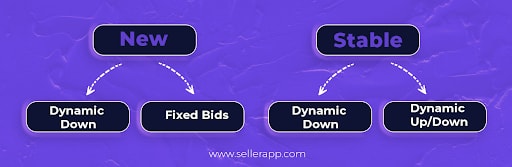
What does Amazon Recommend on Dynamic and Fixed Bidding?
There are some Do’s and Don’ts when it comes to Dynamic and Fixed Bidding. Here’s what Amazon recommends sellers not to do-
- Don’t run ‘Down Only’ and ‘Up and Down’ campaigns together to evaluate their results. (They will be bidding against each other in the same impression)
- Don’t run a new ‘Up and Down’ campaign and compare its results with an older/existing ‘Down Only’ campaign. The older campaign will yield better results as it has more data.
- Don’t imitate an existing campaign and run it using the ‘Up and Down’ bidding. When you copy a campaign, the sales history data will not get transferred.
How do advertisers calculate the optimal bid?
The very fundamental of your bidding is to understand the accepted principles and science behind its calculations. Consequently, advertising experts have crafted a widely accepted, easy-to-understand equation to calculate a bid:
| Bid = Max. CPC = (Ad Sales / Ad Clicks) x (Ad Spend / Ad Sales) |
Now it’s important to note that every Amazon marketer has created their own ‘secret sauce. This equation is simply the basic calculation on which complex bidding algorithms depend. There is a myriad of other assumptions and variables that can be mixed and matched to create an even more powerful formula.
What happens with my existing Amazon campaigns?
This is the first question you must have already asked yourself after Amazon released its new bidding strategies.
Well, all your existing campaigns have been set to ‘Dynamic Bids — Down Only’ (and this can also be chosen as the default bidding option for all the new campaigns you will create).
In fact, ‘Down Only’ dynamic bidding is what you have been using all this while, even before Amazon released the other two bidding strategies.
They just didn’t communicate this. Therefore, if you don’t edit bidding options, your campaigns will not alter at all.
How does Bidding by Placement work?
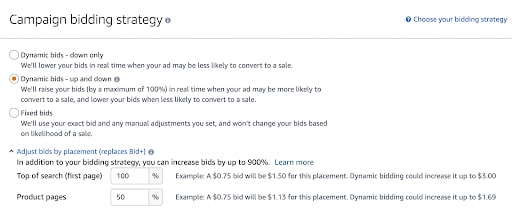
Another innovation in the features of Amazon PPC that will allow you to get into the nitty-gritty of Sponsored ads is the new ‘Adjust bids by placement‘ feature.
You can now allow Amazon to automatically raise your Amazon bid by up to 900% for ‘Top of Search’ and ‘Product Pages’ placement auctions.
Amazon adds, eliminates, and shifts Sponsored product placements very often. As for now, Amazon segregates the placement into the following categories:
- Top of Search: Sponsored product ads appear at the top row on the first page of SERPs.
- Product Pages: ‘Product pages’ means the sponsored products can be viewed on the amazon product details page, and other placements outside the SERPs, like the add-to-cart page.
- Rest of Search: All other placements in the Amazon SERPs that come after ‘Top of Search.’
If you select Dynamic Bidding, you can also select particular placements to bid on: Top of Page and Product Page.
The default setting is “Rest of Page’‘, which targets any other ad placements present on other pages like pages 2, 3, 4, and so on. You can apply an ad adjustment on top of each of these placements. For example, you could select Top of Page and apply a 50% adjustment. If your bid was $2.00 – then it could only be raised to $3 to acquire the Top of Page placement.
3 Strategies to Follow When Bidding by Placement
Plan #1: Measure and Modify
Analyze the placement data for every single campaign and use the recommendations given by SellerApp on how to adjust your modifiers. You can also download the PPC report from SellerApp’s dashboard, which is more convenient. Or you could simply look at SellerApp’s Bulk Actions Report that allows you to view, filter, and edit modifiers at each placement.
Plan #2: Segment your Keywords under every unique Campaign
A lot of sellers make the mistake of adding thousands of keywords under their ad groups, hoping to acquire clicks and conversions. However, not all keywords will generate clicks. Some of them only get impressions which is a waste. Amazon will usually favor those that continue to show results. That’s why the trend nowadays is to segment your keywords so that each of them gets enough clicks and allows for a seamless budget allocation. This is why you need to separate keywords into four categories and choose only the high-performing ones-
4 Ways of How to Separate Keywords
Single Keyword Campaigns – Choose a few keywords that are highly relevant and go aggressive on those(bid very heavily) with Top of Search modifiers. Make sure to allocate a definite budget and separate those keywords from the other ones. For example, if you are selling stilettos for women, keywords like “pink stilettos”, “black stilettos under 500” are super relevant ones that you should bid aggressively on.
Volume Based Separation – Keywords that have high volumes will take away most of your budget, and may not even get you conversions. If you combine high and low-volume keywords, the low ones won’t get many impressions. So, segregate them, to reduce your ACoS.
Relevance Based Separation – Pick up super relevant keywords and add them to your keyword buckets. It will give you more opportunities as far as placement modifiers go.
Competitor Keywords: You can also add your competitor keywords under your single keyword campaigns to grab competitor traffic. Remember, using competitor keywords will need you to bid way higher on them, and at times, they may not even fetch you clicks, but it’s worth a shot if you want to snatch your competitor slot.
Related ASINs: If ASINs from different listing categories are sponsored together within a single campaign, it can be very problematic to report on the performance of different listing categories. This is why you can advertise ASINs at a more granular level. For example, advertising “Straight fit men’s Jeans” instead of “Men’s Jeans” will provide you more data after it gets a sufficient number of clicks, which then allows further segmentation.
Branded vs. Non-Branded – Branded keywords get more attention, so do not mix them with non-branded keywords. Do not forget to allocate a certain budget and bidding strategy.
Plan #3: Modify Bidding Strategy After Launch
If you are new to the PPC strategy or you are launching a new product on Amazon, the first two-three weeks are the most important phase of your ads where you can screen through your best and worst-performing keywords, bid ranges, placements, and so on, and accordingly modify them, as per your Search Term reports.
This time is also when your products get more exposure, so you want to make sure that it gets the highest conversions. You can call this the honeymoon phase, where a lot of historical data is ignored.
In this strategy, you also have to make sure that you don’t have sparse data. This won’t allow a dynamic up and down activity. At SellerApp, we suggest that it is this time when you decide how much you’d like to bid and go for it.
You have the option of Dynamic Bidding but use Dynamic Down bidding, if you want to keep your ACoS low. Don’t forget to have the max default bid you want to spend and watch it for 2 to 3 weeks. Once it settles down, you can track the ACOS. If the ACOS is good, you can use the Dynamic Up/Down bidding strategy.
How to combine “adjust bid by placement” and keyword bid?
We are here to make your life easier and that’s why our PPC team has found the best strategy for you to combine your placement bid and keyword bid to find the optimal way of creating ads.
Single Keyword Campaigns
You can adjust your bids by placement only at the campaign-level setting. That means that advertisers can only adjust bids for campaigns, not individual keywords within a campaign.
So how can sellers optimize placement bids for single keywords?
A single keyword campaign allows us to customize placement settings for an individual keyword. This means that you will have control over all the placement modifiers.
If we see a situation like the one shown below, it’s clear that Keyword A and Keyword B are not performing in the same manner, depending on their placement. As long as these keywords are in the same campaign, they will be treated the same and your budget will not be spent effectively.
| Keyword A | Keyword B |
|---|---|
| Top of Search - 15% | Top of Search - 45% |
| Product page - 5% | Product page - 1% |
Now if both Keyword A and Keyword B were in different campaigns, you can adjust bids for each placement separately and adjust their ad spend.
When Should I not use Single Keyword Campaigns?
When it comes to PPC, there is never a one-size-fits-all strategy. For example, if you have a low-traffic keyword with twenty clicks and one sale, you shouldn’t be using single keyword campaigns. However, a keyword with thousands of clicks and hundreds of conversions is certainly qualified for single keyword campaigns.
What we’re discussing now is not just trying to hit your target CPC simply at the keyword level, but the ad placement level as well. Now let’s consider a couple of scenarios where your actual keyword will be different depending on your ad placement data.
How to Find the Right Placement Bids for Single Single Keyword Campaigns?
If you’ve already made your single keyword campaign, it’s time to measure and modify your placement bids. Here, we will not just hit the target CPC at the keyword level, but also target the at the placement level. Now let’s check a couple of scenarios where your actual keyword will depend on your ad placements.
UseCase 1: When Top of Search and Product Pages are the best performing placements
Let’s say you have a target CPC of $0.80 And the Rest of the Search placement is the worst-performing placement for single keyword campaigns. Top of Search and Product Pages are outperforming Rest of Search by a huge margin.
Should you set your keyword bid to $0.80, thereby giving it an $0.80 bid for every placement? Absolutely not.
When deciding on how to adjust your placement bid settings, remember these two rules:
- Rest of Search doesn’t have a bid modifier. Only Top of Search and Products Pages can be modified.
- Bid modifiers cannot be negative.
So in this scenario, the base bid would be lower than your target CPC for the low-performing Rest of Search placements. We then use bid modifiers to enhance Top of Search and Product Pages bids.
How do you calculate your bid modifier? Use your desired bids for Top of Search and Product Pages and find the percentage increase required to reach that bid. The desired bid is computed by multiplying Revenue Per Click and Target ACOS.
Percent Increase = Amount of Change / Original Amount
UseCase 2: When Product Pages are the worst-performing placements
When Product Pages are the worst-performing ad placement, the formula isn’t the same and gets trickier. Since we can’t simply modify the Rest of the Search bid, we have to calculate the weighted average of our CPC for Product Pages and the second-best performing placement.
Let’s say our second-best placement is ‘Rest of Search’, for this example. The formula to find the base bid would look like this:
(Rest of Search + Product Pages Sales) / (Rest of Search Clicks + Product Pages Clicks) X Target ACOS
Multi-Keyword Campaigns
While the concept of single keyword campaigns may be new to some sellers, multi-keyword campaigns are the most common method used by most amazon sellers. Out of all the campaigns set by SellerApp PPC experts, 99% are multi-keyword campaigns, so the importance of optimizing your bid placement settings for these campaigns is highly important.
How to Get the Best Placement Bids for Multi-Keyword Campaigns?
When computing bids, it’s important to identify what Amazon provides sellers and that this process isn’t mere mathematics. There is no perfect way to do this except having single keyword campaigns for every keyword, which isn’t a very good idea to go about. Sellers are only given the total number of clicks for each keyword and each placement. But for our strategy, that’s all you need.
Let’s look at an example of how to use these parameters to your benefit. Suppose, a keyword has 200 clicks and the entire campaign has 400 total clicks. You can analyze these numbers and say, more likely than not, what percentage came from Top of Search.
In a campaign that has 400 clicks, you can check your Top of Search placement reporting and see that Top of Search acquired 200 clicks or 50% of total clicks. This is the Top of Search click-share.
Click-Share Percentage = Clicks for a Placement / Total Campaign Clicks
You can use each keyword’s click-share to figure out where the next click will originate from and bid based on that assumption.
In short, this strategy comes down to one key fundamental:
Note: Your Target CPC isn’t equal to your bid.
In most cases, you’ll want to bid a little less than your Target CPC as you will set a bid modifier increasing Top of Search or Product Pages. This lower bid, combined with the modifier, will take you to your Target CPC.
Do Bidding Types play an important role in Automatic Campaigns?
Although you can’t decide on your ad placements for automatic campaigns, each ad group still has a maximum bid that can be altered and adjusted according to your ad budget. That’s where your Amazon campaign bidding strategy comes in!
Each ad group also has four categories: close matches, loose matches, complements, and substitutes. You may set an additional percentage to each of these categories, to let Amazon adjust the bids in a favorable way. For example, a -20% adjustment for loose matches will lead to a bid reduction of 20% to every loosely matched bid placement.
Let’s take a look at each of these categories and understand what they indicate:
Close Match
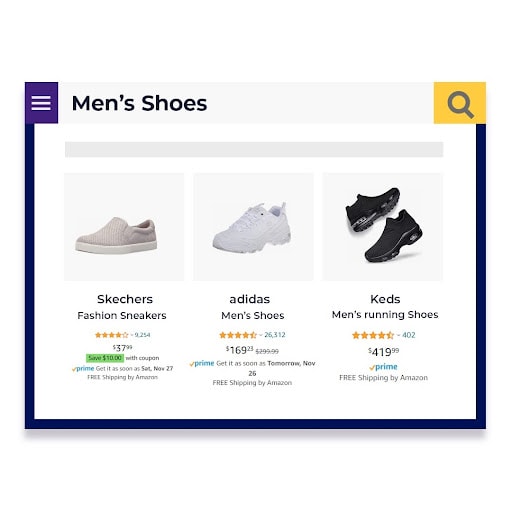
These are placements that are closely matched to your item. If you sell Adidas shoes, this could include “Adidas men’s running shoes” or similar terms. This will definitely provide you with relevant traffic and yield more ad profits.

Complements
These are placements on the product pages of listings that are somewhat associated with your products. In our Adidas shoe example, complements might be Adidas sports socks or other accessories. This is recommended for sellers who wish to gather buyers’ attention even if they aren’t searching for the items they sell. You may opt for this only if you have a huge budget.
Loose Match
Loose matches are placements that are hardly related to your listings. If you sell pencils, loose match terms could include pens, notebooks, or acrylic colors. It is not recommended by us as it leads to high wasted ad spend.

Substitutes
These are placements on items that are substitutes for your listings. Products similar to yours may be sold by a different brand, for example, if buyers are searching for Adidas shoes, they may get recommendations of Puma shoes. This tactic is for sellers who wish to attract competitor traffic.
How does Amazon decide on your bid range?
We have answered your question in the most simple manner-
First, for every single auction, Amazon will increase your default Amazon bid, depending on the placement and your placement modifier (Increasing your default bid by up to 900 %).
Second, the Amazon bid range is based on the dynamic bidding factor (reducing your modified bid down to 0 $ or increasing it by up to 100 %).
How do I understand what the default Amazon bid should be?
- Step 1: Decide on the maximum Cost-Per-Click you are willing to pay (with a definite placement and conversion rate)
- Ad Spend – Find your target ACoS and multiply it by product price to find how much you should spend on ads per sale. Note: An ACoS of 15% is considered a good ACoS.
- No of clicks – Now, calculate the number of conversions you want per click, depending on your product.
- CPC – Lastly, divide your ad spend by clicks to find CPC.
- Step 2: Decide on the default Amazon bid that will yield this maximum CPC
- Calculate Amazon bid before the dynamic bidding increases.
Suppose,
Max Bid = $5
100% Dynamic Bid Adjustment = 2
Maximum Bid before Dynamic Bid adjustment => $5 / 2 = $2.5
- Calculate Amazon bid before the placement is adjusted
Suppose,
Max Bid before Dynamic Bid adjustment = $5
900% Placement Bid Adjustment = 10
Standard Bid => $5 / 10 = $0.25
Hence, your default Amazon Bid should be $0.25.
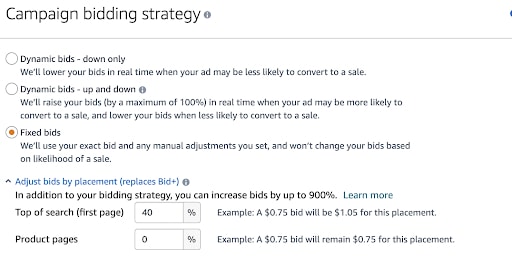
Pro Tip: To bid as low as possible for ‘Product Page’ placements, select a 900 % adjustment for ‘Top of Search’ and 0 for ‘Product Page’ placement. This technique is also useful for the dynamic bidding ‘Up and Down’.
Is there a one-stop formula for Bidding Placements and Bidding Strategies?
To answer this question, let’s take an example. Let’s say we have a keyword with –
Bid: $1.00
Look at the table below for a clear understanding of the math for a bid amount of $1.
| Placement | Placement Multiplier | Dynamic Bids- Up & Down | Bid Amount |
|---|---|---|---|
| Top of the Search | 400% | +100% | $0 – $10 |
| Product pages | 100% | +50% | $0 – $3 |
To understand better, watch this video on Amazon PPC Bidding Strategy Guide – Complete Overview
We generally see Top of Search placements generating higher click-through rates (CTR) and conversion rates, this means that you can afford to bid relatively higher on those particular placements while still maintaining your ad ROI.
If all these sound too overwhelming for you, you can always use SellerApp’s PPC Automation tool to get all the above calculations done by our powerful self-learning algorithms that take into account all the customer data and help you improve your ad strategy for the best outcomes.
How to use Automation rules on SellerApp?
Using SellerApp’s automation tools built on a simple interface, you can set your bids both manually and automatically. Its user-friendly rules are very easy to set up and integrate and can save you both time and effort compared to manual campaign optimization.
Automated rules are a set of actions that you can fulfill to optimize your PPC campaigns without human intervention. To leverage these automated rules, you’ll have to set some conditions for your campaigns to run as you desire. The rules are available on an easy-to-use interface and comprise tool tips and tricks within the system for better understanding. To begin,
- Login to SellerApp dashboard
- Go to Advertising
- Click on Automation
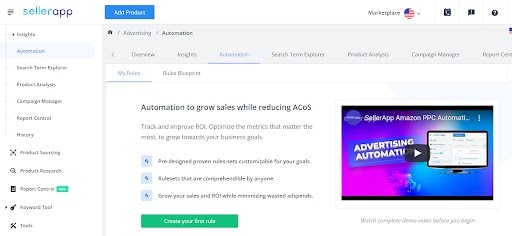
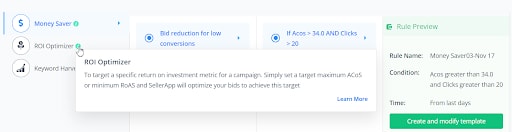
Here, you can find three types of automated rules that you can use as per your campaign goals. These rules are –
- Money Saver
- ROI Optimizer
- Keyword Harvester
SellerApp also allows you to set your rules manually and exert more control over your ad campaigns. Read on to find out how.
Let’s begin with the automated set of rules first –
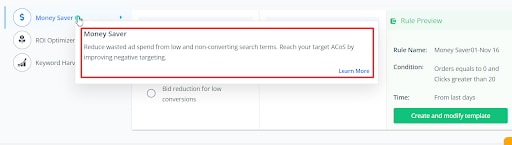
1. Money Saver
Money Saver enables you to eliminate wasted ad spend from poor-performing search terms. With this automation rule, you can reach your target ACoS by implementing negative targeting.
When to use this rule:
Use this rule if you have a fixed budget and you want to optimize your ad spend.
How to use this rule:
Go to the SellerApp Automation templates
Click on the Money Saver rule
You can also assign the KPIs like orders, clicks, and ACoS to determine the profitability of the keyword.
Let’s say you want to decrease bids for poorly-performing keywords, then click on ‘Create and modify template’ to change the rule as per your needs.
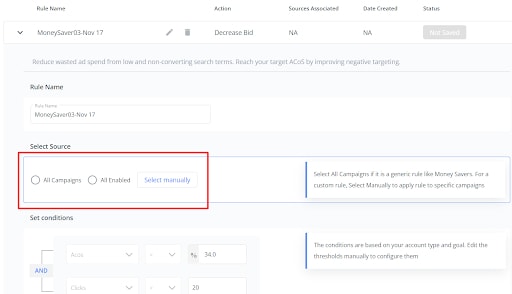
Select Source: Now choose the campaigns that you want to set this rule for. You can choose ‘All Enabled’ if you want to activate this rule for all your campaigns.
Select Conditions: Now, you have to assign the conditions for your campaigns.
Step 1: Set your target ACoS and the number of clicks posts which you don’t want the search terms to convert to clicks.
Step 2: Provide the action item that has to be automated by SellerApp. Here, you can decrease the bid amount by the desired percentage until it reaches the value you aspire to. It’s recommended to set the percentage as low as 2%.
Step 3: Once you set the conditions, name the rules.
Step 4: Click ‘Review and Enable.’ Once your rules are validated by SellerApp’s experts, they will run automatically.
2. ROI Optimizer
This rule is used when you have decided on your target ROI. All you need to do is set a maximum target ACoS or a minimum RoAS and let SellerApp do all the work for you.
Our machine-learning algorithms will target your ACoS/RoAS benchmark and actively identify potential search terms in the campaign. The tool will automatically change bids to meet your campaign goals.
When to use ROI optimizer:
You should use the ROI optimizer if your ultimate aim is to achieve a target ACoS or ROAS.
How to use ROI optimizer:
Click on ROI optimizer within the Automation Rules.
Select ‘Create and modify the template.’
Give the rule name.

Select Source: Select the campaigns for which you want to set this rule.
Set the conditions:
Set your target ACoS, and add a minimum number of orders after which you want to increase your bid value.
Now, let our algorithms increase the bid by the given percentage until it reaches the threshold value you have opted for. Add the ceiling bid and percentage based on which the bidding will improve.
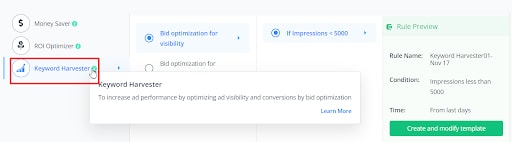
3. Keyword Harvester
This rule is used for greater visibility and conversion rate. SellerApp’s algorithms will allow you to optimize your bids to reach more potential shoppers and thus increase your sales.
When to use Keyword Harvester:
Go for this rule if you want to get more impressions and boost sales for your listings.
How to use Keyword Harvester:
Click on ‘Keyword Harvester’ within the Automation Rules.
Using this rule, you can adjust bids based on ACoS targets or impressions that you want to acquire.
Now, select ‘Create and modify the template.’
Give the rule name.
Select Source: Choose the campaigns for which you want to set this rule.
Set the conditions:
Add the number of impressions you want to achieve for a campaign. Raise the bid value by a particular rate and give a ceiling bid value.
If you want to acquire this within the target ACoS, select the other option in the ‘Keyword Enhancer.’
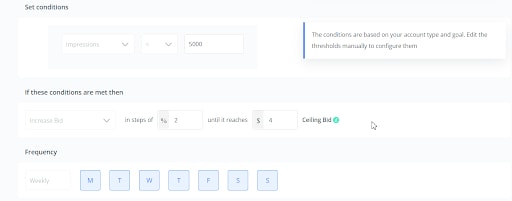
Now, input your target ACoS, and add a minimum number of orders after which you want your bid value to be raised.
Once you set the conditions, ensure you name the rules. Now, wait till our SellerApp team of experts approves your rules. Once done, your campaign will be up and running.
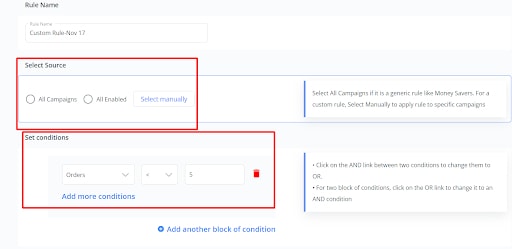
How to set Custom Rules?
If you are an advanced seller on Amazon, you’d want to have some control over your campaigns and set your bids manually. Adjusting your campaigns manually can impact the automation rules you set in a great manner. So, it’s advised to limit manual changes to your ad budget and keyword bids while your campaign is running.

To create your own rule manually-
- Click on Advertising
- Go to Automation
- Select My Rules
- Add Rule Name
Here, SellerApp will automatically find customer search terms from automatic campaigns that drive sales and add them to phrase match.
Step 1: Edit the template – Pick the desired automation rule to modify and configure the rule threshold.
Step 2: Save the rule – Choose the campaigns to apply the rule. The rule checks all the search terms against the threshold value, to determine if an action needs to be executed.
Step 3: Reviewed and Enabled – The rule is automatically enabled once it is verified by our SellerApp team of Amazon advertising experts.
Once you set the conditions, ensure you name the rules. Now, wait till our SellerApp team of experts approves your rules. Once done, your campaign will be up and running.
Not just this, SellerApp’s PPC Analyzer tool has several other features like search term explorer, an overview of your ACoS, RoAS, CTRs, and many other integral KPIs, along with conversion funnel and revenue share. You can also calculate your ACoS and RoAs if you aren’t sure of the process.
How often should bids be adjusted?
You must adjust your bids only if/when you see some statistically significant modification in any of the primary inputs (i.e. average order value, conversion rate, etc.).
This is a challenge for Amazon sellers as this occurs very frequently making it extremely difficult for them to manually manage bids while also looking after underlying components of the seller journey. Therefore, AI-powered automation is crucial for running successful Amazon ad campaigns.
Final Thoughts
Optimizing your ad campaigns doesn’t have to be difficult. Once you are well-versed with all the concepts, it becomes as easier as ever to build a campaign that not only drives sales but also eliminates any wasted ad spend.
To learn more about Amazon PPC, you can watch our 3-part Amazon advertising course. These Amazon PPC tutorials will help you learn how to build, manage, and optimize your campaigns in no time.
- Course 1: Amazon PPC Setup & Things to Remember Before You Start
- Course 2: Budget & Amazon ACoS Calculation
- Course 3: Setup, Match Types, Keywords & Bidding
Was this post helpful?
Let us know if you liked the post. That’s the only way we can improve.
Post Written by:
Was this post helpful?
Let us know if you liked the post. That’s the only way we can improve.


Michael
February 9, 2022A good resource for Amazon sellers.
Simmi
February 10, 2022Excellent blog regarding Amazon PPC bidding.
Thank you for sharing.
Sush
February 18, 2022That was a wonderful article about Amazon’s dynamic bidding. It helps me understand why bidding is important.